Browsing Category

Chicken

Chicken

Peri-Peri Chicken with Cilantro Lime Rice

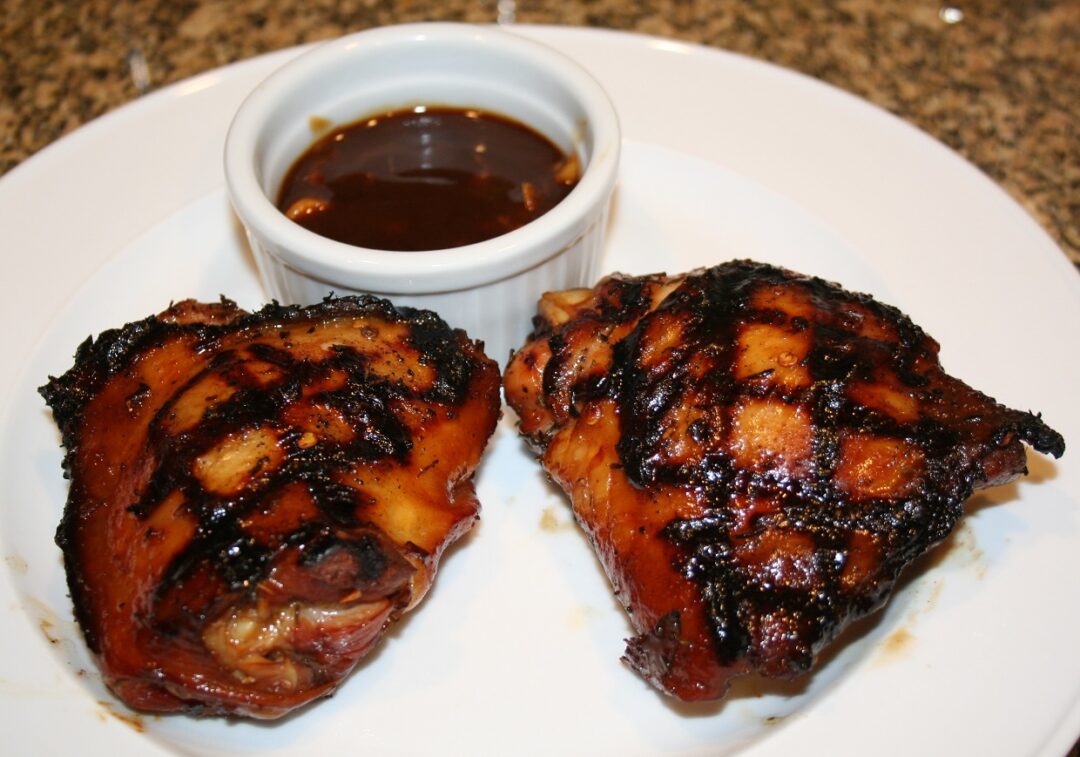
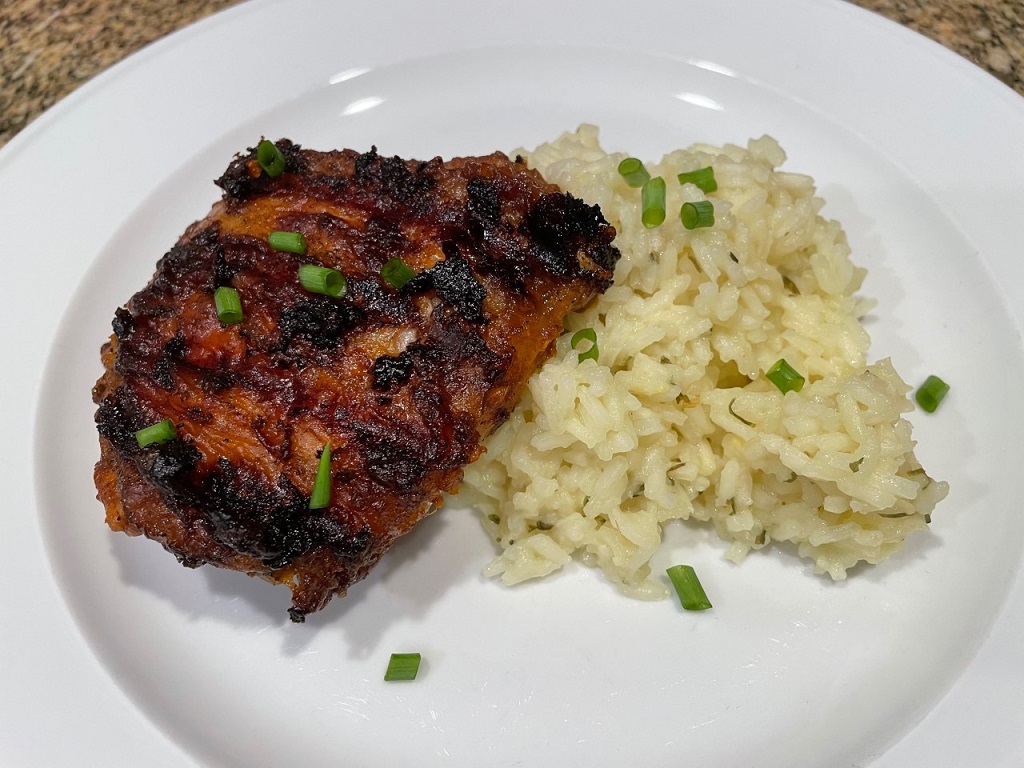
On the menu tonight – Peri Peri Chicken!

What is Peri-Peri? It’s a spicy little pepper, also known as African Bird’s Eye Chili. I heard about it on a cooking show and they mentioned how difficult it was to find this pepper. Challenge accepted! It took very little time to find a source on the internet, and within a few days I had a package from Thailand with my new found peppers!

I said it was a spicy pepper. Peppers’ heat is measured in Scoville units. A Jalapeño pepper measures 2500-8000 Scoville units. The Peri-Peri measures 50,000 – 175,000 Scoville units, so they definitely put out some heat. The peppers are also pretty small, it looks like you would need a lot of them. Be careful.

The really funny/curious thing I found when researching recipes for Peri-Peri Chicken is I didn’t find one that actually used the Peri-Peri pepper. I know they aren’t a pepper that you’ll likely find in your local market, but at least have them in the recipe and put out an alternative. Rant over.

When you make this dish, it is best if you make the marinade, coat the chicken, and let it sit in the fridge for a day.

Take the chicken out of the fridge about an hour before cooking to allow it to come to room temperature. You can use that time to start your rice. My Cilantro Lime Rice is perfect with the Peri-Peri chicken.

The next time you plan to grill, try something different. Try making this dish and let me know what you think.

Peri-Peri Chicken

1 Star2 Stars3 Stars4 Stars5 Stars (No Ratings Yet)
Loading...
By Patrick Dulmage Serves: 4-6

Peri-Peri Chicken

Ingredients

  • 4-10 Peri-Peri Peppers (Arbol chilis if you can't find Peri-Peri)
  • 3 tbsp olive oil
  • 2 tbsp Kosher salt
  • 8 garlic cloves
  • 2 tbsp tomato paste
  • 1 shallot, finely chopped
  • 1 tbsp sugar
  • 1 tbsp paprika
  • 1 tbsp five-spice powder
  • 2 tsp lemon zest
  • 1/4 cup lemon juice
  • 1 tsp pepper
  • 1/8-1/4 tsp cayenne pepper
  • 3 bay leaves, crushed
  • 6 lbs bone-in chicken thighs
  • 1/2 cup roasted peanuts, finely chopped

Instructions

1

In a food processor, add the chilis, oil, salt, garlic, tomato paste, shallot, sugar, paprika, five spice powder, lemon zest, lemon juice, pepper, cayenne, and bay leaves. Process until smooth

2

Taste it to check the heat level. You want it hotter, add more peppers and/or cayenne pepper

3

Pierce the chicken pieces all over with a knife or skewer to let the mixture get deep into each piece.

4

Put the chicken, peanuts, and sauce in a freezer bag. Mix it up until the chicken is fully coated

5

Put in the fridge at least 6 hours, better over night

6

When it is time to cook, pull the chicken from the fridge early enough to let it come to room temperature (about 20 - 30 minutes)

7

Pre-heat the grill to high

8

Put a pie tin with about 2-3 cups of water on one side of the grill and the chicken on the other.

9

Maintain a grill temp of about 325-350 degrees

10

Grill until you get a nice char on each side, about 5 minutes on each side

11

Once it looks good, move to a cooler part of the grill or lower the heat to finish cooking

12

We are looking for an internal temp of about 160 degrees (temperature will rise about 5 more degrees as you let it rest)

13

If the juice runs clear, it's fully cooked. If you see some pink in the juice, it needs more time

14

Serve with some lemon wedges to squeeze over each piece

Chicken/ Italian

Chicken Vesuvio

I wanted to do something else with chicken and I found this Italian recipe for chicken thighs – Chicken Vesuvio!

In addition to the chicken, it has potatoes, artichoke hearts, and garlic – SO GOOD!

You can have this dish on your plate within 45 minutes from start to finish. Chicken thighs are easily my favorite part of the chicken. They are so flavorful and it is tough to over cook them. Once you sear the chicken on both sides, pull it from the pot and continue by searing the potatoes. After the potatoes have been seared, add the garlic and cook about another minute.

Next add the wine and scrape up any of those brown bits from the bottom of the pot. Then add the stock, herbs and bring to a boil.

Once it comes to a boil, cut the heat, add the artichoke hearts and put in the oven. After about 20 minutes in the oven, serve and enjoy!

Chicken Vesuvio

1 Star2 Stars3 Stars4 Stars5 Stars (No Ratings Yet)
Loading...
By Patrick Dulmage Serves: 4
Prep Time: 5 minutes Cooking Time: 40 minutes Total Time: 45 minutes

Chicken Vesuvio

Ingredients

  • 3 tbsp olive oil
  • 4 chicken thighs
  • 1 1/2 lb small potatoes, halved
  • 8 oz artichoke hearts
  • 4 cloves garlic
  • 1 1/2 tsp oregano
  • 1 tsp thyme
  • 3/4 cup white wine
  • 3/4 cup chicken or vegetable stock
  • 2 tbsp butter

Instructions

1

Pre-heat oven to 450 degrees

2

Heat olive oil in a large Dutch oven over high heat

3

Add the chicken thighs, skin side down season with salt and pepper

4

Brown the chicken on each side and transfer to a platter or bowl

5

Add the potatoes and brown them as well

6

Once potatoes are browned, add the garlic, and cook for about a minute

7

Add the wine and scrape up any brown bits from the bottom of the pot

8

Add the broth, oregano and thyme

9

Return the chicken to the pot along with any juices

10

Bring to a boil over medium high heat

11

Once at a boil, cut the heat, add the artichoke hearts, put the lid on the pot and transfer to the oven

12

Set the timer for 20 minutes

13

Remove from the oven, add the butter, and stir to combine

14

Serve immediately

Casserole/ Chicken

Cheesy Chicken and Broccoli Gnocchi with Bacon

Did you say you wanted something cheesy? Look no further than my Cheesy Chicken and Broccoli Gnocchi topped with Bacon!

Inspired by a Mac and Cheese recipe I saw, I decided to use gnocchi instead. This is another great weeknight dinner. Start by pre-heating the broiler to high. While the broiler heats up, cook the bacon and start the water boiling for the gnocchi (or macaroni if you want to go that route).

The rest of the recipe is below. I hope you will make my Cheesy Chicken and Broccoli Gnocchi with Bacon.

Cheesy Chicken and Broccoli Gnocchi with Bacon

1 Star2 Stars3 Stars4 Stars5 Stars (No Ratings Yet)
Loading...
By Patrick Dulmage Serves: 6-8
Prep Time: 15 minutes Cooking Time: 30 minutes Total Time: 45 minutes

Cheesy Chicken and Broccoli Gnocchi with Bacon

Ingredients

  • 17.5 oz pkg gnocchi (DeCecco preferred)
  • 3 cups chopped broccoli florets
  • 3-6 slices bacon, chopped
  • 12-16 oz boneless skinless chicken breasts, cut into bite-sized pieces
  • 1 tsp Kosher salt
  • 2-3 cloves garlic, minced or finely chopped
  • 1/8 tsp turmeric
  • 1 1/4 cups low fat milk
  • 1 cup chicken stock
  • 4 oz Gruyère cheese, grated
  • 4 oz Cheddar cheese, grated

Instructions

1

Pre-heat the broiler to high

2

Cook the gnocchi according to package directions and set aside

3

Cook the broccoli in the same salted water as the gnocchi

4

While the gnocchi and broccoli are cooking, cook the bacon in a large oven-safe skillet over medium heat

5

Once the bacon is cooked, remove with a slotted spoon and leave about 1 1/2 of the drippings to cook the chicken

6

Add the chicken to the pan and cook about 4 minutes. Make sure to flip the pieces so they brown on all sides

7

Add the garlic and turmeric and cook another minute or two

8

Combine the milk and chicken stock, then add to the pan

9

Season with some salt and pepper (if your chicken stock has a lot of salt, you may not need to add any additional)

10

Bring to a boil, add the cheese (reserve some for topping) and broccoli

11

Once the cheese has melted and coated everything, add the gnocchi

12

Give it one last stir, top with remaining cheese and put under the broiler until golden brown and bubbly

13

Top with the chopped bacon and serve

Casserole/ Chicken

One-Pan Chicken Tortellini Alfredo

On the menu tonight – Chicken Tortellini Alfredo!

If you are looking for something that doesn’t take too long to make AND doesn’t dirty too many pots and pans this is it! You probably already have some tortellini and chicken in your freezer. If the chicken is thawed, you can make this meal in about 30 minutes.

The chicken is tender and juicy. The combination of the chicken, cheese sauce, and tortellini is fantastic. Whatever you do, don’t leave out the nutmeg, it adds that little extra layer of flavor making people wonder what that flavor is.

Keep this recipe handy for your quick, week-night dinners. I hope you will try it and let me know how it turns out for you.

One-Pan Chicken Tortellini Alfredo

1 Star2 Stars3 Stars4 Stars5 Stars (No Ratings Yet)
Loading...
By Patrick Dulmage Serves: 6-8
Prep Time: 15 minutes Cooking Time: 15 minutes Total Time: 30 minutes

One-Pan Chicken Tortellini Alfredo

Ingredients

  • 1 1/2 cups heavy cream (half and half would work too)
  • 4 tablespoons butter
  • 1 1/2 cups grated Parmesan cheese
  • 2 pinches nutmeg (freshly grated is preferred)
  • Kosher salt
  • Freshly ground black pepper
  • 18 oz pkg cheese tortellini (you could also use other varieties like mushroom or spinach)
  • 2 boneless skinless chicken breast, cut into bite sized pieces (chicken thighs would also be great)
  • 1/2 - 1 shallot, finely chopped
  • 1/4 cup chopped fresh parsley

Instructions

1

Pre-heat the oven to 425 degrees

2

Heat the heavy cream, butter, nutmeg, shallot, and one cup of the Parmesan cheese in a large cast iron skillet

3

Whisk until the butter and cheese are melted, about 4 minutes

4

Add the tortellini and simmer until they are cooked through, about 5 minutes

5

Add the chicken and mix to combine

6

Add the rest of the Parmesan cheese on top and then put in the oven

7

Bake until the chicken is cooked through and the top starts to get browned, about 12 minutes

8

Once baked, let it rest about 10 minutes before serving

9

Garnish with the fresh parsley or green onions

Casserole/ Chicken

Chicken Tortilla Casserole

On the menu tonight, Chicken Tortilla Casserole!

This dish couldn’t be easier. If you use a rotisserie chicken, you can have this casserole done in about 40 minutes. Simply pre-heat the oven, put all the ingredients in a large bowl, and mix to combine. Bake for about 20 minutes, then pull from the oven to top with cheese and bake another 10-15 minutes. That’s IT!

Garnish with some chopped red onion, cilantro, sour cream and you have dinner!

Chicken Tortilla Casserole

1 Star2 Stars3 Stars4 Stars5 Stars (No Ratings Yet)
Loading...
By Patrick Dulmage Serves: 10-12
Prep Time: 5 minutes Cooking Time: 30 minutes Total Time: 35 minutes

Chicken Tortilla Casserole

Ingredients

  • 5-6 cups cooked chicken (about 1 whole chicken)
  • 3/4 red onion, diced
  • 8 oz Monterey Jack Cheese, grated
  • 2 10 oz cans Rotel tomatoes
  • 1 10 oz canned or frozen corn
  • 1 15 oz can black beans
  • 12 corn tortillas (taco size), quartered
  • 1 tbsp chili powder
  • 1 tsp cumin
  • 1/2 tsp Kosher salt
  • 1/2 cup sour cream
  • 1/3 cup cilantro, finely chopped

Instructions

1

Pre-heat oven to 350 degrees

2

Add the chicken, tortillas, tomatoes, beans, corn, spices, half of the diced onions, and half of the grated cheese to a large mixing bowl.

3

Mix to combine.

4

Add to a greased 13x9 baking dish and put in the oven.

5

Bake for 20 minutes, uncovered.

6

After 20 minutes, take out of the oven, raise the temp of the oven to 400 degrees, cover with the rest of the grated cheese.

7

Bake for another 10-15 minutes.

8

Garnish with the rest of the diced onion, cilantro, and dollops of sour cream.

Casserole/ Chicken

Chicken Pot Pie

On the menu today – Chicken Pot Pie!

I was craving some good ole comfort food today and Chicken Pot Pie has GOT to be in the top two or three for comfort food. I tried something different this time with the crust. Instead of puff pastry or pie dough, I used flakey biscuits. With the cooked biscuits split, I used the bottoms on the bottom of the baking dish and the tops for the top.

Making dough isn’t one of my favorite things to do, so I decided to try using biscuits instead. I think it turned out really well. The filling it out of this world. I used chicken thighs, which I think have more flavor than the breast meat. The thighs were baked seasoned with salt and pepper – that’s it. The rest of the filling comes together really quickly.

With the weather getting cooler, you need to get those comfort food recipes out. I hope you will try my version the next time you make chicken pot pie. Let me know how it turns out.

Chicken Pot Pie

1 Star2 Stars3 Stars4 Stars5 Stars (No Ratings Yet)
Loading...
By Patrick Dulmage Serves: 8
Prep Time: 15 minutes Cooking Time: 30 minutes Total Time: 45 minutes

Chicken Pot Pie

Ingredients

  • 2lb boneless, skin-less chicken thighs, cooked and cubed (You can use breast meat if you like. Cook it yourself or use a rotisserie chicken)
  • 1 medium Vidalia onion, diced
  • 2 ribs of celery, diced (the center portion of the celery would be good too)
  • 1 can cream of celery soup (feel free to substitute cream of chicken)
  • 1 bag frozen peas and carrots
  • 1 12 oz can evaporated milk (you could use whole milk)
  • 1 cup chicken stock (I like Better Than Bullion)
  • 1 tbs fresh parsley, finely chopped
  • 1/3 cup all-purpose flour
  • 1/3 cup butter
  • 1-2 tbsp olive oil
  • 1 tube flakey biscuits
  • Kosher salt
  • Freshly ground pepper

Instructions

1

Pre-heat a large sauce pan over medium heat with olive oil

2

Pre-heat the oven to 350 degrees

3

Add the onion and celery and cook until translucent, about 5 minutes

4

Put the biscuits in the oven for 15 minutes

5

In a large measuring cup, heat the chicken stock and evaporated milk in the microwave, about 2 minutes

6

Add the flour to the onions and celery, mix to combine and cook 1-2 minutes

7

Add the butter, mix to combine

8

Slowly pour in the chicken stock and milk, stir to combine

9

Let the mixture come to a boil and then lower the heat, continuously stirring as it thickens

10

Add the frozen peas and carrots, mix to combine and cut the heat

11

Add the cooked chicken and parsley, then mix to combine

12

In a 13x9 baking dish put a layer of the biscuit bottoms down

13

Pour the chicken mixture into the baking dish and top with the biscuit tops

14

Serve immediately

Chicken

Grilled Chicken Wings

I put it out there for suggestions of what you would like to see me make and several requests came back for Chicken Wings. This version is pretty simple but still full of flavor. I made a quick rub of garlic salt and pepper, then seasoned the wings. This is the most basic of seasonings, but once you get a basic recipe down the seasoning options are limitless.

My charcoal grill was setup for low and slow at about 225 degrees. You could also use a gas grill with a smoker box, or even bake them in the oven. Since I was already grilling some ribs I used the charcoal grill.

After 30-40 minutes (it will depend on your grill), I took the wings off and served some tossed in my BBQ Sauce and some with sauce on the side. The next time you fire up your grill, try grilling some chicken wings.

Grilled Chicken Wings

1 Star2 Stars3 Stars4 Stars5 Stars (No Ratings Yet)
Loading...
By Patrick Dulmage Serves: 6-8
Prep Time: 5 minutes Cooking Time: 30-40 minutes Total Time: 35-45 minutes

Grilled Chicken Wings

Ingredients

  • 2-3 lbs chicken wings, clip the wing tips and save in the freezer to make chicken stock
  • 1/4 cup Garlic Salt
  • 1/4 cup black pepper

Instructions

1

Pre-heat your grill to 225 degrees

2

If you haven't already, clip the wing tips from the wings

3

Separate the drumette from the wingette

4

Season the chicken (both sides) with the dry rub - be careful how much you put on as garlic salt is mostly salt. You can always add but you can't take away, just sayin'

5

Put the wings on the grill over indirect heat and close the lid to let the wings get a little smokey

Chicken

Grilled Honey Garlic Chicken Thighs

On the menu tonight – Grilled Honey Garlic Chicken Thighs!

Honey Glazed Grilled Chicken

After being on vacation last week, it was time to get back in the kitchen. Summer is coming to an end, so I wanted to make sure I grilled out this weekend. Chicken is one of my go-to grill items, but I wanted to do something a little different.

I went slightly Asian this time. The marinade is soy sauce, honey, apple cider vinegar, some thyme, and a little salt and pepper.

After grilling the chicken, I took the marinade and made a nice sauce. It was SO GOOD! You know that sauce your chicken has from the Chinese restaurant? This was that only BETTER!

I hope you’ll try this dish and let me know what you think.

Grilled Honey Garlic Chicken Thighs

1 Star2 Stars3 Stars4 Stars5 Stars (No Ratings Yet)
Loading...
By Patrick Dulmage Serves: 4
Prep Time: 3 hours Cooking Time: 40 minutes Total Time: 3 hours 40 minutes

Grilled Honey Garlic Chicken Thighs

Ingredients

  • 4 bone-in, skin-on chicken thighs
  • 1/3 cup low sodium soy sauce
  • 1/3 cup honey
  • 2 tbsp apple cider vinegar
  • 1 tsp red pepper flakes
  • 1 tsp thyme
  • 3-4 garlic cloves
  • 1/2 tsp freshly ground pepper
  • salt to taste
  • 1 tsp corn starch
  • 3/4 cup water

Instructions

1

In a 2 cup or more glass measuring cup, mix the soy sauce, honey, apple cider vinegar, red pepper flakes, salt and pepper. (you can add the garlic now or wait to use it in the sauce. I prefer to wait and use it in the sauce)

2

Rinse your chicken and put it in a one gallon zip lock bag. Put the bag in a bowl in case it leaks and then in the fridge for 2-3 hours (more is ok)

3

When it's time to cook, pull the chicken from the fridge and let it start coming to room temperature

4

Pre-heat the grill as hot as you can get it

5

Once the grill is to temperature, put on the chicken, skin-side down and let it cook about 15 minutes. DON'T TOUCH IT! Let it get those beautiful grill marks

6

After about 15 minutes, give the chicken a quarter turn and let it cook another 12-15 minutes

7

Flip the chicken and let it cook another 12-15 minutes

8

While the chicken is finishing up on the grill, start your sauce. Put a medium sauce pan on medium heat and put in your marinade (add the garlic if you didn't add it in the beginning)

9

Let the marinade reduce about 5 minutes

10

In a measuring cup add your cornstarch and water, mix well, and add a little to the marinade (about 2-3 tablespoons)

11

The sauce needs to come to at least a gentle boil for the cornstarch to do its thing

12

Once it's to the consistency you want, cut the heat and move to another burner

13

Take the chicken off the grill and let it rest about 5 minutes

14

Serve with the sauce on the side

Notes

I think the next time I make this, I'll include a little lime on the side too for some acid.

Chicken

Chicken Parmesan

I love chicken Parmesan. The crispy crust covering the chicken and melted cheese are a hard combination to beat. This isn’t the soggy homemade chicken Parmesan covered with the stuff from that green cylinder that you’ve probably had. This is the chicken Parmesan you had at an Italian restaurant.

While this isn’t a difficult recipe to make, it does take a little time and planning. The chicken needs to be butterflied and pounded. You could probably buy it prepped, but try going through the process. Also, if you want to go all out, you’ll have either make homemade tomato sauce or have some already made. I wouldn’t fault anyone for using a good jarred sauce.

Once you’ve got the chicken and sauce ready to go, you’re most of the way there. Here’s a bonus for you. If you use an extra chicken breast, you can use that extra cooked chicken for an awesome sandwich. I bought some pepperoni and re-heated a piece of the chicken with some pepperoni and mozzarella under the broiler – OMG! It was AWESOME! The prepared chicken is also the beginning of chicken saltimbocca, but that will be another post.

I hope you’ll try this recipe and let you know what you think!

Chicken Parmesan

1 Star2 Stars3 Stars4 Stars5 Stars (No Ratings Yet)
Loading...
By Patrick Dulmage Serves: 4
Prep Time: 30 minutes Cooking Time: 30 minutes Total Time: 1 hour

Chicken Parmesan

Ingredients

  • 2-3 boneless, skinless chicken breasts, butterflied and pounded thin (about 1/8” thick)
  • 2 teaspoons Kosher salt
  • 1 cup breadcrumbs (plain or Italian seasoned)
  • 20 grams salt and vinegar potato chips, crushed finely
  • 2 teaspoons dried oregano
  • 2 teaspoons dried parsley
  • 1 ½ teaspoons garlic powder
  • 2/3 all-purpose flour
  • 3 large eggs, beaten
  • 4 tablespoons butter, divided
  • 2 tablespoons olive oil, divided
  • 1 cup tomato sauce, jarred or home made
  • 2 oz low-moisture mozzarella, shredded
  • 2 oz Italian fontina, shredded
  • Chopped fresh flat-leaf parsley or basil for garnishing

Instructions

1

Cut the butterflied and pounded breasts into 6-8 even pieces.

2

Season with the salt on both sides and place on a rack inside a sheet pan. Cover and refrigerate for 30 minutes.

3

Combine the breadcrumbs, potato chips, oregano, parsley, and garlic powder in a gallon zip-top bag and crush.

4

Set up breading station. Put the flour in one pan, the eggs in the next, and the breadcrumb mix in the third pan. Also have a wire rack over a sheet pan to put the breaded pieces as you work.

5

Get the chicken from the fridge and pat it dry with paper towels.

6

Dredge the chicken in the flour, shake off excess flour, then dip into the eggs and drain the excess.

7

Finally, coat with the breadcrumbs and then place on the rack.

8

Pre-heat the broiler on high.

9

Pre-heat a large pan over medium heat with 1 tablespoon of the olive oil and 2 tablespoon of butter.

10

When the butter foams, add about half the chicken – don’t crowd the pan, leave room between the pieces.

11

Cook until golden brown, about 2 minutes on each side. Try not to move it around as it cooks but you can peak at about a minute and 30 seconds to make sure the breading isn’t burning.

12

Repeat on the other side.

13

After you have removed all the chicken, wipe the pan clean with paper towels and repeat cooking process for the remaining chicken.

14

Spread about a cup of the sauce on the bottom of a 13x9 baking dish and broil until the sauce bubbles and begins to caramelize. Time will depend on your oven and how far the dish is from the burner. Don’t walk away, watch it.

15

Remove the dish from the oven and arrange the chicken pieces in a single layer.

16

Put a dollup of sauce on each piece of chicken. Don’t completely cover the chicken with sauce. You took the time to make a nice crispy crust, don’t make it soggy now.

17

Spread the shredded cheeses over the sauce and chicken.

18

Put the pan under the broiler until the cheese is bubbly and brown.

19

Once finished, garnish with the parsley or basil. (Note, if you use basil serve it quickly as the heat will discolor the basil)

Chicken

Stir Fry Chicken and Broccoli

On the menu tonight – Stir Fry Chicken and Broccoli!

I love Chinese food, but it can get expensive going out or ordering take out frequently. Luckily, you can make your own take out favorites in the time it takes to wait on delivery. Chicken and Broccoli is one of my go-to take out meals.

This version only takes about 25 minutes to make. Preparation is key to getting it done quickly. Start by cooking the rice since it will take the most time. You’ll have the meal finished in about the same time as it would take to order and wait for it to arrive.

The next time you’re craving Chinese take out, try making this Stir Fry Chicken and Broccoli. Let me know how it turns out.

Stir Fry Chicken and Broccoli

1 Star2 Stars3 Stars4 Stars5 Stars (No Ratings Yet)
Loading...
By Patrick Dulmage Serves: 4-6
Prep Time: 5 minutes Cooking Time: 20 minutes Total Time: 25 minutes

Stir Fry Chicken and Broccoli

Ingredients

  • 4 tablespoons soy sauce (I use low sodium)
  • 2 tablespoons orange juice
  • 2 tablespoons brown sugar (light or dark)
  • 1-2 tablespoons rice wine vinegar
  • ½ tablespoon corn starch
  • ½ tablespoon sesame oil
  • 1 teaspoon crushed red pepper flakes
  • 1-2 tablespoons oil for cooking chicken and veggies (peanut or vegetable oil)
  • 1 lb boneless, skinless chicken thigh, cut into bite size pieces
  • 2 tablespoons peeled and chopped fresh ginger or 1 teaspoon dried ground ginger
  • 4 cloves garlic, minced
  • 1 carrot, finely diced
  • 4 green onions, sliced
  • 4 cups broccoli, pre-cooked
  • Salt and pepper
  • 1 cup rice

Instructions

1

Pre-cook the broccoli.

2

Pre-cook the rice. (see my Cilantro Rice recipe to perfectly cook your rice)

3

In a mixing bowl, whisk together the soy sauce, orange juice, brown sugar, rice wine vinegar, cornstarch, sesame oil, and red pepper flakes.

4

Pre-heat a wok or large pan with oil.

5

When the oil shimmers, add the chicken in batches. Don’t crowd the pan.

6

Stir-fry until the chicken is cooked through, about 4 minutes depending on the size of the pieces.

7

Transfer to a plate or bowl and continue with the rest of the chicken.

8

Once all the chicken is cooked, add a little more oil to the wok or pan and add the ginger, carrot, garlic, and green onions.

9

Add the chicken back to the pan with the broccoli and stir to combine.

10

Pour in the sauce and stir until the sauce thickens.

11

Transfer to a serving dish.

12

Serve over cooked rice. Check out my Cilantro Lime Rice recipe to make the perfect rice.