Browsing Category

Seafood

Seafood/ Vegetarian

Grilled Mahi Mahi and Asparagus

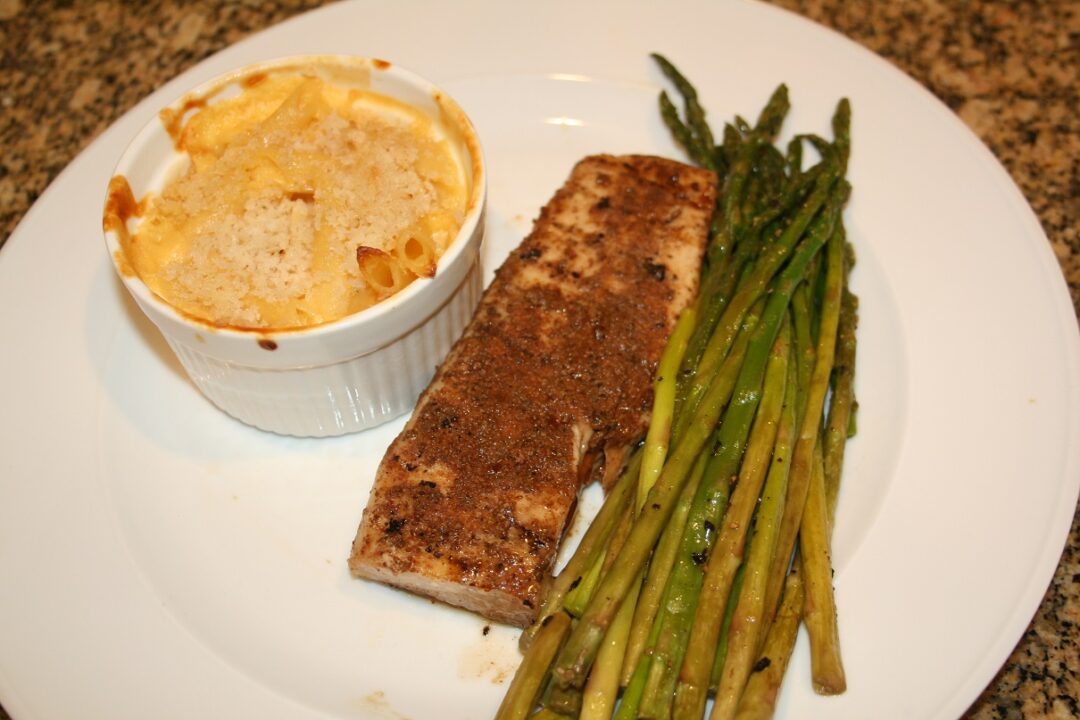
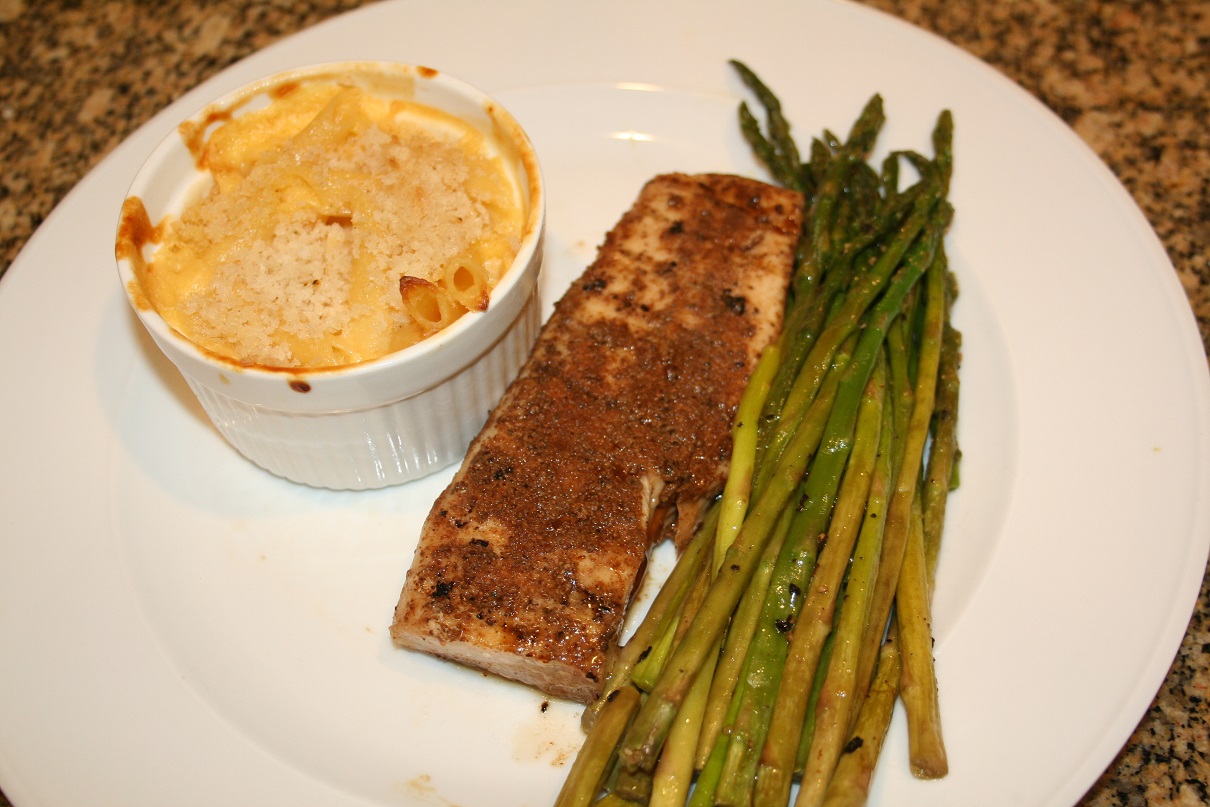
On the menu tonight – Grilled Mahi Mahi and Asparagus!

While I was making my BBQ ribs, I had plenty of time to put some other things on the grill, so grilled some Mahi Mahi and the asparagus that I served with it. I made a rub for the fish, it’s simple – Paprika, Old Bay Seasoning, Salt and Chili powder. The asparagus was drizzled with some olive oil then seasoned with salt and pepper. How easy is that?

I also had some of my Macaroni and Cheese left over that I served with the fish and asparagus. It was the perfect addition to the meal.

The next time you are considering fish for dinner, put some rub on it and grill it!

Grilled Mahi Mahi and Asparagus

1 Star2 Stars3 Stars4 Stars5 Stars (No Ratings Yet)
Loading...
By Patrick Dulmage Serves: 4
Prep Time: 5 minutes Cooking Time: 10-12 minutes Total Time: 15-17 minutes

Grilled Mahi Mahi and Asparagus

Ingredients

  • 4 pieces Mahi Mahi
  • 1/2 - 1 lb of asparagus (I used the thin asparagus, not the big fat stalks)
  • 2 tbsp olive oil
  • The Rub:
  • I'm going to preface this by saying I made this up and didn't really measure. That said,
  • 3 tbsp paprika (I used smoked paprika, you could use sweet or hot if you don't have smoked)
  • 3 tbsp chili powder
  • 2 tbsp Old Bay Seasoning
  • 1 tbsp kosher salt

Instructions

1

Pre-heat your grill to 225-250 degrees. (I was cooking ribs, so my grill was set at 225 degrees)

2

If you haven't already, prepare your rub

3

In a medium mixing bowl, add the paprika, chili powder, Old Bay, and salt, then mix to combine

4

Dry the mahi mahi, then drizzle it with some olive oil and sprinkle the rub on the fish - and rub (It's fish, so be gentle)

5

Prepare the asparagus by cutting off that woody, thick piece at the base of the stalk. I will take one or two and see about where they break naturally and cut the rest at about that same length

6

Drizzle the asparagus with some olive oil, roll it around and then season with kosher salt and pepper

7

Put the fish on the grill and let it sit about 3-4 minutes, then give it a quarter turn and let it cook another 2 minutes (you'll get those nice grill marks in the cross hatch pattern)

8

Put the asparagus on the grill as well and let it cook about 3-4 minutes as well

9

When it's time to turn the fish over, roll/flip the asparagus as well

10

Cook the fish on the other side another 3-4 minutes

11

If the asparagus looks done, test a piece and if done take it off

12

Take the fish off and serve immediately

Seafood/ Vegetarian

Shrimp Spring Rolls

On the Menu tonight – Shrimp Spring Rolls!

This is another one of those dishes that I’ve eaten many times but never made. After a friend suggested I make it, I decided to try it and I’m glad that I did! Making my own spring rolls was so much fun and SO delicious.

There are definitely a few steps to making the rolls. The shrimp need to be cooked first, then shocked to stop cooking and set aside while you prepare the rest of the components. The veggies need to be julienned, a cooking technique cutting something in fine strips. The rice noodles need to be cooked, and the dipping sauce needs to be made. Luckily, the timing of all the components is forgiving, so you have time to take care of each component without fear of another component of overcooking.

Once you get all the components ready, you are ready to assemble the rolls! If you’ve rolled a burrito, you will do fine. These rolls are rolled like burritos but smaller. One thing though, the wrappers can get sticky, so this is where your preparation pays off. Get each of the components ready and close before you soak your first wrapper. Also, have a large platter or each of the plates you intend to serve ready to place the rolls as you make them. The wrapper is delicate, so the less you have to move them after assembly, the better.

So, the next time you’re craving some spring rolls, try making them yourself! They are SO delicious!

Seafood/ Vegetarian

Fish Tacos with Watermelon Salsa

I’ve been feeling like going to the beach lately but haven’t been able to go. The next best thing to being there is eat something that I’d have at the beach – Fish Tacos! This version of fish tacos is made with Cod. Since it’s summertime, I wanted something cool to go with it – Watermelon Salad.

This dish couldn’t be easier to make. Season the fish how you like along with some lime, then grill it. Fish grills really quickly, so it isn’t a meal that is going to take all day to make. Tip when grilling fish. If your grill grates aren’t really close together, consider getting a grill pan for fish, using some tin foil underneath (but you won’t get the lovely char marks), or a flat/skillet type pan to set on the grill grates.

The watermelon salsa is crazy easy to make as well. Check out the recipe and you’ll be having fish tacos the next time you fire up the grill.

Fish Tacos with Watermelon Salsa

1 Star2 Stars3 Stars4 Stars5 Stars (No Ratings Yet)
Loading...
By Patrick Dulmage Serves: 4-6
Prep Time: 15 Cooking Time: 10 minutes Total Time: 25 minutes

Fish Tacos with Watermelon Salsa

Ingredients

  • 1-1.5 lbs Cod (or any fish you want to use)
  • 2-3 tbsp chili powder
  • 2-3 tbsp Old Bay Seasononing
  • 2 limes, zested and juiced
  • 1-2 lime cut into wedges for garnish
  • salt and pepper to taste
  • 2-3 tbsp olive oil
  • 1-2 cups shredded lettuce (romaine or iceberg)
  • Corn tortillas, 10-12
  • Watermelon Salsa:
  • 4 cups cubed watermelon
  • 1/2 red onion, finely diced
  • 1/2 cup Cilantro, finely chopped
  • 1 jalapeno, finely diced
  • 1 tbsp olive oil
  • salt to taste

Instructions

1

Start with the watermelon salsa. Cube the watermelon and put in a large bowl.

2

Add the red onion, jalapeno, cilantro, and salt.

3

Add the olive oil and mix to combine.

4

Refrigerate the watermelon salsa.

5

Pre-heat the grill to high.

6

The fish - look for any bones, scales and remove. Sprinkle with olive oil, then season with salt, pepper, and Old Bay Seasoning.

7

Make sure the grill is nice and clean, oiled, and then lay on the fish.

8

Cook 3-5 minutes per side depending on your grill and thickness of fish.

9

While the fish cooks, I like to put the tortillas on the upper grill shelf to warm them up.

10

As the fish comes off, I'll lay the tortillas on the lower grill to give them a little char.

11

Put the cooked fish on plate/platter and sprinkle with lime juice.

12

Serve the fish tacos with a few wedges of lime. Garnish ideas: the watermelon salsa you just made, slaw mix, avocado, diced tomato, shredded lettuce.

13

Serve the watermelon salad with the finely torn basil or mint.

Seafood/ Vegetarian

Southwestern Shrimp and Grits

This recipe was inspired from one I saw in a magazine. While I’ve seen plenty of Shrimp and Grits recipes, I hadn’t recalled seeing a version from the Southwest. It looked nice with the strips of red bell pepper and poblano pepper. I didn’t have any poblano on hand but I did have a big jalapeno. I also noticed that the grits in their version were grits, water, milk, and a tiny bit of salt – no butter. I also like to use vegetable or chicken stock instead of water to give the grits more flavor.

One the most unusual ingredients, to me, was the addition of black beans. I guess for a dish to be Southwestern it needs to have black beans. The beans seemed like an odd addition to grits, but it was good. The squeeze of lime gives the dish a nice brightness. All in all, it was a really delicious meal. If you haven’t made Shrimp and Grits – Try it! It isn’t a difficult meal to make and it’s SO delicious.

Southwestern Shrimp and Grits

1 Star2 Stars3 Stars4 Stars5 Stars (1 votes, average: 5.00 out of 5)
Loading...
By Patrick Dulmage Serves: 4
Prep Time: 5 minutes Cooking Time: 30 minutes Total Time: 35 minutes

Southwestern Shrimp and Grits

Ingredients

  • 3 cups vegetable or chicken stock
  • 1 cup whole milk
  • 1 tbsp butter
  • 2 tsp Kosher salt, divided
  • 1 cup grits
  • 2 tbsp olive oil
  • 1 poblano chili or 1 jalapeno de-seeded and sliced
  • 1 red bell pepper, de-seeded and sliced
  • 3/4 lb shrimp, peeled and de-veined
  • 2 garlic cloves
  • 1 14 oz can black beans, drained and rinsed
  • 1/4 cup queso fresco, crumbled
  • 1 lime, cut into wedges

Instructions

1

Bring the water, milk, and 1 tsp salt to a boil

2

Whisk in the grits, add the butter, and continue whisking until the mixture comes to a boil

3

cover and lower heat to a medium low, periodically whisking until grits are soft and creamy - about 25 - 30 minutes

4

In a large cast iron skillet heat the olive oil over medium high heat

5

Add the poblano chili and bell pepper, stir often until they are soft

6

Add the shrimp, garlic, and the rest of the salt, stirring often until the shrimp turn pink

7

Add the beans and cook until they are warm

8

Serve - add the grits to a bowl, top with the shrimp mixture along with some queso fresco and a lime wedge

Seafood

Grilled Shrimp Scampi

Tonight, I fired up the grill again to make Grilled Shrimp Scampi!

What’s not to like about grilled, buttery, garlic, shrimp? This dish goes together quick. The longest part is the marinade time. After the shrimp marinade for about 30 minutes, they are ready for the grill.

The next time you fire up the grill, get some shrimp and make this Grilled Shrimp Scampi!

Grilled Shrimp Scampi

1 Star2 Stars3 Stars4 Stars5 Stars (No Ratings Yet)
Loading...
By Patrick Dulmage Serves: 8-10
Prep Time: 30 minutes Cooking Time: 15 minutes Total Time: 45 minutes

Grilled Shrimp Scampi

Ingredients

  • 2 lbs large deveined shrimp
  • 1 1/2 sticks of butter
  • 15 - 20 cloves of garlic, smashed and rough chop
  • 1 tsp red pepper flakes
  • 2 tsp fennel seed
  • salt and pepper
  • 2 lemons, zested and juiced
  • 2 tsp dried thyme or 4 tsp fresh thyme
  • 1 cup of canola oil
  • 1/4 cup freshly chopped parsley

Instructions

1

Put the shrimp in a large mixing bowl.

2

In a small blender, combine the canola oil, garlic, red pepper flakes and fennel seed. Blend until the garlic is broken up.

3

Pour the mixture over the shrimp and let marinade at least 30 minutes.

4

When you're ready, pre-heat the grill on high.

5

Grill the shrimp on each side for about two minutes. If the shrimp aren't fully cooked, don't worry, they will cook a little more in the butter sauce.

6

In a large saute pan, melt the butter and add the thyme, the lemon zest and the juice, cook for about 30 seconds to a minute.

7

Add some of the garlic and spices from the marinade to the butter, then add the shrimp.

8

Work in batches, cooking the shrimp about 30 seconds to a minute on each side. Pull the shrimp and set on a platter.

9

Continue until all the shrimp are cooked.

10

Garnish the shrimp with the parsley and serve immediately.

Notes

You and your guests will be really happy if you also have some good bread to dunk in the leftover butter that the shrimp cooked in.

Seafood

Crab and Ricotta Cannelloni

While I was working on the recipe for the Spinach and Ricotta Cannelloni, I came across a recipe for Crab and Ricotta Cannelloni. It sounded so good, I decided to make it too.

I wanted to make something special tonight and I hope this hits the mark. The cannelloni are topped with a creamy bechamel sauce and a little Parmesan. The crab meat and bechamel are a fantastic combination.

The next time you are in the mood for seafood, I hope you’ll try this dish.

Crab and Ricotta Cannelloni

1 Star2 Stars3 Stars4 Stars5 Stars (No Ratings Yet)
Loading...
By Patrick Dulmage Serves: 8
Prep Time: 10 minutes Cooking Time: 30 minutes Total Time: 40 minutes

Crab and Ricotta Cannelloni

Ingredients

  • 1 box of 8 oz cannelloni shells (manicotti shells will also work well)
  • 1 cup whole milk ricotta cheese
  • 3/4 cup grated Parmesan cheese, plus more for topping
  • 1 egg yolk
  • 1/2 cup chopped fresh basil leaves
  • 1 lb lump crab meat
  • 1/4 tsp sea salt
  • 1/4 tsp freshly ground pepper
  • 1 lemon
  • Bechamel Sauce:
  • 5 tbsp unsalted butter
  • 1/2 cup flour
  • 4 cups whole milk
  • 1/2 tsp salt
  • 1/4 freshly ground pepper
  • Pinch of freshly grated nutmeg

Instructions

1

Bring a large pot of salted water to a boil

2

Add the pasta and cook to package instructions, between 7-10 minutes

3

Drain pasta

4

In a large bowl, mix together ricotta, 3/4 cup Parmesan, egg yolk, basil, crab, salt and pepper

5

Pre-heat oven to 350 degrees

6

Put a few spoonfuls of Bechamel in the bottom of the baking dish

7

Fill the cannelloni with the crab mixture and put in the baking dish

8

Top the filled cannelloni with the rest of the Bechamel sauce

9

Sprinkle the top with the rest of the Parmesan cheese

10

Bake 20 minutes. If the top of the dish isn't golden brown, put under the broiler for a few minutes

11

Serve immediately and squeeze a little lemon juice on the cannelloni

12

Bechamel Sauce:

13

In a medium saucepan, melt the butter over medium heat

14

Add the flour and whisk until smooth

15

Gradually add the milk, continually whisking until the sauce is thick and creamy - don't let the sauce boil

16

Once it is the consistency you want, remove from the heat

17

Whisk in the salt, pepper, and nutmeg

Seafood/ Vegetarian

Shrimp a la Diabla

This weekend, I decided to go South of the Border and make one of Audrey’s favorite Mexican dishes – Shrimp a la Diabla!

As you might guess, with Diabla in the name there is going to be some heat. I used a combination of Anaheim and Thai chiles for the heat. The recipe calls for guajilo and chile de arbols but my market didn’t have either so I experimented with what I could find. It turned out great!

The sauce is nice and thick which thoroughly coats the shrimp the spicy goodness. Once you make the sauce, you’ve almost completed the dish. The shrimp only take about a minute of cooking on each side and then pour in the sauce to coat the shrimp and warm up the sauce.

I paired the shrimp with Cilantro Lime Rice to add some brightness to the dish. It turned out fantastic! But don’t take my word for it, you should make your version and let me know how it turned out.

Shrimp a la Diabla

1 Star2 Stars3 Stars4 Stars5 Stars (No Ratings Yet)
Loading...
By Patrick Dulmage Serves: 4
Prep Time: 20 minutes Cooking Time: 10 minutes Total Time: 30 minutes

Shrimp a la Diabla

Ingredients

  • 8 dried guajillo chiles, rinsed, stems and seeds removed
  • 3 dried chile de arbol chiles
  • 3 roma tomatoes, chopped
  • 2 cloves garlic
  • ½ medium onion, rough chop
  • 1 tsp kosher salt
  • 4 tbsp olive oil
  • 1.5 lbs medium or large shrimp, peeled and deveined
  • Salt and pepper to taste

Instructions

1

In a medium bowl or saucepan, add dried guajillo and arbol chiles.

2

Add very hot or boiling water until chiles are fully submerged.

3

Cover with a lid or large plate and let sit for 15 minutes, until chiles have softened.

4

Using a slotted spoon, transfer the softened chiles to a large blender.

5

Add the tomatoes, garlic, onion and salt. Puree until completely smooth.

6

Taste and season with more salt, if necessary. If the sauce is too spicy, add more tomatoes.

7

Heat a large saute pan or skillet over medium-high heat.

8

Add olive oil and shrimp.

9

Cook shrimp for 1 minute per side, or until shrimp is light pink.

10

Add the red chile sauce to the pan or skillet and mix together to coat the shrimp.

11

Lower the heat to medium and cook for 3 to 5 minutes, until the sauce is bubbling and hot.

12

Remove the pan or skillet from the heat and serve alone as an appetizer or with Mexican rice as a meal.

Seafood/ Vegetarian

Homemade Lox

Last week, when I went to the market I wanted to buy lox but they were out. I remember having seen videos on how to make lox, so I decided to try it. I found a nice piece of salmon, picked up some fresh dill and went to work.

It was surprisingly easy to make and it turned out great! The hardest part was waiting for it to cure. So, whether your market is out of lox or you just want to make your own, check out the recipe and make it!

Homemade Lox

1 Star2 Stars3 Stars4 Stars5 Stars (No Ratings Yet)
Loading...
By Patrick Dulmage Serves: 8-10
Prep Time: 15 minutes Total Time: 15 minutes

Homemade Lox

Ingredients

  • 1 lb Salmon
  • 3-5 tbsp fresh Dill
  • 1 cup Salt
  • 1 cup Sugar
  • 1-2 tbsp White pepper and black pepper

Instructions

1

In a large bowl, mix the salt, sugar, pepper, and dill.

2

Trim the salmon into pieces of equal thickness. Whatever the thickness of your salmon, it will taper on one side and lengthwise as you get down toward the tail.

3

Set the thinner pieces aside.

4

spread out a piece of plastic wrap large enough to wrap two pieces of the salmon.

5

Coat the salmon on both sides generously with the spice mix.

6

Stack two pieces of coated salmon and wrap tightly in the plastic wrap.

7

Put the wrapped salmon on something that will capture the liquid that will leak out.

8

Put in the refrigerator for 3-4.

9

After 3-4 days, unwrap the newly created lox and rinse it thoroughly, pat it dry and enjoy!

Seafood/ Vegetarian

Spaghetti Aglio e Olio (with Garlic and Olive Oil) and Seared Scallops

On the menu tonight – Spaghetti Aglio e Olio (with Garlic and Olive Oil) with Seared Scallops!

The first time I had Spaghetti Aglio e Olio, I couldn’t believe how simple yet delicious it was. Literally just five ingredients, spaghetti, olive oil, garlic, and crushed red pepper. Garnish with some fresh Italian Parsley. That’s it! Done right, you’ve got a super delicious and inexpensive meal. Add some seared scallops or shrimp and you’ve got something really special.

With so few ingredients there isn’t much room to hide behind a sauce or a layer of cheese. The pasta has to be cooked perfectly, the olive oil has to be good and of course fresh garlic and parsley. The trick is don’t over cook the pasta or the garlic. Over cooked garlic is going to make the dish bitter. We’re going for garlicky goodness. A lot of recipes have you slice the garlic very thinly – think Pauli in Goodfellas. If you don’t have the time to slice your garlic with a razor blade, you can smash the cloves and chop into big chunks and fish out before it gets burned and bitter.

The seared scallops also have to be done right. Over cooked scallops are rubbery and not very good. The trick to good scallops, well there are a few. Start with good fresh scallops. After pulling off that tough muscle, pat them dry and season with salt and pepper. I used a fine sea salt in this dish. The pan – I used a non-stick pan. Pre-heat the pan with a little olive oil, barely enough to cover the bottom of the pan. Once it’s hot, place the scallops in one at a time around the pan. Remember the order you put them in because that’s the order you’ll take them out. I start at the top of the pan and go clockwise. The scallops should cook for about a minute and a half to a minute and 45 seconds depending on the heat of your pan. Once finished, there should be a nice golden sear. Flip them and cook another 90 seconds. That’s it! Take them off the heat or they become rubbery.

I hope you’ll try this dish and let me know how it turns out.

Spaghetti Aglio e Olio (with Garlic and Olive Oil) and Seared Scallops

1 Star2 Stars3 Stars4 Stars5 Stars (No Ratings Yet)
Loading...
Seafood
By Patrick Dulmage Serves: 4-6
Prep Time: 5 minutes Cooking Time: 15 - 20 minutes Total Time: 20 - 25 minutes

Spaghetti Aglio e Olio (with Garlic and Olive Oil) and Seared Scallops

Ingredients

  • Kosher Salt
  • Freshly ground pepper
  • 1 pound dried pasta (Angel Hair or Spaghetti)
  • ½ cup extra-virgin olive oil
  • 1 tsp crushed red pepper flakes
  • 6 cloves garlic, smashed or thinly sliced
  • ½ cup fresh parsley, chopped
  • 12-18 Sea Scallops

Instructions

1

Bring pot of salted water to a boil.

2

Also pre-heat a non-stick skillet over medium-high heat.

3

Prepare your scallops by patting them dry. Get them as dry as you can to get that beautiful sear.

4

Season the scallops with salt and freshly ground pepper. Set aside for now.

5

Drizzle about a tablespoon or two of olive oil in the skillet.

6

Place 6 – 8 scallops in the pan one a time. Start at the 12 o’clock position and work your way around the pan. After 90 seconds, the first scallop should be ready to flip. If it doesn’t have that nice sear, let them cook another 15 seconds.

7

Work your way around the pan flipping the scallops in the order you put them in.

8

After another 90 seconds, remove the scallops to a serving dish and repeat until they are all cooked.

9

After the first batch of scallops is when I drop my pasta into the boiling water. Cook the pasta about ¾ of the time the package says.

10

Don’t forget to save some pasta water!

11

The Sauce – in a large saute pan, heat the ½ cup of olive oil over medium heat.

12

Add the crushed red pepper flakes and the garlic. If you want to get your inner Pauli going, you’ve thinly sliced your garlic. While I do that sometimes, usually I will smash the garlic cloves and drop them in the oil. Just as the garlic starts to turn brown I remove it before it gets bitter.

13

Take a ladle of the pasta water and add it to the olive oil.

14

About this time, the pasta should be ready too. Add the pasta to your olive oil sauce you just created and cook a few minutes longer.

15

Season with salt if needed and transfer to a serving dish along with your scallops.

16

Drizzle a little bit more olive oil on top and serve immediately.

Seafood

Southern Fried Catfish

On the menu tonight – Southern Fried Catfish! I was feeling like making another Southern dish today so I made fried catfish and this Vidalia Onion Cornbread. The seasoning on the catfish is fantastic! People often think of fried fish as heavy, but if it’s done right, it won’t be greasy – the fish will be light and flaky. The trick is to maintain the oil temperature and not over crowd the pot.

I paired the fish with some Vidalia Onion Cornbread and it was FANTASTIC! Check out the recipes and make your own fish fry. You can thank me later.

Southern Fried Catfish

1 Star2 Stars3 Stars4 Stars5 Stars (No Ratings Yet)
Loading...
By Alton Brown Serves: 2-4
Prep Time: 10 minutes Cooking Time: 15 minutes Total Time: 25 minutes

Southern Fried Catfish

Ingredients

  • 1 quart peanut oil
  • 1 cup fine cornmeal
  • 1 cup all purpose flour
  • 1 teaspoon Old Bay seasoning
  • ½ teaspoon kosher salt
  • ¼ teaspoon hot smoked paprika
  • ¼ teaspoon ground black pepper
  • 6 farm-raised catfish fillets, rinsed and thoroughly patted dry
  • ¾ cup low-fat buttermilk

Instructions

1

Heat the peanut oil in a 5 quart Dutch oven to 350 degrees.

2

Whisk the cornmeal and flour together in a shallow dish.

3

Combine the seasonings in a small bowl.

4

Season the fish on both sides.

5

Pour the buttermilk in another shallow dish.

6

Dip each piece of fish into the corn meal mixture.

7

Dip each piece of fish into the buttermilk.

8

Then, dip each piece of fish into the corn meal mixture again and set on a cooling rack for at least 5 minutes.

9

Gently add the filets to the hot oil (no more than two at a time) and fry until golden brown, about 5 – 6 minutes.

10

Remove the fish to a cooling rack, then repeat with the rest of the fish.

11

Serve immediately.