All Posts By:

Patrick Dulmage

Beef

Copy Cat Big Mac Sliders

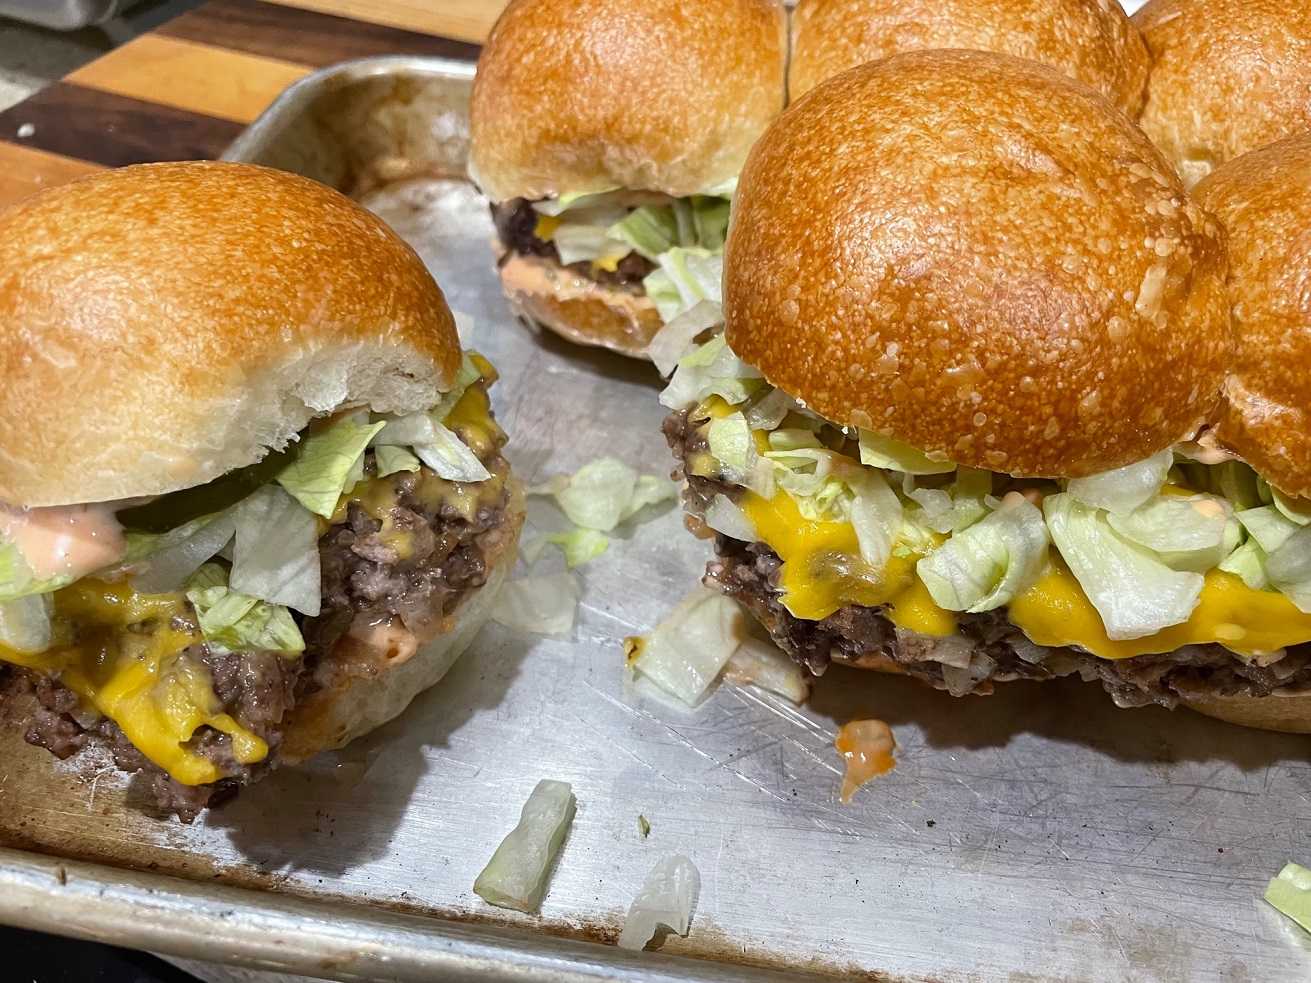
On the menu tonight – Copy Cat Big Mac Sliders! I rarely eat fast food anymore, but I recently saw a post on FB for these Copy Cat Big Mac sliders and they looked really good. There was also a post for Copy Cat White Castle sliders and those looked good too! The recipe I’m going to share is a combination of the two and it turned out pretty fantastic if I say so myself.

The great thing is that this comes together really quickly, there isn’t anything difficult in making these sliders, no exotic ingredients… just a good ‘ole slider that would be right at home during the week, at a party, game day… they’re delicious crowd-pleasers!

One of the really great things about these sliders is that they are made in the oven! So, it doesn’t matter what the weather is, you can make this meal.

The next time you are thinking about making burgers, I hope you’ll give these sliders a try!

Big Mac Sliders
Big Mac Sliders

Copy Cat Big Mac Sliders

1 Star2 Stars3 Stars4 Stars5 Stars (No Ratings Yet)
Loading...
By Patrick Dulmage Serves: 3-6
Cooking Time: 25-30 minutes

Copy Cat Big Mac Sliders

Ingredients

  • 2 lbs 80/20 ground beef (I like ground chuck
  • 1 pkg slider buns (I used 6 buns for this recipe)
  • 1 packet Lipton Soup mix or equivalent
  • 1/2 finely diced Vidalia Onion
  • 1/4 - 1/2 cup dehydrated onion / dried minced onion
  • 2 Tsp Garlic powder
  • 1/3 cup Thousand Island dressing or make your own (Ketchup, mayo, and relish)
  • Dill pickle slices, at least one per slider
  • 1 cup Shredded lettuce
  • 3-4 slices American cheese

Instructions

1

Pre-heat the oven to 375 degrees

2

On a large sheet tray, spread out the ground beef

3

Season the ground beef with the Lipton Soup mix, pepper, onions (finely diced and dry), garlic powder, and gently mix (don't over mix)

4

Once the meat is thoroughly seasoned, form it in to a rectangle roughly the size of the slider buns but a little larger as the meat will shrink a little as it cooks.

5

Cover with tin foil and put in the pre-heated oven.

6

Set the timer for 15 minutes.

7

As the meat cooks, carefully cut the slider buns in half, but leave them all intact - don't separate them.

8

Spread the Thousand Island dressing on both the tops and bottoms and set aside.

9

Shred the lettuce

10

When the timer goes off, remove the tray from the oven, remove the foil, drain any fat, and return to the oven uncovered for another 15-20 minutes.

11

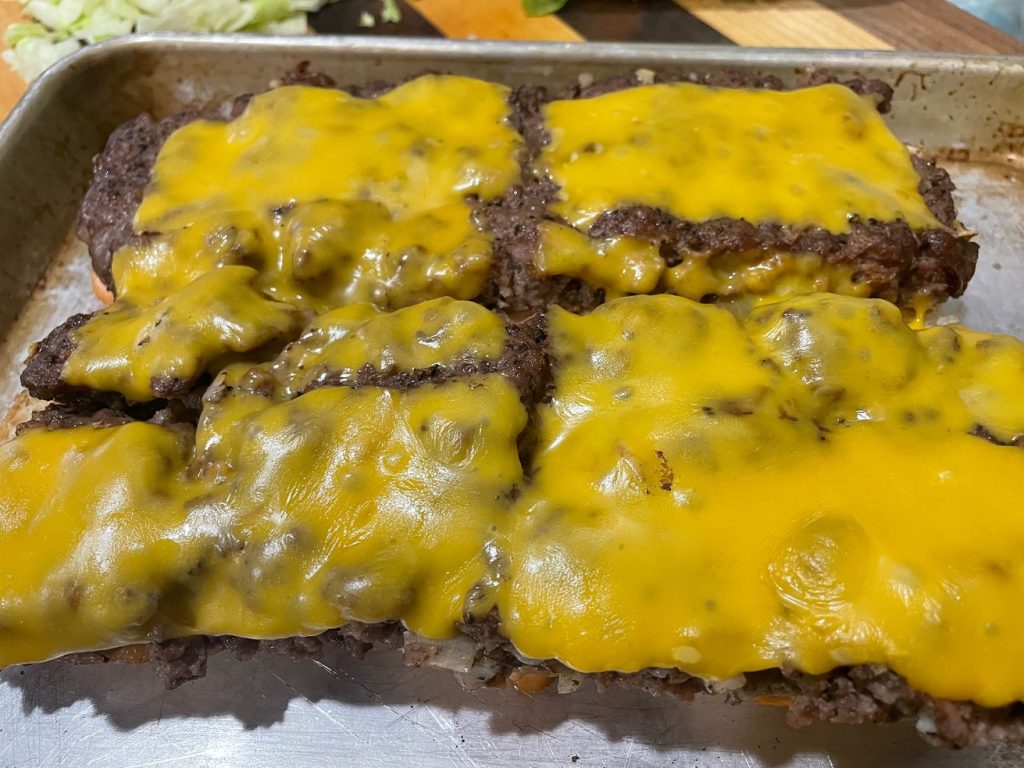
When the burgers are ready, add the American cheese and return to the oven for a few minutes to let the cheese melt.

12

Cut the rectangle in half (length-wise) so you have two rows of three sliders. This will make it easier to transfer to the buns.

13

Dab the hamburger with paper towels to avoid transferring a lot of grease to your burgers. I tilted the pan and drained the fat a second time, then dabbed the burgers with paper towels to get a lot of the excess grease off of them.

14

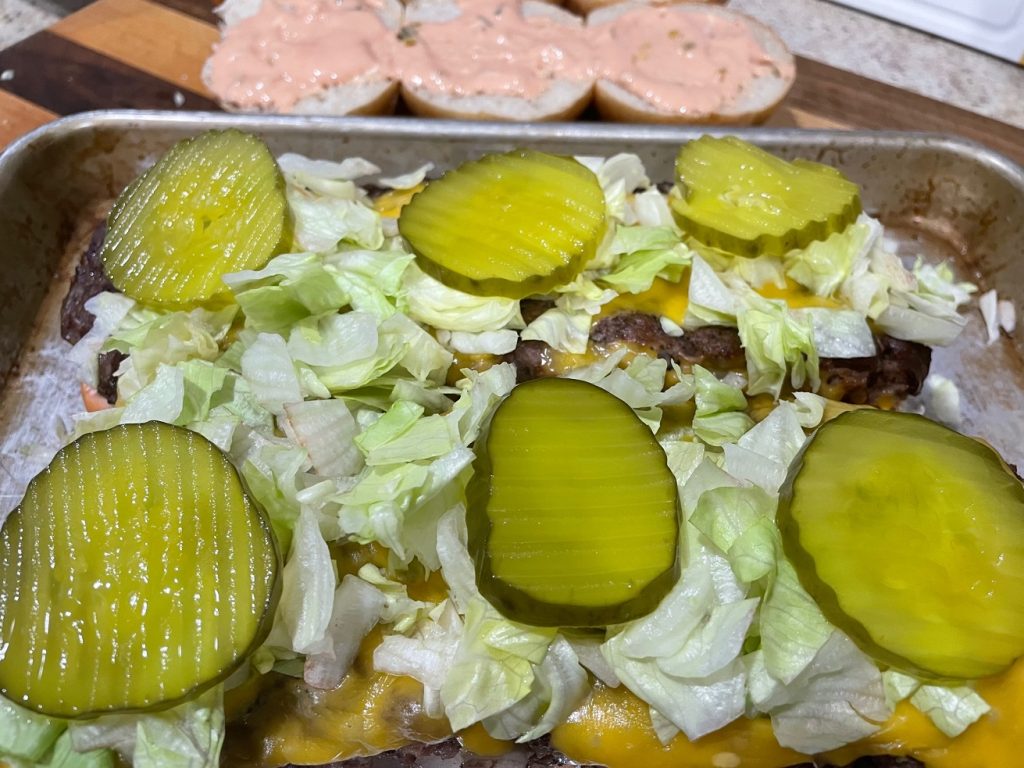
Transfer the burgers to the slider buns.

15

Top with pickles, lettuce, and the bun tops.

16

Serve with french fries or onion rings.

Notes

You'll note I don't have sesame seed buns. I don't feel that the sesame seeds add anything to the taste, texture... anything. If you like them, use sesame seed buns.

Fish

Miso Glazed Black Cod with Couscous

On the menu tonight – Miso Glazed Black Cod with Couscous!

This is another one of those dinners that comes together very quickly. If your fish is already thawed, all you have to do is mix together a few ingredients for the glaze and pre-heat the oven.

While I baked this dish, I would recommend broiling it a few minutes first to get some color on the glaze and then bake it. I baked it at 375 degrees for 15 minutes. If I broiled it first, I would probably drop the bake time to about 8-10 minutes.

For the couscous, I took a supermarket shortcut with the bag of couscous you and microwave. From start to finish, this dinner only took about 30 minutes and it is WAY healthier than ordering something online. I hope the next time you aren’t sure what to have for dinner, you will try this dish!

Beef

Sheet Pan Beef and Broccoli with Rice

On the menu tonight – Beef and Broccoli with Rice!

I’ve been trying, off and on for a while to make a Chinese food knock off that would satisfy my craving for Chinese food without having to order take-out. Sadly, most of those attempts haven’t been very successful – UNTIL NOW! This meal hits all the buttons AND it only took about 30 minutes to make from start to finish.

To save time, the meat was mostly cut to size. I had a package of beef tips and I just had to cut the pieces to bite size. The rice was the microwave bag types that is ready in 90 seconds. If you haven’t tried them, DO. They’re really good, especially for something like this. What’s left? The broccoli. I cut up the broccoli to bite-sized pieces and did a rough chop of the scallions.

There is a sauce, but all you have to do for that is mix the ingredients in a bowl and add your chopped ingredients to coat them before putting everything (minus the rice) on a sheet pan. After 15 minutes in the oven, take it out and cook the rice for 90 seconds. All you have to do next is plate it and eat it!

The next time you get cravings for Chinese food, consider making this Sheet pan Beef and Broccoli. It will be on the table quicker than take-out.

Sheet Pan Beef and Broccoli with Rice

1 Star2 Stars3 Stars4 Stars5 Stars (No Ratings Yet)
Loading...

Sheet Pan Beef and Broccoli with Rice

Ingredients

  • Sauce:
  • 2 Tbsp reduced sodium soy sauce
  • 2 Tbsp oyster sauce
  • 2 Tbsp canola oil
  • 1 Tbsp toasted sesame oil
  • 1 Tbsp brown sugar (light or dark)
  • 1 Tbsp sriracha sauce
  • 1/2 tsp crushed red pepper flakes
  • 2-3 cloves of garlic, minced
  • Beef and Broccoli:
  • 3/4 - 1 lb of sirloin steak, cut to bite-sized pieces (about 3/4 of a inch)
  • 10-12 oz broccoli florets
  • 3 scallions, cut in to 1-2" pieces (use the entire scallion, light and dark parts)
  • Cooked rice, for serving or 1 bag microwave rice (I used Jasmine rice)
  • Freshly cracked black pepper to taste
  • Toasted sesame seeds for garnish

Instructions

1

Pre-heat the oven to 425 degrees and position a rack in the upper third of the oven

2

Make the sauce: In a large bowl, whisk together the soy sauce, oyster sauce, canola oil, sesame oil, sriracha, brown sugar, red pepper flakes, and minced garlic

3

Add the steak, broccoli, and scallions to the bowl, then toss to coat all the ingredients

4

Spread the ingredients on a large sheet pan and spread everything in a single layer

5

Bake for 15-16 minutes until the steak is browned and the broccoli is al dente

6

Season with freshly cracked black pepper

7

Serve with the rice and sprinkle with toasted sesame seeds

Notes

If you like a lot of sauce, you could double the amounts for the sauce recipe. Just be careful not to dump too much sauce on the sheet pan, as it will burn. Next time I will probably cut a Vidalia onion in half, then slice it and add to the mixture.

Sauces

Chimichurri Sauce

Where has THIS been all my life?! YUM! I have seen countless TV shows where the chef/cook adds chimichurri sauce over steak or whatever. I always thought, I’d rather just taste the meat. Well, I finally gave in and figured I’d give it a try. WOW! Delicious! Now I see what I’ve been missing all these years.

There are a bunch of different ways you can make this and I don’t even begin to claim this is the best version of a chimichurri sauce. This is my first attempt at it and I am REALLY happy with the result. I put it on a grilled pork loin and grilled chicken.

I hope the next time you are grilling that you’ll give this sauce a chance – especially if you’ve never tried it.

Chimichurri Sauce

1 Star2 Stars3 Stars4 Stars5 Stars (No Ratings Yet)
Loading...

Chimichurri Sauce

Ingredients

  • 2 cups fresh flat leaf parsley
  • 1 cup fresh oregano
  • 2-4 garlic cloves
  • 3 limes, juiced
  • 1/2 cup olive oil (use good quality extra virgin olive oil)
  • 1-2 jalapeno peppers, seeded (or not if you want some heat)
  • Kosher salt to taste
  • Freshly ground pepper to taste

Instructions

1

Give the parsley, oregano, and garlic cloves a rough chop and add to your food processor

2

add the lime juice to the food processor

3

add the salt and pepper to the food processor

4

pulse to start breaking down the greens

5

add the olive oil slowly as the greens break down

6

you'll likely have to stop and push down what splatters up on the sides of the processor

7

once it's blended nicely, stop and taste

8

adjust the seasoning as needed and then let it rest in the fridge while you make whatever you plan to put it on

Seafood

Scallops Provencal over Pasta

On the menu tonight – Scallops Provencal over Pasta!

After having made seared scallops countless times, I wanted to do something a little different. I had plenty of white wine butter sauce left over from a recent dish and thought it would go perfectly with scallops and pasta. It DID!

For the pasta, I used buccatini. It was good, but it wasn’t the right noodle for this application. Somewhere, someone said that every pasta has a purpose. They were RIGHT! This dish, in my humble opinion, requires a more delicate pasta. Angel hair pasta or vermicelli would have been better choices and I’ll use one of those the next time I make this dish.

Similar to seared scallops, this dish goes together pretty quickly. The extra time is going to be spent making the sauce and making the pasta.

Despite my pasta choice, this dish STILL turned out really well. I hope you’ll make your own version and let me know how it goes!

Scallops Provencal over Pasta

1 Star2 Stars3 Stars4 Stars5 Stars (No Ratings Yet)
Loading...
By Patrick Dulmage Serves: 4

Scallops Provencal over Pasta

Ingredients

  • 1 lb Scallops, bay or sea
  • 1 cup All-purpose flour, for dredging
  • Kosher salt
  • Freshly ground black pepper
  • 4 tablespoons butter, 1/2 stick
  • 2-3 garlic cloves, minced
  • 1 shallot, finely chopped
  • 1/4 cup flat-leaf parsley, chopped
  • 1/3 cup dry white wine
  • 1 lemon, zested and juiced
  • 1 lb pasta, angel hair or vermicelli

Instructions

1

Bring a large pot of water to a boil

2

If you haven't already, pat the scallops dry. If they are wet, you won't get a good sear.

3

In a 13x9 baking dish or a pie tin, put in the flour and season it with salt and pepper. Mix to combine.

4

Put the scallops in the flour and thoroughly coat. I put the scallops in a colander or strainer and shake off the excess flour. You just want a light coating of flour.

5

In a large pan, over high heat, put enough butter to coat the entire pan, but not so much the scallops would be swimming in butter.

6

Place the scallops in the pan one at a time, starting at the 12 o'clock position and going clockwise until you've added all the scallops. Leave at least a half inch between the scallops and feel free to put some in the center as well - just keep track of the order you put them in the pan because you only need to sear them about 90 seconds each side before they are done.

7

After all the scallops are in the pan, I'll wait about another minute and I start flipping them in the order I put them in the pan.

8

They should have a nice light brown sear.

9

Cook them on the other side for a minute to 90 seconds and then remove them.

10

Lower the heat to medium, if you haven't already, add the rest of the butter, shallots, garlic, and parsley, saute for 2-3 minutes, then add the wine.

11

Scrape the brown bits from the bottom of the pan.

12

Drop the pasta in the boiling water and cook to pkg directions.

13

When the pasta is done, reserve a cup of the cooking liquid and then drain the pasta.

14

I add the pasta to the butter and wine sauce, and add the lemon zest and juice, mixing to coat all of the pasta with the lovely sauce. If you need some additional sauce or what you have isn't thick enough, you can add some of that reserved pasta water.

15

Plate some of the pasta and add scallops on top, then sprinkle a little of the chopped parsley. I'll also usually have some lemon wedges in case anyone wants extra lemon to sprinkle on top.