Browsing Category

Fish

Asian-inspired/ Fish

Teriyaki Salmon & Cauliflower Fried Rice

On the menu tonight – Teriyaki Salmon & Cauliflower Fried Rice!

I made this Teriyaki Salmon Fried Rice with Cauliflower as a way to pack more vegetables into fried rice without giving up the rice altogether. Instead of replacing the rice with cauliflower, this recipe combines basmati rice with riced cauliflower, peas, and carrots. The result still eats like fried rice, but with a lot more vegetables in every serving.

Chunks of salmon make it substantial enough for dinner, while teriyaki sauce brings everything together with a sweet and savory glaze. I finished mine with a drizzle of homemade chili oil, which added just the right amount of heat.

The Secret Is Cooking Everything in Stages

Fried rice cooks quickly, but that doesn’t mean everything should go into the wok at once.

The cauliflower and frozen vegetables contain quite a bit of water. Cooking them separately first allows that moisture to evaporate instead of turning the finished fried rice soft and steamy.

The salmon gets the same treatment. Searing it separately gives the outside some color while allowing you to leave the center slightly underdone. It finishes cooking when everything comes back together at the end.

Why Mix Cauliflower and Rice?

I wasn’t trying to make traditional cauliflower fried rice or eliminate rice from the dish. I wanted the texture and flavor of actual fried rice while adding substantially more vegetables.

Using both worked really well. The basmati rice provides the familiar fried-rice texture, while the riced cauliflower blends into the dish surprisingly well alongside the peas and carrots.

Patrick’s Tips

Get the wok hot. A properly heated wok helps the ingredients fry rather than slowly steam.

Listen to the cauliflower. When frozen cauliflower first hits the wok, you’ll hear a wet, steamy hiss. As the moisture cooks away, that changes to a sharper, drier sizzle. That’s a good indication that you’re ready to move on.

Give the rice some contact time. Don’t constantly toss it. Let the rice sit against the hot wok for 20–30 seconds at a time so it has a chance to develop some toasted flavor.

Have everything ready before you start. Once the wok is hot, the cooking moves fast. This is not the recipe where you want to stop halfway through to chop the garlic.

Add the teriyaki sauce last. Once the sauce goes in, you only need enough time to coat everything and heat it through. Teriyaki contains sugar and can scorch quickly against a very hot wok.

Make It Your Own

The homemade chili oil is optional, but I really liked the extra heat it added at the table. Adding it individually also lets everyone control how spicy they want their serving.

Teriyaki Salmon Fried Rice with Cauliflower

(1 votes, average: 5.00 out of 5)
Dinner Asian-inspired
By Patrick Dulmage Serves: 3-4
Prep Time: 15 minutes Cooking Time: 25 minutes Total Time: 40 minutes

Wok-seared salmon, basmati rice, riced cauliflower, peas, carrots, and eggs tossed with teriyaki sauce for a quick, vegetable-packed fried rice.

Ingredients

  • 12–16 ounces salmon, skin removed and cut into ¾–1-inch pieces
  • 1 teaspoon soy sauce
  • ½ teaspoon toasted sesame oil
  • 1 teaspoon neutral high-heat oil
  • ½ teaspoon cornstarch
  • ¼ teaspoon freshly ground black or white pepper
  • 1 (12–16-ounce) bag cauliflower medley with riced cauliflower, peas, and carrots
  • 1–1½ cups frozen peas and carrots
  • 1 package Uncle Ben's Original Ready Rice Basmati (microwave rice)
  • 2 large eggs, beaten
  • 3 scallions, whites and greens separated and sliced
  • 3 garlic cloves, finely chopped
  • 1–2 teaspoons fresh ginger, finely minced or grated
  • 2–3 tablespoons neutral high-heat oil, divided
  • 1 pouch Kevin's Teriyaki Sauce, 7oz
  • Homemade chili oil, to taste, for serving

Instructions

1

Combine the salmon with the soy sauce, sesame oil, 1 teaspoon neutral oil, cornstarch, and pepper. Toss gently to coat and marinate for 10–15 minutes while preparing the remaining ingredients.

2

Prepare the basmati rice according to the package directions. Spread the hot rice onto a plate or shallow bowl and leave it uncovered while you begin cooking. This allows steam to escape and helps dry the surface of the rice.

3

Prepare the cauliflower medley mixture by putting the contents into a colander to drain any excess water.

4

Heat a wok over high heat until thoroughly hot. Add the cauliflower medley without oil and cook, tossing periodically, for 4–7 minutes. If starting from frozen, it will initially release considerable moisture. Continue cooking until most of that moisture has evaporated and the sound changes from a wet hiss to a drier sizzle. Transfer to a large bowl.

5

Add the frozen peas and carrots to the hot wok. Cook for 2–3 minutes, tossing occasionally, until thawed and most of the surface moisture has evaporated. Transfer to the bowl with the cauliflower.

6

Return the empty wok to high heat and allow it to become thoroughly hot. Add about 1 tablespoon neutral oil and swirl to coat. Add the salmon in a single layer and cook undisturbed for 45–60 seconds. Turn or toss the salmon and cook for another 1–2 minutes, until browned outside but still slightly underdone in the center. Transfer to a clean plate.

7

Reduce the heat to medium-high. Add 1–2 teaspoons oil followed by the beaten eggs. Let the eggs sit for about 10 seconds, then gently scramble them into fairly large curds. Remove while still slightly glossy and transfer to the plate with the salmon.

8

Return the wok to high heat and add about 1 tablespoon neutral oil. Add the scallion whites and ginger and stir-fry for about 20 seconds. Add the garlic and cook for another 10–15 seconds, just until fragrant.

9

Immediately add the prepared basmati rice. Break apart any clumps and spread the rice across the hot surface of the wok. Leave it undisturbed for 20–30 seconds, then toss. Repeat several times for about 2 minutes, allowing the rice to make direct contact with the hot wok and develop a lightly toasted flavor.

10

Return the cauliflower medley and peas and carrots to the wok. Stir-fry for another 2–3 minutes, alternating between tossing the mixture and allowing it to sit briefly against the hot wok. The vegetables and rice should be hot and relatively dry before proceeding.

11

Return the salmon and eggs to the wok along with most of the scallion greens. Gently toss everything together, taking care not to break apart the salmon.

12

Pour in the teriyaki sauce and toss until it evenly coats the salmon, rice, and vegetables and everything is piping hot, about 30–60 seconds. Remove from the heat promptly; the sugar in the teriyaki sauce can scorch against a very hot wok if cooked too long.

13

Divide among bowls or plates. Garnish with the reserved scallion greens and drizzle with homemade chili oil to taste. Serve immediately.

Notes

Have all of your ingredients prepared and beside the stove before heating the wok. Once stir-frying begins, the recipe moves quickly. The key to good texture is removing excess moisture from the cauliflower and frozen vegetables before combining everything. You're drying them in the wok rather than trying to deeply brown them. Don't fully cook the salmon during its first trip through the wok. Leaving the center slightly underdone prevents it from becoming dry when it goes back into the wok at the end.

Fish/ Vegetarian

Red Pepper Jelly Glazed Salmon with Roasted Vegetables

On the menu tonight, Red Pepper Glazed Salmon with Roasted Vegetables!

So, you’ve used red pepper jelly with cream cheese and crackers, but what ELSE can you use it for? A glaze for fish or chicken! This was a nice change from some of the usual ways I make salmon. The pepper jelly gives it a little bit of spice without being too hot.

There isn’t a lot of preparation required for this meal. I cut the ends off of the Brussel sprouts, then cut them in half. For the potatoes, I used the baby Yukon golds. I cut those in half or quarters, depending on the size of the potato. I had to mix the glaze for the salmon, but there aren’t too many ingredients for that either.

The cooking of this dish is broken in to three parts, the potatoes, the Brussel sprouts, and then the salmon. Starting with the potatoes, cook them for 15 minutes. Pull from the oven, turn them over so each side gets nice and golden brown. Add the Brussel sprouts to the sheet pan, cook for another 15 minutes. Once the time goes off again, add the salmon to the middle of the sheet pan and cook for, you guessed it, another 15 minutes. Check the salmon at about 12 minutes. The salmon will take about 12-20 minutes, depending on your oven. That’s IT!

This is a fantastic meal for two or you can scale it up for however many people you need to feed. Try it and let me know what you think of my Red Pepper Jelly Glazed Salmon!

Red Pepper Jelly Glazed Salmon with Roasted Vegetables

(3 votes, average: 5.00 out of 5)

Red Pepper Jelly Glazed Salmon with Roasted Vegetables

Ingredients

  • 24 oz Salmon, either one big piece or 6 oz portions already cut
  • 1lb Yukon gold or baby Yukon gold potatoes - cut in half or quarters, depending on the size.
  • 1 lb Brussel sprouts, trimmed and cut in half. (I like the crispy bits on the outside and I despise the horsradishy taste if they are too big)
  • 4 -6 sprigs fresh thyme
  • 1 Tbsp olive oil
  • Kosher salt and freshly ground pepper to taste - enough for each component of the dish
  • Glaze:
  • 1/3 cup red pepper jelly
  • 2 Tbsp Balsamic vinegar
  • 1 Tbsp Dijon mustard
  • 2 tsp fresh or dry thyme (If using dry, start with 1 tsp)

Instructions

1

Pre-heat oven to 425 degrees

2

Prepare the potatoes:

3

In a large mixing bowl, add the potatoes, olive oil (enough to lightly coat the potatoes), salt, pepper, and some dried thyme

4

Toss to coat all the potatoes

5

Put the potatoes on a half-sized sheet pan, evenly so they have plenty of room

6

Bake for 15 minutes

7

Prepare the Brussel sprouts:

8

In the same mixing bowl you used for the potatoes, add the Brussel sprouts with some additional olive oil, salt and pepper

9

Toss to coat all the Brussel Sprouts

10

At the 15 minute mark, pull the potatoes from the oven, push them to one side of the baking sheet, then add the Brussel Sprouts

11

Bake for another 15 minutes

12

Prepare the salmon:

13

In a small mixing bowl, add the red pepper jelly, Balsamic vinegar, Dijon mustard, and thyme. Mix thoroughly

14

Brush the salmon with the mixture

15

At the 15 minute mark, pull the veggies from the oven, push the sprouts to the other side of the sheet pan, leaving enough room in the middle for the salmon. Add the salmon to the sheet pan, bake for another 15 minutes

16

When the timer goes off, pull from the oven and serve

Fish

Miso Glazed Black Cod with Couscous

On the menu tonight – Miso Glazed Black Cod with Couscous!

This is another one of those dinners that comes together very quickly. If your fish is already thawed, all you have to do is mix together a few ingredients for the glaze and pre-heat the oven.

While I baked this dish, I would recommend broiling it a few minutes first to get some color on the glaze and then bake it. I baked it at 375 degrees for 15 minutes. If I broiled it first, I would probably drop the bake time to about 8-10 minutes.

For the couscous, I took a supermarket shortcut with the bag of couscous you and microwave. From start to finish, this dinner only took about 30 minutes and it is WAY healthier than ordering something online. I hope the next time you aren’t sure what to have for dinner, you will try this dish!

Fish

Salmon Wellington

On the menu tonight – Salmon Wellington!

I was looking for something different to do with Salmon and decided to wrap it in puff pastry, making a version of Salmon Wellington. This dish came out really well and wasn’t difficult to make.

I used puff pastry, dijon mustard, dill, shallots, and mushrooms.

Once you cook the mushrooms and shallot, all you have to do is top the salmon with that mixture and bake. About 30 minutes later, you have a beautiful dish to serve your family or at a party. I’d recommend serving it with a little sour cream with dill on the side.

The next time you make salmon, I hope you will try this dish! Oh, while I made two big wrapped pieces of salmon, you could also do individually portioned Salmon Wellingtons. I may try that next time myself.

Salmon Wellington

(No Ratings Yet)
By Patrick Dulmage Serves: 6-8
Prep Time: 10 minutes Cooking Time: 35 - 40 minutes Total Time: 45 minutes

Salmon Wellington

Ingredients

  • 3lb salmon, de-boned
  • 2 sheets puff pastry sheets, thawed and rolled out
  • 1 lb cremini or button mushrooms, sliced
  • 3-4 Tbsp butter, divided
  • 4 Tbsp Dijon mustard, grainy mustard works well too
  • 4 Tbsp dill
  • 1 shallot, finely chopped
  • 1-2 eggs, beaten
  • Kosher salt
  • Freshly ground black pepper
  • 1/2 cup sour cream with 1 tsp of dill mixed in for garnish - optional

Instructions

1

Thaw and roll out two sheets of puff pastry to accommodate salmon (size will be determined by the size of the salmon, but you don't want the puff pastry to be too thick when you bake it)

2

Pre-heat a large skillet over medium-high heat and add a tablespoon of butter

3

Add the sliced mushrooms to the pan and cook 3-4 minutes

4

Add the shallot to the mushrooms and cook an additional 2-3 minutes

5

When the mushrooms and shallots are cooked, remove from heat and set aside to cool

6

Cut the salmon so you have two uniform pieces to be wrapped in the pastry (you may need to cut one end of the salmon so you can stack the thin ends to make one thicker piece)

7

Place each piece of salmon on top of the puff pastry sheets

8

Slather the de-boned salmon with Dijon mustard, then season with Kosher salt and pepper to taste

9

Sprinkle the dill over the salmon, then add the mushroom and shallot mixture

10

Carefully wrap the salmon with the puff pastry and put on a rimmed baking sheet, seam-side down

11

Brush the puff pastry with the beaten egg and sprinkle with a little Kosher salt

12

Bake for about 30 minutes, the puff pastry should be golden brown

13

Serve immediately with sour cream on the side

Casserole/ Fish/ Vegetarian

Not Your Average Tuna Casserole

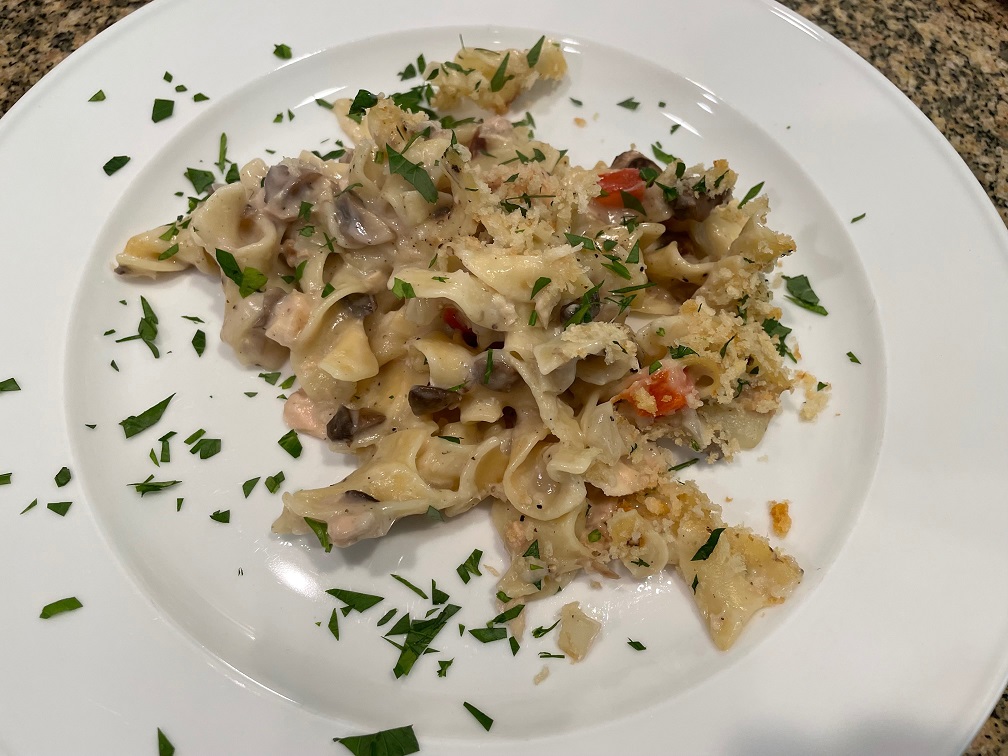
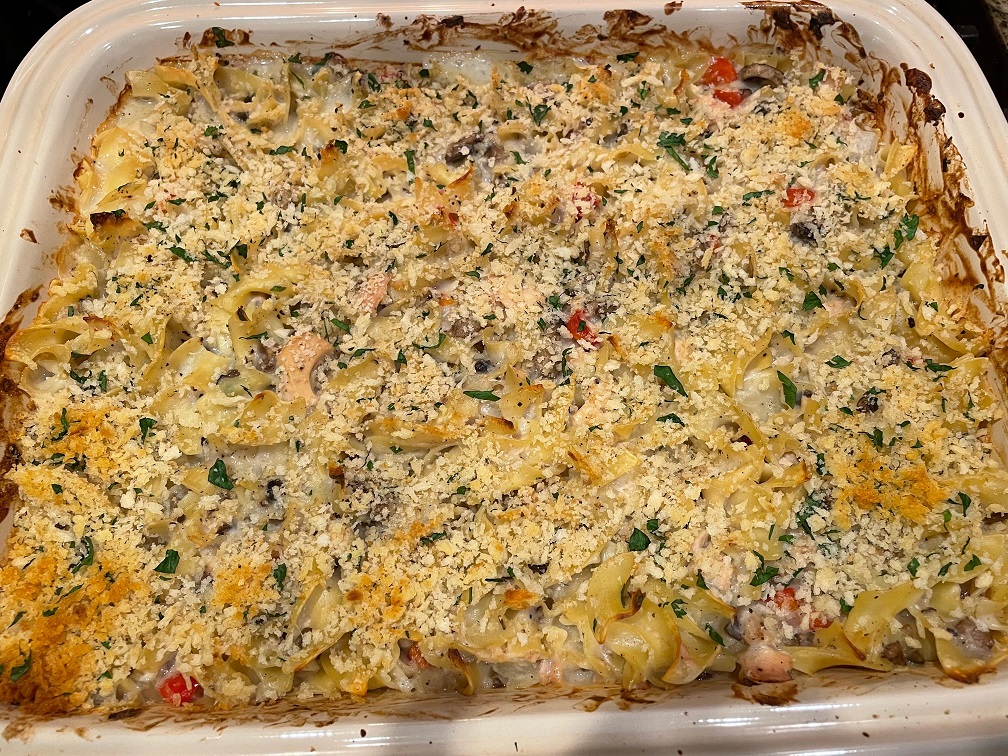
On the Menu Tonight – Not Your Average Tuna Casserole!

I really like Tuna Casserole, but it is one of those things I just don’t make very often. This version of Tuna Casserole is elevated by using fresher ingredients. For example, I didn’t use any frozen veggies or any dry herbs. Most versions I have had include peas, but I swapped them out with diced red bell pepper. Instead of using canned cream of mushroom soup, I made it.

The results were FANTASTIC! Whether you are feeding a big family, or making enough for leftovers, try my version of Tuna Casserole.

Tuna Casserole

Not Your Average Tuna Casserole

(No Ratings Yet)
By Patrick Dulmage Serves: 8-12
Prep Time: 15 minutes Cooking Time: 45 minutes Total Time: 1 hour

Not Your Average Tuna Casserole

Ingredients

  • 16 oz egg noodles
  • 3 6.4 oz cans tuna fish, drained and broken into small pieces
  • 1 diced onion
  • 3 cups whole milk (2% is OK, but don't go below 2% fat), warmed or room temp
  • 8 Tbsp butter
  • 6-8 oz mushrooms, finely chopped (White button or Cremini)
  • 1/4 cup flour
  • Kosher salt and freshly ground pepper
  • 1/2 cup panko bread crumbs
  • 2 Tbsp parsley, finely chopped

Instructions

1

Pre-heat oven to 400 degrees

2

Boil the egg noodles according to pkg directions, drain and set aside

3

Pre-heat large skillet over medium-high heat

4

Add 4 Tbsp of butter to the pan along with the diced onion

5

Let the onions get translucent, then add the mushrooms and cook 2-3 more minutes

6

Add the flour and mix thoroughly to coat the onions and mushrooms

7

Slowly add the milk and whisk/mix as you go to avoid lumps

8

Season with salt and pepper

9

When the mixture thickens, add the tuna, half the chopped parsley, and red bell pepper

10

Add the egg noodles and mix to coat all the noodles

11

Transfer to a buttered baking dish (13x9)

12

Melt the remaining 4 Tbsp of butter and mix with the panko and remaining parsley

13

Top the casserole with the bread crumb mix and put in the oven

14

Bake for 25-30 minutes

15

Let it rest for about 5 minutes before serving

Notes

If you mix the noodles with the creamy tuna mixture and it looks like you need more liquid, add a can of cream of mushroom soup with a little additional milk.

Fish/ Vegetarian

Tuna Steaks with Tomato Basil and Garlic Sauce

On the menu tonight – Tuna Steaks with Tomato Basil and Garlic Sauce.

This dish was literally born from trying to figure out what to have for dinner AND use up stuff in our fridge/pantry. We had some tuna steaks we wanted to use, and we didn’t want to do what we usually do – olive oil, salt, pepper, then grill. Nothing wrong with that, it’s delicious. BUT, it isn’t as delicious as what I made tonight.

From start to finish, there was about 30 minutes invested, including prep time. You can’t order anything healthier and tastier that will get to your door in 30 minutes or less. We LOVED it!

Check out the recipe for all the ingredients, but there isn’t much to do other than zest the lemon and chop the ingredients for the sauce.

I hope you will try this recipe the next time you are in the mood for fish or trying to figure what to make quickly.

Tuna Steaks with Tomato Basil and Garlic Sauce

(No Ratings Yet)
By Patrick Dulmage Serves: 4

Tuna Steaks with Tomato Basil and Garlic Sauce

Ingredients

  • 4 (1 inch) Tuna Steaks
  • 4-6 Tbsp olive oil
  • 1 lemon, zested and juiced
  • 1 tbsp Thyme
  • 1 handful fresh parsley, finely chopped
  • 2-3 plum tomatoes, diced
  • 1/2 cup fresh basil, finely chopped
  • 1/2 medium red onion, finely chopped
  • 2-3 cloves garlic, minced
  • Kosher salt
  • Freshly ground pepper

Instructions

1

Pre-heat a grill pan on high OR pre-heat grill to high

2

In a medium bowl, add the olive oil, lemon zest, juice, parsley, tomato, basil, thyme, onion, and garlic. Mix to combine and let sit at least 10 minutes

3

Brush the tuna steaks with olive oil, then season with salt and pepper

4

Put the tuna steaks on the grill, about 2 minutes on each side. You should see a line where the tuna is cooked. If you want rare (preferred), you want to see a cooked line about a quarter way up the steak, then flip to achieve the same cook on the other side

5

Once cooked to your preference, plate and top with the sauce you made

6

Serve immediately