Browsing Category

Beef

Beef

Beef and Cheese Enchiladas with Habanero, Poblano, andJalapeno Peppers

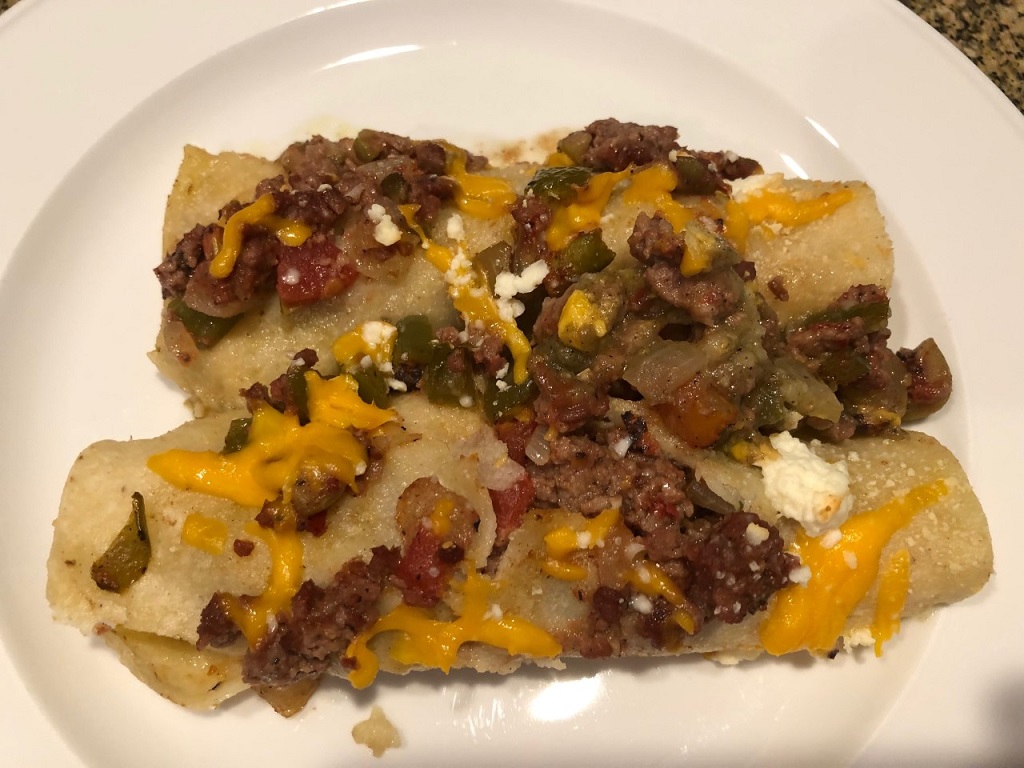
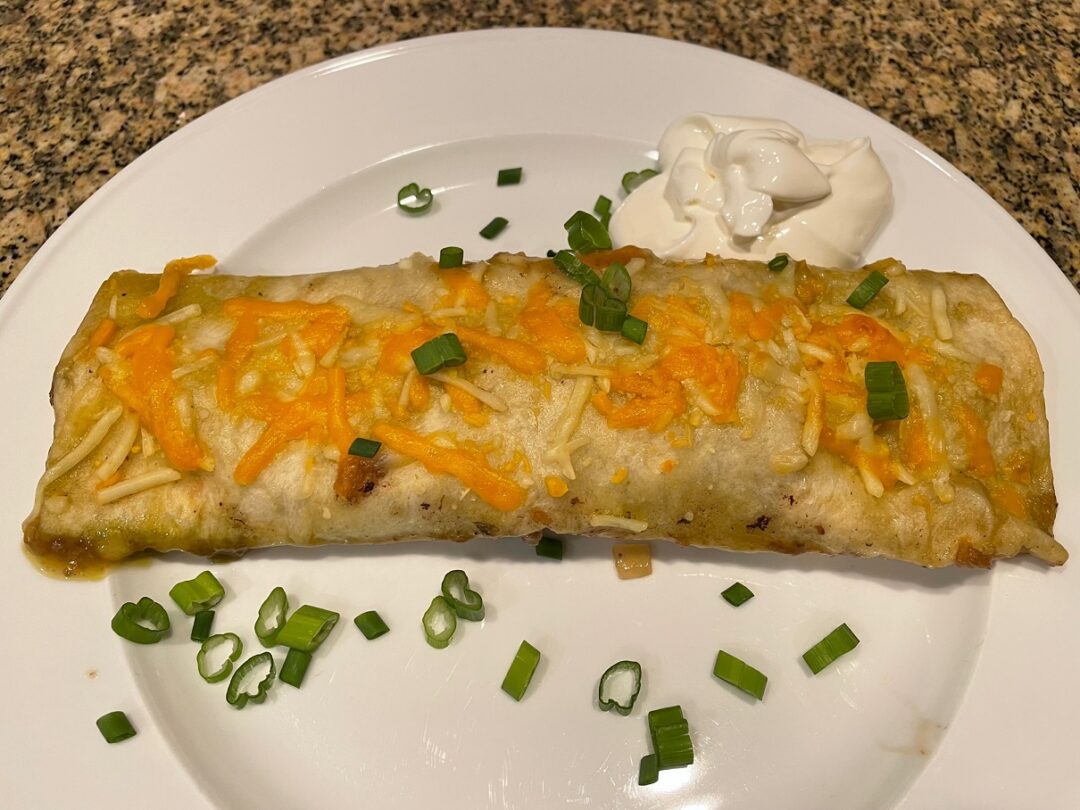
On the menu tonight – Beef and Cheese Enchiladas with Jalapeno Peppers!

Full disclosure, there were mistakes made in the process of making this dish, but it turned out really well. One of the best lessons you can learn in cooking is how to pivot and adapt when you make a mistake or realize after you started that you don’t have a particular ingredient.

In my case, I accidentally grabbed a can of green enchilada sauce rather than the red sauce. I decided to go with it and see what happens. I guarantee that if you walked in as I pulled these enchiladas from the oven you wouldn’t turn your nose up because they have green enchilada sauce. I was doing a happy dance when I tasted them.

Another important lesson in cooking is learning how to use what you have on hand. I had a lot of peppers on hand, and I knew they would be perfect in enchiladas, so in they went! In this case, I had a habanero, a poblano, and some canned diced jalapeno. The flavors were fantastic! Since I de-seeded the habanero, they won’t melt your face. Poblano peppers are pretty big, so I only used about a quarter of it with one pound of meat. Despite all the peppers, it wasn’t overly spicy.

Once I sautéed the onions and peppers, I added the ground beef and browned it. The entire cooking time on the stove was about 15 minutes and another 5-10 minutes for assembly. There wasn’t anything complicated about this dish and it tastes as good or better than anything I’ve had at a Mexican restaurant.

I hope the next time you are in the mood for enchiladas, I hope you will try my version of Beef Enchiladas!

Beef Enchiladas

Beef Enchiladas with Jalapeno Peppers

1 Star2 Stars3 Stars4 Stars5 Stars (No Ratings Yet)
Loading...
Dinner Mexican
By Patrick Dulmage Serves: 4-6

Beef Enchiladas with Jalapeno Peppers

Ingredients

  • 1 lb ground beef
  • 1 medium Vidalia onion, diced
  • 2 oz diced jalapeno peppers (I had some left over canned diced jalapeno)
  • 1/4 poblano pepper, diced
  • 1 habanero pepper, seeded and finely chopped
  • 4 cloves garlic, finely chopped
  • 4 large corn or flour tortillas
  • 1 28 oz can red or green enchilada sauce
  • 1 cup beef broth
  • 3 cups grated cheddar cheese or cheddar/Monterrey jack mix
  • 1 Tbsp olive oil
  • 1 Tbsp flour
  • Kosher Salt and freshly ground pepper

Instructions

1

Pre-heat oven to 375 degrees

2

In a large skillet, add the olive oil, onions, and peppers

3

Cook about 5 minutes until the onions are translucent

4

Add the ground beef, break it up and brown with the onions and peppers

5

Season with salt and pepper

6

Once the ground beef is browned, about 5 minutes, add the flour and cook an additional 2 minutes

7

Add the beef stock, mix to combine, and let the sauce reduce and thicken

8

Add the garlic and continue to cook another 2-3 minutes

9

Cut the heat on the meat mixture and set aside

10

In another pan, or put the meat mixture in a bowl and use the same large skillet for the enchilada sauce

11

Add the enchilada sauce and heat over medium heat

12

Get a 13x9 baking dish

13

Cover the bottom of the baking dish with a light coating of the heated enchilada sauce

14

Dip the tortillas in the enchilada sauce and put in the baking dish

15

Spoon the meat mixture in a line on the tortilla in the center... ish

16

Sprinkle some of the grated cheese on top of the meat mixture

17

Tightly roll the enchilada and then repeat with the rest of the tortillas, meat, and cheese

18

Once all the tortillas are filled, sprinkle a little cheese on top (This isn't the time to smother them in cheese)

19

If you have any meat mixture left over, evenly distribute it on the sides and/or ends of the enchiladas

20

Bake for 20-25 minutes

21

After they bake, take out the enchiladas and let rest for at least 5-10 minutes before serving

Beef

New York Strip – Sous Vide with Mashed Potatoes

On the menu tonight – Sous Vide New York Strip!

What in the world is Sous Vide (pronounced Soo Veed)?

Sous Vide cooking is the process of sealing food in an airtight container —usually a vacuum sealed bag—and then cooking that food in temperature-controlled water. The only special equipment you HAVE to have is the sous vide cooker, which can be had for around a hundred bucks. While you can cook the food in ziplock type bags (and I have done that a LOT), it’s better if you get a vacuum sealer to seal the food in that. A vacuum sealer can be used for a lot of things, so it wouldn’t be a uni-tasker (as Alton Brown would say). Here’s a link with some pictures of the cooker.

Back to the steak! This dish is top shelf worthy, I’m not kidding, but it isn’t something you will whip up in 30 minutes. If I want a steak, I will plan at least a week out. I’ll start by doing a dry age in the fridge. The day of the cook, I’ll bring the steak to room temperature (do this no matter what method you plan to cook your meat) and then season with Kosher salt and freshly cracked pepper. That’s it, nothing else. Maybe, sometimes, hardly ever, I’ll put a sprig of fresh rosemary and/or thyme in the sous vide bag. If you plan to marinade the steak, sous vide is awesome! By vacuum sealing the meat with the marinade, it gets that flavor in quicker.

Cooking sous vide, you put that vacuum sealed bag in a vessel of water (it could be anything that will hold enough water and be able to clamp the cooker to a side. It cooks at a precise temperature and will never rise above that temp. SO, whatever temperature you like your steak, set it to that temp and BOOM! Your steak will come out PERFECT every time. Here’s the best part. Since the temp never rises above the desired temp, you can set it to cook at a certain time (of course allowing time for the cook) and you can stop it when you’re ready. With a steak, you probably don’t want it to cook more than about 2 hrs beyond the finish time, but that’s a BIG window to work with.

But there is one more step after you take it out of the bag. Since the steak has been cooking in the bag, it doesn’t have that beautiful sear. You will need to finish it either on the grill or in a cast iron pan. I like to fire up the grill as hot as I can get it, then I’ll sear the steak on each side for about a minute – that’s it! It is already perfectly cooked, so the only thing you need to do on the grill or pan is get the sear you want. If you decide to sear it in a pan, you can do it with butter and the thyme and/or rosemary while basting it. When I grill it, I’ll sometimes put a pat of compound garlic butter on it after it comes off the grill.

I keep talking about steak, but there are a BUNCH of things you can do with a sous vide cooker. I invite you to do some googling for some of the many things you can do with it. You want perfectly cooked chicken? Sous vide! Again, it has to be finished after or else you end up with very flabby, soggy, undesirable skin. SO, you could sous vide the chicken to not quite done and then finish it in the fryer, without worrying whether the chicken is cooked through.

I hope you’ll explore the world of sous vide cooking. Let me know what YOU make.

New York Strip - Sous Vide

1 Star2 Stars3 Stars4 Stars5 Stars (No Ratings Yet)
Loading...
By Patrick Dulmage Serves: 1
Prep Time: 1 week Cooking Time: 1 hr 20 minutes Total Time: 1 week 1 hr 20 min

New York Strip - Sous Vide with mashed potatoes

Ingredients

  • 16-20 New York Strip steak
  • Kosher salt
  • Freshly ground black pepper
  • Mashed Potatoes:
  • 1.5 - 2 lbs Yukon Gold potatoes, quartered
  • 1/4 cup whole milk
  • 1/2 stick butter
  • 4 oz cream cheese, cubed
  • Kosher salt
  • Freshly ground black pepper
  • Compound Butter:
  • 1/2-1 stick of butter, room temperature
  • 1 garlic clove, minced through garlic press
  • 1 tsp Kosher salt

Instructions

1

The Dry Age:

2

When you get the steak home from the store, remove it from it's wrapper and pat it dry

3

Put the steak on a plate, uncovered

4

Every day, turn the steak and pat both sides dry (you could also put the steak on a wire rack to allow airflow on both sides)

5

Cook Day:

6

Season the steak with Kosher salt and freshly ground pepper

7

Seal the steak in the vacuum bag (if you don't have a vacuum sealer, you can use a good quality re-seal-able bag. Consider double bagging)

8

Set up the sous vide cooker including vessel with water

9

Add the sealed steak to the vessel and set the temperature to your preference of "doneness", I like my steak medium rare and I set it at 129 degrees. Below is chart of the various levels of cook

10

Medium rare 125° F to 130° F 1-4 hours

11

Medium 135° F to 140° F 1-4 hours

12

Medium well 145° F to 150° F 1-3 1/2 hours

13

Well done 160° F and above 1-3 hours

14

While the steak is cooking, you can start on the mashed potatoes. Boil the quartered potatoes until fork tender

15

Drain the potatoes and put back in the pot

16

Add the butter, cream cheese, milk, salt, pepper, and mash

17

Taste and adjust seasoning as needed

18

For the compound butter, mix together the butter, garlic, and salt, then refrigerate

19

Pre-heat the grill or cast iron pan to high

20

Take the steak out of the bag, pat dry

21

Put on the grill and let it sear for 30 - 45 seconds, then give it a quarter turn for the cross-hatch grill marks

22

After it has cooked another 30 seconds, flip and repeat the process for the other side

23

Plate the steak with the potatoes and add a pat of the butter on top of the steak

Notes

I know not everyone is going to dry age their steak, but DO give it a try At the very least, when you get the steak home from the store, take it out of that pack with the "diaper" underneath it. If you plan to cook the steak that night, pat it dry and put it on a plate in the fridge uncovered. It sounds counter-intuitive, but the steak will be juicier. If you aren't going to cook the steak the day you bring it home, pat it dry and re-wrap as tightly as you can with saran-wrap and put in fridge or freezer.

Beef/ Pork

Meatloaf with Beef, Veal, and Pork

On the menu tonight – Meatloaf with Beef, Veal, and Pork!

Meatloaf is kind of like chili in that it is always a little different each time you make it. This time, I used beef, Veal, and Pork. Feel free to use all beef or any two of the three meats. I like the flavor and texture you get from using three types of meat.

Once the meatloaf has finished baking, let it rest for at least 10 minutes. Serve it with mashed potatoes and you are living large! If you have any leftovers, it would make fantastic sandwiches. So, the next time you decide to make meatloaf, I hope you will try my version.

Meatloaf with Beef, Veal, and Pork

1 Star2 Stars3 Stars4 Stars5 Stars (No Ratings Yet)
Loading...
By Patrick Dulmage Serves: 8-10

Meatloaf with Beef, Veal, and Pork

Ingredients

  • 1 lb Beef, ground
  • 1 lb Veal, ground
  • 1 lb Pork, ground
  • 1/2 green bell pepper
  • 1/2 medium Vidalia onion
  • 1/2 cup parsley, chopped
  • 2 cloves, minced
  • 1tsp thyme, dried
  • 1/4 cup BBQ sauce
  • 2 Tbsp whole milk
  • 2 eggs, beaten
  • 1 cup Italian breadcrumbs
  • 1 Tbsp Worcestershire sauce
  • 1/4 cup ketchup
  • 1 Tbsp Kosher salt
  • 1 Tbsp freshly ground pepper

Instructions

1

Pre-heat oven to 350 degrees

2

In a large mixing bowl, add everything except for the ketchup

3

Gently fold the ingredients together to combine

4

On a rimmed sheet pan, form the meat into a loaf shape

5

Brush on the ketchup and then put it in oven

6

Bake for 40 minutes

7

When the timer goes off, pull it from the oven and let it rest for at least 10 minutes before serving

Beef

Classic Beef Stroganoff

On the menu tonight – Beef Stroganoff!

I love beef stroganoff. I love the fall apart goodness of the beef and the buttery noodles along with the creaminess from the sour cream and cream cheese. DELICIOUS!

This is one of those dishes that has been around forever and made a thousand ways. When I made this, I wanted to make the version I remember as a kid. I think I came pretty close. The next time you want Beef Stroganoff, I hope you will try my version.

Beef Stroganoff

1 Star2 Stars3 Stars4 Stars5 Stars (No Ratings Yet)
Loading...
By Patrick Dulmage Serves: 6-8
Prep Time: 15 minutes Cooking Time: 3 hours 15 minutes Total Time: 3 hours 30 minutes

Beef Stroganoff

Ingredients

  • 2 lbs beef, 2" cubes (chuck roast or whatever cut you would use for stew)
  • 1 stick of butter, divided
  • 1 Tbsp canola oil
  • 1-2 bay leaves
  • 1 medium Vidalia onion, sliced
  • 2 cups cremini mushrooms, sliced
  • 2 cups beef broth
  • 2-3 cloves garlic, minced
  • 2 Tbsp soy sauce
  • 1 Tbsp dry thyme
  • 2 Tbsp grainy or honey mustard
  • 16 oz extra-wide egg noodles
  • 1 cup sour cream
  • 4 oz cream cheese, cubed
  • Kosher salt, to taste
  • Pepper, to taste
  • 1/2 cup parsley, chopped

Instructions

1

Pre-heat a large Dutch oven over medium-high heat

2

Add the canola oil and 2 tablespoons of butter

3

Cook the meat in batches to get each side browned (you want a nice little crust on each piece)

4

Set aside the cooked meat

5

Once all the meat is cooked, add the sliced onions and mushrooms

6

Cook for about 8 minutes until the onions are translucent

7

Add the meat, beef stock, soy sauce, mustard, thyme, garlic (I intentionally put the garlic in later to ensure it doesn't burn), and the bay leaf

8

Bring to a simmer and let it cook for 3 hours

9

Bring a large pot of water to a boil

10

Heavily salt the water and add the noodles

11

Once the noodles are cooked, drain and add back to the pot with the rest of the butter

12

Mix the butter into the noodles

13

Add the sour cream, cream cheese, and half the chopped parsley to the meat and stir to incorporate

14

Season with salt and pepper to taste

15

For serving, put a bed of noodles on a plate, then ladle on the stroganoff mixture on top of the noodles

16

Sprinkle with a little more chopped parsley and serve

Beef/ Pork

Stuffed Cabbage – A Second Look

On the menu tonight – Stuffed Cabbage!

It’s that time of year again to make stuffed cabbage. I decided to try a little bit different version this time. While very similar to what I made last time, I used a few new ingredients, one of them was Cognac.

I usually bake this in a baking dish, but this time I did it in a Dutch oven in layers. Either way works fine, so use whichever method you prefer. There isn’t anything difficult about this dish, but getting that perfect cabbage leaf and meat mixture to roll pretty can be a little challenging. The good news is, it is going to get covered with sauce, so if it isn’t perfectly rolled it’s OK.

Stuffed Cabbage

Stuffed cabbage always brings me back to my grandmother’s place. I love sweet and sour tomato sauce, the sour from the red wine vinegar and the sweet from the brown sugar and raisins. As far as comfort food goes, this ranks right up there with meatloaf and mashed potatoes with gravy.

I hope you’ll make a batch of stuffed cabbage and let me know how your version turns out!

Stuffed Cabbage - A Second Look

1 Star2 Stars3 Stars4 Stars5 Stars (1 votes, average: 5.00 out of 5)
Loading...
By Patrick Dulmage Serves: 8-10
Prep Time: 30 minutes Cooking Time: 1 hour 30 minutes Total Time: 2 hours

Stuffed Cabbage - A Second Look

Ingredients

  • 1-2 Heads of cabbage, boiled and leaves separated
  • Filling:
  • 1 lb ground beef
  • 1 lb ground pork
  • 1 onions, grated
  • 2 cloves garlic, minced
  • 1 Tbsp Cognac or Brandy
  • 1/2 cup cooked white rice (leftover Chinese food rice works great)
  • 1 cup bread crumbs
  • 1/2 cup whole milk
  • 1 tsp finely chopped thyme
  • 1/4 tsp ground nutmeg
  • 1 tsp parsley
  • 1 1/2 tsp Kosher salt
  • 1 tsp white pepper
  • 1 tsp freshly ground black pepper
  • Sauce:
  • 1 onion finely chopped
  • 2 28 oz cans crushed tomatoes
  • 1 14 oz can tomato sauce
  • 1/4 cup red wine vinegar
  • 1/2 cup raisins (white or red)
  • 3 Tbsp Cognac or Brandy
  • 2 cloves garlic, finely chopped
  • 1 tsp red pepper flakes
  • 1 tsp oregano
  • 2 Tbsp freshly chopped parsley
  • 1 1/2 tsp Kosher salt
  • 1 tsp freshly ground black pepper

Instructions

1

Core the head(s) of cabbage

2

Boil the cabbage about 5-7 minutes

3

As it cooks, carefully remove the outer leaves and set aside to cool (You want leaves that are pliable but not falling apart)

4

Once the leaves are cool enough to work with, cut the tough rib from each each leaf

5

For the filling:

6

In a large mixing bowl, add the ground beef, ground pork, scrambled eggs, seasonings, Cognac, bread crumbs, rice, and gently combine and set aside

7

For the sauce:

8

Heat a large pot over medium-high heat

9

Add the olive oil and onion, then cook for about 8 minutes

10

Add the Cognac and let the alcohol cook off

11

Add the crushed tomatoes, tomato sauce, garlic, red pepper flakes, parsley, oregano, salt and pepper

12

Bring to a boil, and then reduce to a simmer

13

Simmer for about 30 minutes

14

Assembly:

15

Pre-heat the oven to 350 degrees

16

After the sauce is finished, take 1 cup of it and add it to the meat mixture and give it one last gentle mix

17

In a 13x9 baking dish or large Dutch oven, put a few cabbage leaves on the bottom, then add a layer of sauce

18

On your work surface, lay out 1-2 cabbage leaves and add about a 1/2 cup of meat mixture and roll like you would a burrito

19

Repeat until you've used up all the meat

20

If you have more than one layer of cabbage rolls, cover the first layer with sauce before starting the next layer

21

Cover the cabbage rolls with sauce, then cover the baking dish/Dutch oven and bake for 1 hour

22

Once cooked, serve hot. I've seen some people garnish with a dollop of sour cream. Try it - it's DELICIOUS!

Beef/ Italian/ Pork/ Sauces

Meatballs and Sauce aka Sunday Gravy

On the menu tonight – Meatballs and Sauce!

I just got back from a trip to Boston and one of the places I had to eat was the North End. There are SO many great Italian places to eat there. One of the places we went served a big meatball and sauce as an appetizer. As many Italian places I’ve eaten over the years, this is the first time I can recall seeing just a meatball and sauce as an appetizer.

This was one of the most tender meatballs I’ve had. The sauce that the meatballs were cooked in was incredible. I decided to try to replicate this incredible dish at home. It honestly wasn’t as good as what I had in Boston, BUT it was still AMAZING!

For the meatballs, I used pork and beef. I think the restaurant in Boston used pork, beef, and veal. I ever-so gently mixed all the meatball ingredients in a large bowl. If you over-mix the ingredients, you get a firm meatball – be gentle.

The sauce – When I decided to make this, I wanted the sauce to cook a few hours on low. It will be ready to eat in about 45 minutes, but I let it sit on low for a couple of hours – the house will smell amazing.

Serve the meatballs and sauce either by themselves, over pasta… OR you could make the BEST ever meatball subs. Don’t forget the garlic bread! You need garlic bread to sop up every bit of that lovely sauce. Mangia!

Meatballs and Sauce

1 Star2 Stars3 Stars4 Stars5 Stars (No Ratings Yet)
Loading...
By Patrick Dulmage Serves: 10-12

Meatballs and Sauce

Ingredients

  • The Meatballs:
  • 2 lbs ground beef (80/20)
  • 1 lb ground pork
  • 2 large eggs, beaten
  • 1 cup Pecorino Romano
  • 4 cloves garlic, minced
  • 1 cup Italian bread crumbs
  • 1 cup Milk
  • 1 cup Fresh Parsley, finely chopped
  • 1 Tbsp Onion Powder
  • 1 Tbsp Granulated Garlic
  • 1 Tbsp Oregano
  • 2 Tbsp Olive Oil for browning
  • The Sauce:
  • 2 28oz cans Crushed Tomatoes
  • 2 Tbsp Olive Oil
  • 1 Onion, finely chopped
  • 3-4 bay leaves
  • 1/2 bunch Parsley, finely chopped
  • 1 Tbsp Red Pepper flakes
  • Salt and Pepper to taste
  • 6-8 Basil leaves, torn into little pieces or chiffonaded

Instructions

1

Pre-heat, over medium heat, a large dutch oven or heavy pot that will hold all the sauce and the meatball

2

In a large bowl, gently mix all the ingredients for the meat balls - don't over work the mixture

3

Form the meatballs into 1 1/2 - 2 inch balls

4

Brown the meatballs in batches and set aside

5

In the same pot, add some additional olive oil, the chopped onion, red pepper flakes, and cook until translucent - about 4-5 minutes

6

Add the garlic and cook for about a minute, then add the crushed tomatoes, bay leaves, and parsley

7

Season with salt and pepper

8

Bring the sauce to a boil, then reduce to low

9

If you want a really smooth sauce use an immersion blender or blender

10

Add the meatballs and simmer at least 45 minutes.

11

When it is time to serve, add the basil and give it a gentle mix

12

If you haven't already, remove the bay leaves

Beef/ Pork/ Sauces

Bacon Jam with Classic Hamburger

On the menu tonight – Bacon Jam! I’ve seen bacon jam included in a lot of hamburger recipes I have seen on Food Network. It always looks so good, I decided to make some. It was SO GOOD!

Start with about 2 pounds of your favorite bacon by cooking it until crispy. Once it has cooled enough to touch, chop it into relatively small pieces.

Then, add the chopped bacon and the rest of the other ingredients back to the same pan you cooked the bacon. Bring to a boil, then reduce to a simmer for about 45 minutes.

Since I saw it served over a hamburger, that’s what made – a Classic Hamburger. All I had on that burger was the bacon jam, a little lettuce, a few pickles, and it was fantastic.

If you want to serve something a little different and a LOT delicious, make a batch of bacon jam. Let me know how it turns out.

Bacon Jam with Classic Hamburger

1 Star2 Stars3 Stars4 Stars5 Stars (No Ratings Yet)
Loading...
By Patrick Dulmage Serves: 8-12

Bacon Jam with Classic Hamburger

Ingredients

  • 2 lbs cooked and chopped bacon
  • 1 Red onion - chopped
  • 3 cloves Garlic - minced
  • 1/2 cup Molasses
  • 1/2 cup Brown sugar
  • 1/2 cup Honey
  • 1/4 cup Apple Cider Vinegar
  • 1/4 cup Sherry Wine
  • 1 tsp Dry Mustard
  • 2 tsp Garlic Powder

Instructions

1

Cook the bacon until crispy and set aside, reserve about 2 tbsp of the grease for cooking the onion and garlic

2

Add the chopped bacon, onions, garlic, brown sugar, molasses, honey, apple cider vinegar, sherry, and dry mustard to the pan

3

Bring to a boil and then reduce to a simmer

4

Simmer until it gets syrupy, about 45 minutes

5

Stir frequently, don't let it burn

6

Once it is the consistency you want, transfer to a container, let cool, and store in the fridge

7

Serve over hamburgers, hotdogs, anything you want to add bacony goodness to

Beef/ Italian

Stuffed Shells with Ground Beef and Mushrooms

It’s kind of rainy today and I decided to make a comforting pasta dish – Stuffed Shells with Ground Beef and Mushrooms!

There isn’t anything difficult about making this dish, but there are a few steps. You have to brown the ground beef, cooked with onions and mushrooms, then set it aside to cool off. Then, make the cheese mixture with ricotta, Parmesan, and mozzarella along with garlic, basil, and Italian parsley. Mix the meat and cheese mixtures together. Then, cook the pasta shells and let those cool off.

With all the components prepared, it’s time to assemble. Get a 13×9 baking dish and add about a cup of the marinara sauce. Then, start assembling the shells. Take a spoonful of the meat and cheese mixture and carefully fill the shells to fill up the baking dish. Finally, top the shells with some more marinara sauce and some mozzarella cheese. Bake it until the cheese is bubbly and golden brown. Serve it with some garlic bread – enjoy!

Hopefully, you’ll have some leftovers for your lunch during the week. Let me know how your version turns out.

Stuffed Shells with Ground Beef and Mushrooms

1 Star2 Stars3 Stars4 Stars5 Stars (No Ratings Yet)
Loading...
By Patrick Dulmage Serves: 6-8
Prep Time: 20 minutes Cooking Time: 45 minutes Total Time: 1 hour

Stuffed Shells with Ground Beef and Mushrooms

Ingredients

  • 1 lb ground beef
  • 1 box large pasta shells
  • 15 oz ricotta cheese
  • 4-6 oz sliced cremini mushrooms
  • 3 cups grated mozzarella cheese
  • 1 cup Parmesan cheese, grated
  • 1 medium onion, chopped
  • 3 Tbsp freshly chopped Italian parsley
  • 1 Tbsp freshly ripped basil (dry will do if you don't have fresh)
  • 2-3 cloves garlic, minced
  • 3 cups marinara sauce
  • Kosher salt and pepper to taste

Instructions

1

Pre-heat a large skillet over medium-high heat

2

Brown the ground beef and season with salt and pepper

3

Add the onions and mushrooms, cook until the onions are translucent

4

Set the beef mixture aside to cool

5

Pre-heat the oven to 350 degrees and bring a large pot of water to a boil

6

In a large mixing bowl, add the ricotta, parsley, basil, garlic, the Parmesan cheese, about half the mozzarella cheese, stir to combine

7

Once the water comes to a boil, add the shells and cook to aldente. The shells need to be firm enough for you to stuff without them falling apart

8

Add the meat mixture to cheese mixture, stir to combine

9

In a 13x9 baking dish, put in about a cup of marina

10

Once the shells have finished cooking, remove from the water and let cool

11

Start filling the shells with the meat and cheese mixture and add the shells to the baking dish

12

Once all the shells are stuffed, top with marinara and the rest of the mozzarella cheese

13

Bake until the cheese is golden brown

Beef

Ground Beef Enchiladas with Olives and Cheddar Cheese

On the menu tonight, Ground Beef Enchiladas. I’ve made enchiladas before but these are different in that I didn’t use a lot of sauce on top. I also added olives, which I don’t normally use, but it turned out delicious. Other enchilada dishes I have made used flour tortillas, but I used corn tortillas in this dish. The taste and texture changes were really nice.

Unlike a lot of enchiladas I’ve had, this one has a lot of veggies with the meat. I mentioned the olives but there are also onions and green bell pepper. This isn’t a spicy dish, but you could easily add a little cayenne pepper and or jalapeno (or hotter) peppers to give it some heat. The most interesting change I made was adding Chinese 5 spice. WHAT?? In enchiladas?? Yes! It was so good.

If you don’t eat meat, you could easily substitute the ground beef with Impossible burger. I hope the next time you are in the mood for enchiladas, you will try my version.

Ground Beef Enchiladas with Olives and Cheddar Cheese

Ground Beef Enchiladas with Olives and Cheddar Cheese

1 Star2 Stars3 Stars4 Stars5 Stars (No Ratings Yet)
Loading...
By Patrick Dulmage Serves: 4-6
Prep Time: 15 minutes Cooking Time: 30 minutes Total Time: 45 minutes

Ground Beef Enchiladas with Olives and Cheddar Cheese

Ingredients

  • 1 lb ground beef
  • 1 green bell pepper, diced
  • 1 small Vidalia onion, diced
  • 1 14 oz can crushed tomatoes
  • 1 tsp Chinese 5-spice powder
  • 1/4 cup green olives, chopped
  • 12 6" corn tortillas
  • 2 cups medium cheddar cheese, grated
  • 1 cup Cotija cheese, crumbled
  • Kosher salt and pepper to taste
  • 2-3 Tbsp olive oil

Instructions

1

Pre-heat the oven to 350 degrees

2

Pre-heat a large skillet with a little olive oil over medium-high heat

3

Add the onion and bell pepper to the pan and season with a little salt and pepper

4

Cook until the onions are translucent, about 5 minutes

5

Add the ground beef and season it with the 5-spice powder along with salt and pepper

6

Break up the ground beef and let it carmelize, another 5-10 minutes

7

Add the tomatoes and olives to the pan, stir to combine

8

Cook another 2-3 minutes and taste for seasoning

9

Remove and set aside

10

Heat some more oil in the pan and heat the tortillas on each side - 10-15 seconds per side

11

Place the cooked tortillas on a lined plate to absorb any excess oil

12

In a 13x9 baking dish, put down some of the meat mixture, about 1/2 cup

13

Start assembling the enchiladas. Put about 1/4 cup of mixture in the middle of tortilla along with a sprinkle of cheese

14

Roll the filled tortilla tightly and put in the baking dish seam-side down

15

Repeat until you've used all the tortillas and top the entire baking dish with some additional cheddar and Cotija cheese

16

Bake for 15-20 minutes until the cheese melts

17

Serve with some sour cream, salsa, and maybe some home-made guacamole

Beef

Cheeseburger Empanadas with Special Sauce

I decided to make empanadas again, who doesn’t love a fried meat pie? This time, I went with Cheesburger Empanadas with “Special Sauce”. The special sauce is equal parts ketchup, mustard, and mayonnaise. For the meat, I used Impossible burger instead of ground beef, but either will work fine – the cooking technique is the same for both.

While it isn’t too difficult a dish to make, there is some preparation. As always, it’s a good idea to have everything organized before you start – especially with this recipe. Once you start frying the pies, you won’t have a lot of time to do other things. You’ll want to watch the ones you have in the oil so they don’t burn.

I hope you will make these empanadas. They would be perfect for a picnic or party.

Cheeseburger Empanadas with Special Sauce

1 Star2 Stars3 Stars4 Stars5 Stars (No Ratings Yet)
Loading...
By Patrick Dulmage Serves: 4-6

Cheeseburger Empanadas with Special Sauce

Ingredients

  • 1/2 cup ketchup
  • 1/2 cup mustard
  • 1/2 cup mayonnaise
  • 1/2 cup chopped pickles
  • 1 lb ground beef or Impossible burger
  • Kosher salt and pepper
  • 1 medium onion, finely diced
  • 8 slices American cheese, chopped
  • 1 egg, beaten
  • 1 pkg empanada wrappers or 1 pkg puff pastry
  • 1 quart oil for frying if using empanada wrappers

Instructions

1

If using puff pastry, pre-heat oven to 425 degrees / if using empanada wrappers, pre-heat the oil to 350 degrees in a dutch oven

2

In a mixing bowl, combine the ketchup, mustard, mayo, and chopped pickles, season with salt and pepper

3

In a large skillet over medium heat, add the onion and cook until translucent, about 3 minutes

4

Add the ground beef or Impossible burger, season with salt and pepper

5

Break apart the meat as it cooks, you want small crumbles

6

Once the meat is lightly browned, transfer to a mixing bowl

7

Let the meat and onions cool, then mix in about a 1/3 of the "special sauce" and the cheese

8

Prepare the empanada wrappers or puff pastry for filling. If using puff pastry, roll out the puff pastry and cut into 4 inch circles. Get a platter ready for the pre-cooked empanadas

9

Fill each wrapper with about 1-2 tablespoons of your meat/onion/cheese filling and a pinch of the chopped pickles

10

Wet the edges of the empanada with the beaten egg and fold over to seal the filling in

11

Try to press out any air near the filling, working your way out to the edges, then seal with a fork

12

Once you have the empanadas prepared, start frying them (or put in the oven if using puff pastry)

13

If frying, gently lower them into the oil with a spider

14

Once they are golden brown, remove to a wire rack or lined platter to drain