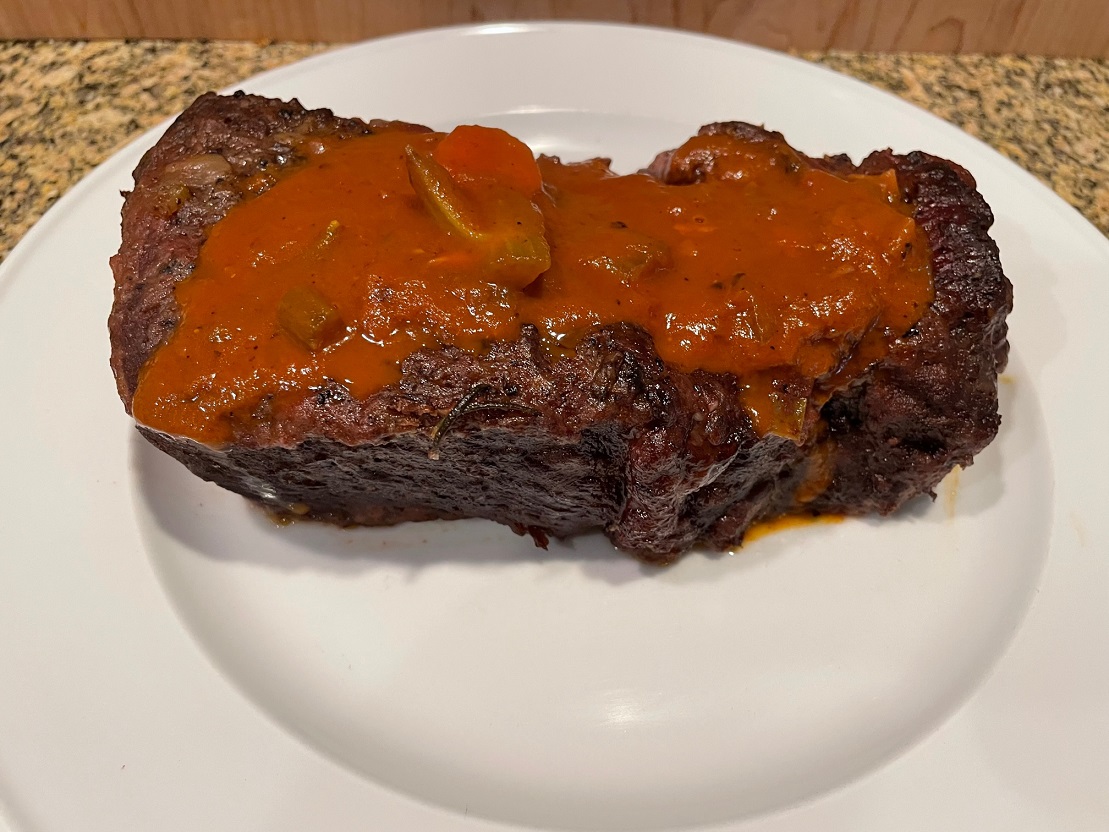
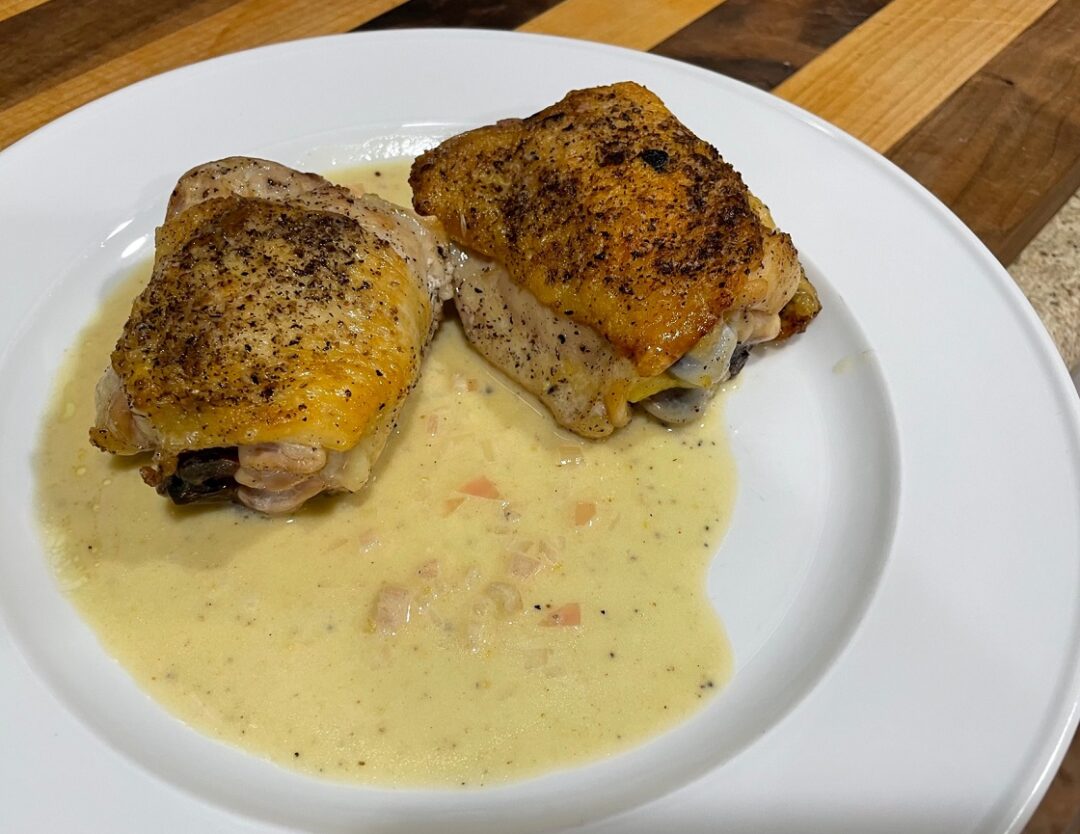
All Posts By:

patrickdulmage

Breakfast

Matzo Brie Two Ways

On the Menu this Morning – Mazto Brie!

What is Matzo Brie / Matzah Brie? In short, it’s literally fried matzo. A breakfast dish served during Passover. I like it so much, it’s a regular breakfast in my house. You can read all about Matzo/Matzah here.

Traditionally, the matzo is moistened a bit with water, then fried in butter to get it toasty, then you add scrambled eggs. I should also mention there are two traditional ways to make it, sweet or savory. I’ve always had the savory, seasoned with salt. The sweet version is seasoned with sugar. Once cooked, serve it with some sour cream, apple sauce. This is where I put my spin on it.

Deciding to try something a little different, my first deviation was serving with salsa. YUM! Then, I decided to add some onions to the pan before the matzo goes in. I’ll let the onions get a little toasty first, then continue with the traditional method. This is now my go-to. Today, I decided to change it up a little more. In addition to the onions, I added some jalapeno to give it a little heat.

The second version. In addition to the Jalapeno, I also added some chopped ham. Think of it as a Spicy Matzo Brie Smothered and Chunked for you Waffle House fans. SO GOOD! If you really wanted to go nuts, you could go Smothered, Covered, and Chunked! I don’t know if would still be matzo brie at this point, but it sounds delicious.

So, the next time you can’t decide what to make for breakfast, I hope you’ll try one of my Matzo Brie versions.

Matzo Brie Smothered Covered and Chunked

1 Star2 Stars3 Stars4 Stars5 Stars (No Ratings Yet)
Loading...
By Patrick Dulmage Serves: 2
Prep Time: 5 minutes Cooking Time: 15 minutes Total Time: 20 minutes

Matzo Brie Smothered Covered and Chunked

Ingredients

  • Two pieces matzo
  • 4 Tbsp butter (don't be afraid to add more if the pan gets too dry)
  • 6 eggs, scrambled
  • 1/2 onion, diced
  • 1/2 jalapeno pepper, finely chopped
  • 2 pieces ham, chopped
  • Kosher Salt / Freshly ground pepper
  • 2 slices cheese (your choice American, Pepper Jack, or Cheddar) (optional)
  • Salsa (optional)

Instructions

1

Pre-heat a large skillet with butter

2

Add the onions, jalapeno, and ham (if you are using it)

3

Let the onions get translucent, stir, and cook a little more to get some brown bits

4

Run water over the matzo a few seconds to soften it up a little

5

Break up the mazto in the pan with the butter to get it toasty (don't be afraid to add some more butter)

6

Stir the mixture around letting the matzo get toasty

7

Add the eggs and stir to desired consistency

8

Season with salt and pepper

9

Serve immediately with Salsa on the side

Casserole/ Chicken

Classic Chicken Pot Pie

On the menu tonight, Chicken Pot Pie!

This is, hands down, my best version of Chicken Pot Pie. Many versions I’ve see and eaten use only chicken breast. My version uses a combination of chicken breast and thighs. I also took a big shortcut by using rotisserie chicken. As soon as I got it home, I took the chicken off the bone and then cubed it. I took another shortcut with the crust, I used the prepared version in the refrigerator aisle. Taking these two shortcuts makes the dish come together MUCH quicker. Quicker means you are more likely to make it.

There are quite a few spices, not too much though, in this version and I think they are what makes it so darn tasty. I hope the next time you are trying to figure out what to make for dinner, that you try this version of Chicken Pot Pie.

Classic Chicken Pot Pie

1 Star2 Stars3 Stars4 Stars5 Stars (No Ratings Yet)
Loading...
By Patrick Dulmage Serves: 12
Prep Time: 20 minutes Cooking Time: 25-30 minutes Total Time: 50 minutes

Classic Chicken Pot Pie

Ingredients

  • 1 lb cooked chicken, breast and thighs (rotisserie chicken is perfect)
  • 1 cup diced Vidalia onion
  • 1 cup diced celery
  • 1 cup diced carrot
  • 1/2 stick butter (I used salted butter)
  • 2 cloves garlic, crushed
  • 1 cup chicken broth
  • 1 - 1 1/2 cups half-and-half
  • 1/2 teaspoon Kosher salt
  • 1 tsp sage
  • 1/2 tsp freshly ground pepper
  • 1/4 tsp grounds allspice
  • 1/8 tsp ground nutmeg
  • 1/4 tsp dry mustard
  • 1/4 tsp cayenne pepper
  • 1/4-1/2 cup peas (optional)
  • Store-bought pie crust
  • 1 egg beaten, and 2-3 Tbsp water

Instructions

1

Pre-heat the oven to 425 degrees

2

Pre-heat pot over medium high heat

3

Add the butter, onion, celery, and carrot to a heavy pot and cook until soft - about 5 minutes

4

Add the garlic, cook an additional 2 minutes

5

Stir in the flour and cook until it thickens

6

Reduce the heat to low, add the broth, half-and-half, the spices - cook until thickened (if it gets too thick, add some chicken broth), cut the heat

7

Add the chicken and the peas (if using them), stir to combine

8

Add the mixture to the baking dish. Pie tin, 9x9 baking dish, or ramekins - your choice

9

Roll out the pie crust, top the mixture, and trim the crust to fit

10

Brush the crust with the egg wash and bake for 25-30 minutes or until pie crust is golden brown

11

When done, remove from the oven and let rest about 5 minutes before serving

Notes

Puff pastry would be fantastic instead of pie crust

Chicken/ Soup

Coconut Curry Chicken Soup

On the Menu Tonight – Coconut Curry Chicken Soup!

Today was definitely a soup kind of day, cloudy, chilly, and gloomy. To warm up, I decided to make this Thai inspired chicken soup. I made a similar coconut chicken soup a while back, but it didn’t have curry in it. This soup has three types of curry, red, yellow, and green. It sounds like it would be spicy, but it wasn’t hot at all – despite the red pepper flakes I added. If you wanted to spice it up, you could add some jalapeno, and / or some Thai chilies.

While this soup was great as I made it, you could also serve it over rice or noodles. I hope the next time you want to make a pot of soup, you will try my Coconut Curry Chicken Soup!

Coconut Curry Chicken Soup

1 Star2 Stars3 Stars4 Stars5 Stars (No Ratings Yet)
Loading...
By Patrick Dulmage Serves: 8-12

Coconut Curry Chicken Soup

Ingredients

  • 2 Tbsp olive or vegetable oil
  • 2 Tbsp unsalted butter
  • 1 Red bell pepper, sliced in thin strips, then cut to 1 in lengths
  • 1 Vidalia onion, diced
  • 3-5 cloves of garlic, minced
  • 3 Tbsp ginger, minced or sliced very thinly
  • 8 ounces mushrooms, Cremini, Shitaki, or Button would be great
  • 3 Tbsp green curry paste
  • 3 Tbsp red curry paste
  • 2 yellow curry bouillon cubes
  • 8 cups chicken stock, low sodium
  • 2 14 oz cans coconut milk
  • 1 1/2 Tbsp Fish sauce
  • 2 Tbsp brown sugar
  • 1/4-1/2 tsp crushed red pepper flakes
  • 3 cups cooked and shredded chicken (rotisserie chicken is great)
  • 1/4 cup freshly squeezed lime juice
  • 2 green onions, sliced
  • 1/4 cup chopped cilantro
  • 1 - 2 limes cut in to wedges for garnish
  • Kosher salt and Freshly ground pepper to taste (make sure to taste it before adding any salt)

Instructions

1

Prep the vegetables first to make sure you can drop things in quickly.

2

In a large heavy pot, over medium heat, add the oil and butter

3

Add the onion and cook until translucent

4

Add the curry pastes and stir to combine

5

Add the red bell pepper, mushrooms, garlic, stir to combine

6

Cook about 5 minutes

7

Add the chicken broth, coconut milk, fish sauce, brown sugar, red pepper flakes, and chicken

8

Stir to combine, cover and lower to a simmer for about 15-20 minutes.

9

When ready to serve, add the lime juice, green onions, fresh black pepper, and cilantro, give it one last stir

10

Taste and adjust seasoning as needed

11

Serve with lime wedges on the side

Beef

Sunday Pot Roast with Gravy

On the Menu Tonight – Sunday Pot Roast with Gravy!

It’s getting cooler outside and that put me in the mood for pot roast. This recipe has a few extra ingredients than my usual pot roast, including cognac and leeks.

To get started on the meal, I prepped all the ingredients. I chopped the carrots, onions, and garlic, as well as sliced the leeks and soaked them in water to get the dirt out. Once everything was in place, I got started.

I seasoned the meat with salt, pepper, and then sprinkled with flour on all sides. Then, I seared the meat on all sides and took it out of the Dutch oven and set aside while I started on the veggies.

With all the veggies chopped and prepped, I simply put those in the pot and cooked them for a bit until they were tender. Then, I added in the cognac, wine, chicken broth, and tomatoes. Once that was brought to a boil, I put it in the oven to cook. At this point, let it go for 90 minutes. When the timer goes off, lower the temperature to 225 degrees and reset the timer for another hour.

When the hour is up, take the pot roast out of the dutch oven and make the gravy. Take about half the liquid and veggies from the pot and put in a blender or food processor. Blitz it until smooth, then add back to the pot. Stir to combine and bring it back to a boil on the stove top. If it isn’t thick enough add a butter/flour paste – about two tablespoons, stir it in and let the sauce thicken. I didn’t need to add it this time.

When the sauce is the desired thickness, you are ready to serve. By this time, the meat has rested at least 5 minutes. Slice it and spoon over that lovely sauce you just made.

This dish is SO comforting and filling. I hope you will try this Sunday Pot Roast and let me know how your version turns out.

PoatRoast

Sunday Pot Roast with Gravy

1 Star2 Stars3 Stars4 Stars5 Stars (No Ratings Yet)
Loading...
By Patrick Dulmage Serves: 4-6
Prep Time: 30 minutes Cooking Time: 2 hours 30 minutes Total Time: 3 hours

Sunday Pot Roast with Gravy

Ingredients

  • 4-5 lb chuck roast
  • 4 carrots - sliced
  • 2 onions - diced
  • 3 stalks celery
  • 2 leeks - chopped (only the white and light green part)
  • 5 cloves garlic
  • 1 can (28 oz) plum tomatoes
  • 2 cups red wine
  • 2 Tbsp Cognac
  • 1 cup chicken stock
  • 1 tsp chicken powder
  • 3 branches fresh thyme
  • 3 branches fresh rosemary (tie the thyme and rosemary together so it's easier to remove from the pot)
  • Kosher Salt
  • Freshly ground pepper

Instructions

1

Pre-heat oven to 325 degrees

2

Pre-heat Dutch oven to high heat

3

Season the meat on all sides with salt, pepper, and flour

4

Sear the meat on all sides - 3-5 minutes per side

5

Once the meat is seared, remove from Dutch oven and set aside

6

Lower the heat to medium-high

7

Add the onions, leeks, carrots, and celery (reserve the garlic) - season with salt and pepper

8

Let the veggies cook until tender, about 10 minutes

9

Add the wine and Cognac and bring to a boil

10

Add the chicken stock, tomatoes, thyme, rosemary, and chuck roast

11

Bring to a boil, then put it in the oven for 90 minutes

12

When the timer goes off, lower the temperature to 225 degrees and cook one more hour

13

When the timer goes off, take the Dutch oven out, take the meat out and set aside

14

Take about half the liquid and veggies out of the pot (use a measuring cup or ladle), and put it in a blender or food processor

15

Since it's hot, don't fill the blender more than half way and start the blender slowly

16

When the mixture is smooth, add it back to the Dutch oven and stir to combine

17

Let it reduce a bit and if it isn't thick enough, now is the time to add the flour/butter paste to thicken it

18

Taste the sauce and see if you need to add the chicken powder or other seasoning

19

Once the pot roast has rested at least 5 minutes, slice it and spoon over the sauce

20

Serve immediately

PartyFood/ Side Dishes/ Uncategorized/ Vegetarian

Boiled Peanuts

On the snacking menu for tonight – Boiled Peanuts!

Boiled peanuts are definitely one of those things that get really mixed results when you mention them. “What are boiled peanuts?” “That sounds gross…” “Yum! If you are from the South, you’ve likely had had boiled peanuts. If you are from the South and haven’t had boiled peanuts, please mail your Southern card to… I’m just kidding.

Seriously though, if you are from the South, even if you haven’t tried boiled peanuts, you HAVE seen the roadside stand with the guy sitting next to a half barrel or converted beer keg sitting over a low burning fire filled with boiled peanuts. You buy some, and the guy ladles out your peanuts into a styrofoam cup. I mentioned the ladle. The ladle used to get the peanuts is something to watch out for as your purchase is being prepared. It’s almost always a jerry-rigged device with holes drilled in so the water from the barrel or keg can drain as they get your boiled peanuts.

Oh, definitely strike up a conversation with the person at the stand. For me, half the fun of the drive to wherever it is I’m going is stopping to get some boiled peanuts and chatting with the person at the stand. You may also buy some fresh fruit, produce, and / or BBQ as well before you continue on your way.

If you’ve never tried boiled peanuts, I hope the next time you plan to have people over for a game or the holidays you will make a batch of boiled peanuts for your guests to snack on.

Boiled Peanuts

1 Star2 Stars3 Stars4 Stars5 Stars (No Ratings Yet)
Loading...
By Patrick Dulmage Serves: unknown
Prep Time: 5 minutes Cooking Time: 8-9 hrs Total Time: 8-9 hrs

Boiled Peanuts

Ingredients

  • bag of green peanuts
  • Kosher Salt
  • Filtered / Bottled Water (tap water has chlorine and other chemicals that don't taste so great)

Instructions

1

Spread out the peanuts from the bag and remove any rotten or moldy peanuts

2

Fill a crockpot about 3/4 full with peanuts

3

Pour in enough water in to the crockpot that the peanuts begin to float and then pour some more. The water will evaporate, so I fill it as high as I can but still able to close the lid

4

Pour in 4 palm-fulls of Kosher salt and stir it in. If you have never made them before, start with 3 palm-fulls if you are nervous they will be too salty

5

Set the crockpot on high for 4 hrs.

6

Once the 4 hrs are up, lower the temperature to low and let it go another 4 - 5 hrs. At the 4 hour mark, taste a few to see if they are the consistency you want. I like mine with a little bite to them... too mushy and you can't get them out of the shell.

7

Once finished, cut the heat, drain, and transfer to another container.

8

Serve hot

Notes

They are great hot, warm, or even cold. They store well in the fridge a few days, if they last that long. You can add flavorings too. You can add some sliced jalapeno, or hatch chilies, or Old Bay Seasoning. When I've done Old Bay, I'll add two spoonfuls (like a cereal spoon) of the Old Bay at the beginning with the salt

Side Dishes/ Vegetarian

Scalloped Potatoes au Gratin with Smoked Gouda and Cheddar Cheese

On the menu tonight – Scalloped Potatoes au Gratin!

I’ve seen so many pictures of Scalloped Potato dishes that I decided to make it. This isn’t a difficult dish to make, but it looks awesome – especially if you take the time to arrange the potato slices neatly. I didn’t have the time to arrange the slices in any particular shape this time.

The trick to this dish is getting the slices the same thickness. Take the help from your food processor or box grater to get perfectly uniform slices – about 1/8″. From there, all you have to do is add the cream and other ingredients to a large pan and cook the potatoes about 15 -18 minutes. Then, transfer the ingredients to your baking dish and bake. That’s it!

So, the next time you are serving potatoes, consider making them a little fancy and try my Scalloped Potatoes!

Scalloped Potatoes au Gratin with Smoked Gouda and Cheddar Cheese

1 Star2 Stars3 Stars4 Stars5 Stars (2 votes, average: 4.00 out of 5)
Loading...
side dishes
By Patrick Dulmage Serves: 12
Prep Time: 15 minutes Cooking Time: 30 minutes Total Time: 45 minutes

Scalloped Potatoes au Gratin with Smoked Gouda and Cheddar Cheese

Ingredients

  • 2 1/2 - 3 lbs Russet or Yukon Gold Potatoes, sliced about 1/8" thick
  • 1 onion, finely chopped
  • 2 cups heavy cream
  • 1 Tbsp chicken bouillon powder
  • 1 Tbsp butter
  • 2 garlic cloves, minced
  • 1/2 tsp nutmeg
  • 1 tsp thyme (2 tsp if using fresh)
  • 1/2 - 3/4 cup Smoked Gouda cheese
  • 1/2 - 3/4 cup Cheddar cheese

Instructions

1

Pre-heat oven to 375 degrees

2

In a large pan, over medium high heat, add the butter and onions. Cook about 5 minutes

3

Add the garlic, and cook another minute or two, lower the temp to medium, then add the heavy cream (don't let the cream burn, keep stirring and lower the temp more if needed)

4

Add the thyme, nutmeg, chicken bouillon powder, and potatoes. Cook about 15 minutes until the potato slices are fork tender

5

Transfer to a 9x9 baking dish and cover with the grated cheese

6

Bake about 15 minutes or until the cheese is slightly golden brown on top and the cheese is bubbly

7

Pull from oven and let rest at least 5 - 10 minutes before serving

Casserole/ Seafood/ Vegetarian

Lobster Mac and Cheese with Smoked Gouda

On the menu tonight – Lobster Mac and Cheese!

We’ve all made Mac and Cheese, right? So, this time, I wanted to make it special – like going to an expensive steak house special. So, I used smoked Gouda cheese and lobster as a nod to the lobster mac and cheese I always see when I’m out.

While I used smoked Gouda cheese, you could also use Gruyere or any other cheese you like. I think next time, I may use a mix of Smoked Gouda and Gruyere.

It comes together quickly, so have all your ingredients ready to go before you start cooking. When you start adding liquid to the roux, do it slowly and make sure you work out any lumps as you go. One other tip, take the time to toast the panko in butter. That extra crunch the panko brings is a great tasty texture.

I hope the next time you make mac and cheese, you try my version. It’s SO GOOD!

Lobster Mac and Cheese

1 Star2 Stars3 Stars4 Stars5 Stars (No Ratings Yet)
Loading...
By Patrick Dulmage Serves: 8-10
Prep Time: 15 minutes Cooking Time: 1 hour 10 minutes Total Time: 1 hour 25 minutes

Lobster Mac and Cheese

Ingredients

  • 1 lb Pasta shells / elbow macaroni / Cavatappi - your choice
  • 1 quart whole milk
  • 1 stick butter, divided
  • 4 cups cheese, grated - your choice of smoked Gouda, Gruyere, or good ole Velveeta (since it's Lobster mac and cheese, I went fancier on the cheese)
  • 2 cups sharp cheddar, grated
  • 1/2 - 1 1/2 lbs lobster meat, cooked
  • 1/2 cup flour
  • 1/2-1 tsp ground nutmeg
  • 1 - 1 1/2 cups Panko bread crumbs
  • 1/2 tsp freshly ground pepper
  • Kosher salt to taste

Instructions

1

Pre-heat the oven to 350 degrees

2

Bring a large pot of salted water to a boil and cook pasta according to pkg instructions

3

Heat the milk in a small pot over low heat - don't let it burn

4

In a medium skillet, toast the Panko with 2 Tbsp of butter and set aside

5

In a large pan, melt 6 Tbsp of butter and add the flour for 2-3 minutes over medium heat

6

Slowly pour in the milk and whisk as you go. Work out any lumps as you go and whisk until the sauce thickens

7

Add in the grated cheese and continue stirring

8

Once the cheese is incorporated, cut the heat, and add in the pasta and lobster

9

Season with nutmeg, salt and pepper

10

Top with the toasted Panko

11

Bake until browned on top and the cheese is bubbly - about 30-40 minutes

12

Once finished, pull from the oven and let rest at least 5 minutes

Beef

Oven Roasted Beef Brisket

On the Menu Tonight – Beef Brisket!

I’ve tried a few times, more than a few times, to cook a beautifully tender beef brisket and failed. The main failure was two things. The meat wasn’t tender and it wasn’t juicy.

I tried again today and we’re getting there. The meat wasn’t dry and it was more tender than the last time. Before I go on, there are a few main types of cook on a brisket in my opinion. There’s the oven roasted brisket your grandma did with the Lipton onion soup mix and there’s the competition BBQ pit-master brisket with the smoke ring. Tonight, I was going for the oven roasted version with the dry rub one would use when smoking the brisket. I didn’t do a braising liquid, or veggies – just the meat rubbed down with the BBQ rub. The rub was a simple, paprika, salt, pepper, onion powder, and garlic powder mix.

Similar to what the BBQ folks would do, I patted the meat dry with paper towels and then liberally coated all sides with my rub. I wrapped it in cling wrap and put it in the fridge over night.

For the day of the cook, I took it out of the fridge and let it come to room temperature and pre-heated the oven to 225 degrees. I put the meat in a cast iron braising pot, a Dutch oven will do fine if you don’t have a braising pot, and let it go for three hours. Here’s where the fail happened in the past. Most recipes I’ve read have you take it out around the three hour mark. Whenever I have done that, mine comes out tough. It tastes good, but it’s not that tender cut you are looking for. I cut the heat to 205 degrees and let it go another 1/2 hour.

When the timer goes off, pull it from the oven, but let it rest in the braiser for at least an hour. It will still be cooking, but coming down in temperature slowly. After it has had a chance to rest, slice it and serve with your choice of sides.

I hope the next time you decide to cook a brisket, you will try my version. Let me know how it turns out!

Oven Roasted Beef Brisket

1 Star2 Stars3 Stars4 Stars5 Stars (No Ratings Yet)
Loading...
By Patrick Dulmage Serves: 8-10
Prep Time: 1 day Cooking Time: 3 1/2 hours Total Time: 1 day 3 1/2 hours

Oven Roasted Beef Brisket

Ingredients

  • 3 lb beef brisket
  • 1/4 cup dry rub:
  • 1 part onion powder
  • 1 part garlic powder
  • 1 part paprika
  • 1 part ground black pepper
  • 1 part Kosher Salt

Instructions

1

Pat the brisket dry with paper towels

2

Liberally season the meat on all sides with the rub of your choice. I made my own, but feel free to use whatever rub you like

3

Wrap the meat in cling wrap and put back in the fridge over night (add'l days in fridge are fine)

4

Pre-heat the oven to 225 degrees

5

Put the meat in a cast iron braising pot with a heavy lid

6

Bake for 3 hours

7

At the three hour mark, lower oven temp to 205 degrees and let it bake another 30 minutes

8

Pull from the oven and let it rest at least an hour before serving

Beef

Beef Brisket, Rice and Cheese Burritos

On the menu tonight – Beef Brisket, Rice, and Cheese Burritos!

I made a brisket the other night, and I’m already working on things I can do with it. Steak burritos are awesome, so I decided to make a batch of burritos.

Steak burritos from my local Mexican place are so delicious and were the inspiration for what I made tonight. I tried to keep it pretty simple as far as ingredients, beef, onions, peppers, cheese, and rice. Red bell pepper and jalapeno were the peppers. The burritos were seasoned pretty simply with some ground cumin, salt and pepper. Mexican cheese blend and queso blanco were the cheeses used. I kind of went crazy on the cheese at the store, buying the Mexican blend, Queso blanco, another pre-shredded queso blanco cheese, and a pre-made queso blanco with jalapenos like you get when you order cheese dip.

The pre-shredded queso blanco tasted pretty much like mozzarella and decided I won’t be using that again. I tasted the pre-made queso blanco with jalapenos and while it was pretty good decided not to use it for this application.

The only fussy thing about this dish was folding the burritos. I decided to use measuring cups to make sure that I could roll each one shut consistently. In the end, I was really happy with the way they turned out. I hope the next time you are craving Mexican food, you will try Beef Brisket Burritos!

Beef Brisket, Rice and Cheese Burritos

1 Star2 Stars3 Stars4 Stars5 Stars (No Ratings Yet)
Loading...
By Patrick Dulmage Serves: 8
Prep Time: 15 minutes Cooking Time: 45 minutes Total Time: 1 hour

Beef Brisket, Rice and Cheese Burritos

Ingredients

  • 2-3 lbs cooked beef brisket, shredded or chopped
  • 8 large flour tortillas
  • 1 red bell pepper, diced
  • 1 Vidalia Onion, diced
  • 1 Jalapeño pepper, seeded and diced
  • 3-4 cups Mexican cheese blend, shredded
  • 1 cup rice
  • 2 cups water or chicken stock
  • 2-3 Tbsp Rotelle tomatoes and chiles
  • 1 tsp cumin
  • 1 Tbsp olive oil

Instructions

1

Pre-heat a large skillet over med-high heat

2

Add olive oil onion, bell pepper, and jalapeño

3

Cook the mixture beyond translucent and let it get a little darker

4

Once done, cut the heat, add the brisket, mix, and let it cool

5

If you haven't already, start on the rice

6

Rinse the rice and then add it along with the chicken stock to a small pot

7

Bring the water and rice to a boil, then simmer 12 minutes

8

If it doesn't look light and fluffy allow more time to finish cooking

9

Once finished, add the Rotelle tomatoes and stir to combine

10

With the rice finished, warm the tortillas to make them pliable

11

Add about a 1/4 cup of the rice mixture on a tortilla

12

Sprinkle some shredded cheese, not too much, on the rice

13

Add about 1/4-1/2 cup of the brisket, onion, pepper mixture

14

Tightly roll the burrito and put in a baking dish

15

Repeat for the rest of the burritos

16

Top the burritos with some more cheese

17

Bake for about 30 minutes until the cheese is bubbly and a little browned

18

Serve with sour cream and your favorite salsa

Featured Item

Featured Item – Dexter-Russel 4″x2 1/2″ Spatula

One of the ways you can support what I do is by clicking on any of the Featured Items.
It won’t cost you anything and it will help keep cooking and sharing my tips and recipes.
Please consider helping the site by clicking on any of the Featured items before you do your
Amazon shopping.

https://amzn.to/3nMl1j8

Dexter-Russell Spatula

I have a few spatulas for various tasks. They market this spatula as a pancake turner. I like it because it isn’t too big and it is made of metal, so I can use it for the grill. The blade is nice and thin so you can easily get under your food to flip or remove from the grill / pan. While the blade is thin it is sturdy.

If you are cooking with cast iron, carbon steel, or the grill, you need a metal spatula so it doesn’t melt.

You need the right tool for the job, it makes the task so much easier and enjoyable. If you are in need of a good quality spatula made in the U.S.A., check out the Dexter-Russel line.