Browsing Category

Desserts

Desserts

Banana Pudding with Vanilla Wafers

This is hands down one of my favorite desserts – Banana Pudding with Nilla Wafers!

I’m making this one from scratch, not with the box mix. Fun fact, when I go to a BBQ place, I almost always get the banana pudding as kind of a gauge to see how good the food is. I love how the nilla wafers get kind of mushy. YUM!

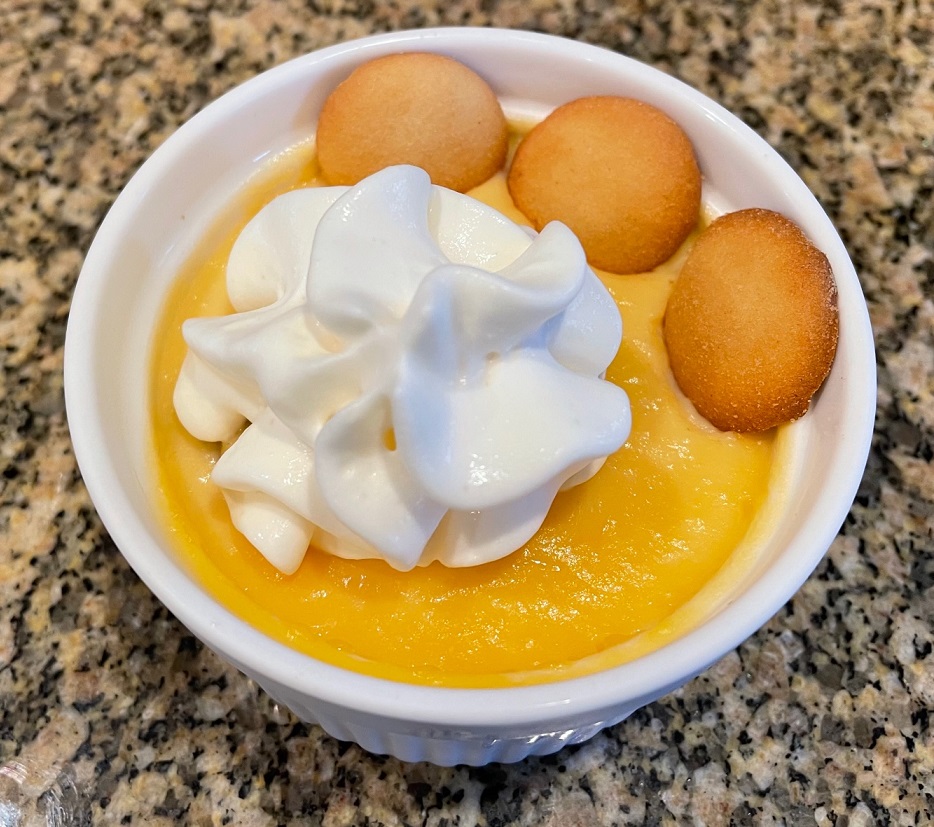
Full disclosure, this isn’t my recipe. I don’t do a lot of desserts, so on this one, pretty much the only thing I changed was how it is served. I looked at a bunch of recipes and landed on one made by my best friend that I never met, Alton Brown. Alton, presented his version in a large clear bowl showing the layers. I chose to serve my version in ramekins.

I hope the next time you plan to make banana pudding you will take a few extra minutes to make it from scratch. Homemade has SO much more flavor and you know exactly what went into it. Try making your version and let me know how it turns out.

Banana Pudding with Vanilla Wafers

1 Star2 Stars3 Stars4 Stars5 Stars (No Ratings Yet)
Loading...
By Alton Brown Serves: 8
Prep Time: 30 minutes Cooking Time: 10 minutes Total Time: 3 hrs and 10 minutes

Banana Pudding with Vanilla Wafers

Ingredients

  • 3/4 cup granulated sugar, plus 2 tablespoons
  • 3 tablespoons cornstarch
  • 1/4 teaspoon kosher salt
  • 2 large eggs
  • 1 large egg yolk
  • 2 cups whole milk
  • 3 tablespoons unsalted butter, cut into cubes
  • 1/2 teaspoon vanilla extract
  • 45 vanilla wafers
  • 4 ounces banana liqueur
  • 3 ripe bananas, peeled and sliced into 1/4 inch rounds
  • 1 tablespoon freshly squeezed lemon juice
  • 1 cup heavy whipping cream, very cold

Instructions

1

Combine 3/4 cup of the sugar, the cornstarch, and salt in a 3 quart pot.

2

Add the eggs and egg yolk, then whisk to combine

3

Add the milk and whisk until well combined

4

Cook over medium-low heat, stirring constantly until the mixture reaches about 180 degrees - about 10 minutes

5

The mixture will begin to thicken and bubble around the edges

6

Remove from heat and whisk in the butter, piece by piece until fully incorporated

7

Add the vanilla extract, whisking to combine

8

Cover the pudding with a round piece of parchment paper (I used clear wrap similar to saran wrap)

9

Refrigerate until the pudding reaches 45 degrees (I wasn't measuring the temperature, but I DID make sure to wait well over 2 hours to ensure it cooled off)

10

** Recipe deviation. Alton's version calls for laying out the vanilla wafers on a sheet pan and slowly pour the liqueur over them, then set them aside for 10 minutes. Since I was using ramekins, I put the cookies (6 in each) on the bottom of the ramekin and then drizzled about a teaspoon of the liqueur in each one. After tasting the final product, I think I would add a little more liqueur as I didn't pick up on it at all.

11

Toss the banana slices with the lemon juice in a small bowl and set aside

12

Spread a small amount of the banana pudding in the bottom of a 1 1/2 quart glass bowl

13

Cover with a layer of vanilla wafers, followed by a layer of banana slices

14

Spoon 1/3 of the remaining pudding on the top of the bananas and repeat, ending with a layer of pudding

15

Put the whipping cream in a bowl of a stand mixer

16

add the remaining 2 tablespoons of sugar and whisk until stiff peaks form

17

Spoon the whipped cream over the cooled pudding and spread

18

Top with any remaining soaked cookies

19

Refrigerate for 30 minutes before serving

20

Store covered in the refrigerated for 3 days... if it lasts that long

Notes

Since I used ramekins, I didn't do the step of tossing the bananas with the lemon juice. I simply sliced the bananas as I needed them in each ramekin. As mentioned above, I put the wafers on the bottom, put in some of the liqueur, put a little pudding in, then some bananas, and then topped with pudding. I won't judge if you don't make your own whipped cream. 🙂

Desserts

White Chocolate Chip, Pecan, and Cranberry Cookies

For Dessert Tonight – White Chocolate Chip and Cranberry Cookies!

Usually I make chocolate chip cookies around Christmas time, but this year I wanted to do something different. I found this recipe by Trisha Yearwood that used white chocolate chips and cranberries along with macadamia nuts. It sounded really good and it was something I hadn’t tried yet. I stayed true to her recipe with the exception of the nut, I used pecans instead of Macadamia nuts.

These are SO good! The pecans were awesome in this cookie. I’m so glad that I tried something a little different. The next time you bake cookies, I hope you will try this recipe!

White Chocolate Chip and Cranberry Cookies

1 Star2 Stars3 Stars4 Stars5 Stars (No Ratings Yet)
Loading...
By Patrick Dulmage Serves: 6-8
Prep Time: 15 minutes

White Chocolate Chip and Cranberry Cookies

Ingredients

  • 1/2 cup butter (1 stick), softened
  • 1/2 cup white sugar
  • 1/2 cup brown sugar
  • 1 Tbsp vanilla extract
  • 1 1/2 cups flour
  • 1 1/2 tsp baking soda
  • 1 egg
  • 1 cup dried cranberries
  • 3/4 cup white chocolate chips
  • 3/4 cup pecans, chopped

Instructions

1

Pre-heat the oven to 350 degrees

2

In a stand mixer or bowl, add the butter and sugars, then cream them until smooth

3

Add the vanilla extract and egg

4

Sift the flour and baking soda in a large bowl

5

Gradually and carefully spoon in the flour/baking soda mix to the mixing bowl with the butter and sugar

6

Add the cranberries, pecans, and chocolate chips

7

Scoop or use spoons to put 2 tablespoon sized drops of cookie dough on a greased baking sheet. Leave about 2 inches between each cookie

8

Bake 1 sheet at a time until the tops are lightly browned, about 12-15 minutes

9

After baking, let the cookies rest between 3-5 minutes before transferring to a wired cooling rack to completely cool

10

Enjoy!

Desserts

Hanukkah Chocolate Graham Cracker Bars with Coconut

Last week, I made these Hanukkah Bars with white chocolate, coconut, milk chocolate squares (or gelt), and a graham cracker crust. In the spirit of Hanukkah, I decorated them with blue and white sprinkles. Everyone who tried them loved them!

The holidays are the only time I make many sweet treats, so when I do I try to make them special. While I used chocolate bars for the squares of chocolate, I recommend using gelt. What’s gelt? Gelt are the milk chocolate candy coins wrapped in foil. Of course, for the recipe you would unwrap them first. Cut the servings so each piece has a chocolate coin in the center.

While I made these Hanukkah bars, you could easily turn them into Christmas bars by changing the color of sprinkles to red and green. If you really wanted to get fancy, you could use milk chocolate Christmas trees on top instead of the gelt.

The next time you are deciding what dessert to make your family or pot-luck, I hope you will try my Hanukkah Bars!

Hanukkah Chocolate Graham Cracker Bars with Coconut

1 Star2 Stars3 Stars4 Stars5 Stars (No Ratings Yet)
Loading...
By Patrick Dulmage Serves: 20

Hanukkah Chocolate Graham Cracker Bars with Coconut

Ingredients

  • 2 cups graham cracker crumbs (about 14 graham sheets)
  • 1 stick unsalted butter, melted (plus a little more to grease the baking dish)
  • One 14 oz can sweetened condensed milk
  • 40 pieces of gelt, unwrapped (chocolate bar squares or Christmas trees work great too)
  • 1 cup chopped walnuts
  • 1 cup white chocolate chips
  • 1 1/2 cups sweetened coconut flakes
  • 1/3 cup Hanukkah sprinkles (any blue and white sprinkles will work)

Instructions

1

Pre-heat oven to 350 degrees

2

Combine the graham cracker crumbs and melted butter in a medium sized mixing bowl

3

Toss the crumbs and butter until evenly all the crumbs are evenly coated with butter

4

Evenly spread the crumb/butter mixture into a 9x13 inch baking dish, then press the crumbs down to form the crust (a measuring cup works great)

5

Pour the sweetened condensed milk over the top and spread evenly with a spoon or off-set spatula

6

Arrange 20 pieces of the gelt in a grid - 5 down the long side of the dish and 4 across the narrow side

7

Sprinkle the walnuts, then the chocolate chips, the coconut, and finally the sprinkles

8

Bake for 25 to 30 minutes. It should be golden around the edges and the coconut lightly toasted

9

Remove from the oven and let it completely cool before trying to cut it. Wait about two hours

10

Slice into 20 bars, each one should have a piece of chocolate

11

Happy Hanukkah!

Desserts

Original Gooey Cake

Today, I brought the Original Gooey Cake to work for my co-workers to try. They LOVED it! What’s not to love in a dessert whose main ingredients are butter and sugar?

The entire dessert can be made in about an hour. For the base, melt a stick of butter and combine with a box of yellow cake mix and one egg. Spread that in a 13×9 baking pan.

For the filling, melt another stick of butter and combine with two eggs, a block of cream cheese, vanilla extract, and confectioner’s sugar. Bake for about 45 minutes and that’s it!

Once you make this, you can also make almost infinite variations. How about a red velvet cake with cream cheese filling? You like chocolate and peanut butter? Use chocolate cake mix and mix in peanut butter to the filling. What about lemon cake mix and lemon zest to the filling? Like I said, the possibilities are limitless.

Make this once and you will be making it many more times after that.

Original Gooey Cake

1 Star2 Stars3 Stars4 Stars5 Stars (No Ratings Yet)
Loading...
dessert
By Patrick Dulmage Serves: 12
Prep Time: 15 minutes Cooking Time: 45 minutes Total Time: 1 hour

Original Gooey Cake

Ingredients

  • Base:
  • 1 box yellow cake mix
  • 1 egg
  • 1 stick melted butter
  • Filling:
  • 1 block cream cheese
  • 2 eggs
  • 1 tsp vanilla extract
  • 16 oz confectioner's sugar / powdered sugar

Instructions

1

Pre-heat oven to 350 degrees

2

For the base:

3

In a stand mixer (or large bowl if you don't have one) mix the cake mix, egg, and melted butter thoroughly

4

Spread evenly in a 13x9 baking dish and set aside

5

For the filling:

6

In a stand mixer, beat the cream cheese until smooth, then add the eggs, vanilla extract, and slowly add the powdered sugar

7

You may want to stop periodically and scrape the bowl

8

Once all the ingredients are mixed, spread evenly over the base and bake for 40-50 minutes

9

Let it cool before serving

Desserts

Blueberry Cheesecake Lush

On the menu tonight – Blueberry Cheesecake Lush! When I saw a picture of a similar dish online, I knew I had to make it. I love cheese cake and I love blueberries, what’s not to love?

The crust of this dish is a mix of ground graham crackers and Biscoff cookies held together with butter. There is a layer of the cream cheese filling, a layer of cheese cake pudding, and a layer of blueberry filling, all topped with whipped cream!

The entire dessert comes together really quickly. You could make the crust with pecans, graham crackers, Biscoff cookies, or any combination you like. For the filling, you could use whatever fruit you like. It’s perfect for holiday parties, potlucks, or … cuz dessert! I hope you’ll try this dessert and let me know how your version turns out.

Blueberry Cheesecake Lush

1 Star2 Stars3 Stars4 Stars5 Stars (1 votes, average: 1.00 out of 5)
Loading...
Dessert
By Patrick Dulmage Serves: 12
Prep Time: 20 minutes Cooking Time: 15 minutes Total Time: 35 minutes

Blueberry Cheesecake Lush

Ingredients

  • 1 1/2 cup vanilla wafer crumbs
  • 1 1/2 cup biscoff cookie crumbs
  • 1 3/4 stick butter, melted
  • 8 oz cream cheese, softened
  • 1 cup powdered sugar
  • 16 oz whipped topping, divided
  • 1 small boxes cheesecake flavored pudding
  • 3 cups milk
  • 1 can blueberry pie filling

Instructions

1

In a medium mixing bowl, combine vanilla wafer crumbs, and melted butter.

2

Press into a 9x13 inch baking pan; bake at 350° for 15 minutes. Remove from oven and cool.

3

In a separate mixing bowl, combine cream cheese, powdered sugar, and 1 ½ c. whipped topping.

4

Mix until smooth; spread evenly over cooled crust.

5

Combine cheesecake pudding mix, milk, and 1 c. whipped topping and mix until smooth.

6

Spread evenly over cream cheese layer in pan.

7

Top with 1 can Lucky Leaf Cherry Pie Filling, remaining whipped topping.

8

Put the finished product in the refrigerator for 20-30 minutes before serving.

Notes

Experiment with different crusts and fruit fillings. You can serve immediately, but I like to let it set up in fridge for a bit first.

Desserts

Chewy Chocolate Chip Cookies and a Pizookie

The holidays are here! It wouldn’t be the holidays without homemade chocolate chip cookies. Tonight, I made a big batch of Chewy Chocolate Chip Cookies!

Usually, I use the Neiman Marcus Chocolate Cookie recipe. They are awesome and I will post that recipe here another time. This year, I wanted to try something different and I’m glad I did. These cookies are definitely chewy.

One of the differences in this recipe than others I tried is you use all brown sugar instead of a mix of brown sugar and cane sugar. I also add a little espresso in my batter to bring out more of the chocolatey goodness. The next time you want to make chocolate chip cookies, I hope you’ll try my recipe. Don’t forget to serve at least a few warm with a glass of milk.

After making the last batch, I still had some cookie dough in the bowl. As much as I wanted to eat the rest of the dough right from the bowl, I decided to also make a Pizookie. What’s that you ask? It’s a big chocolate chip cookie baked in a small cast iron skillet and served with a scoop of ice cream on top. YUM!

Chewy Chocolate Chip Cookies

1 Star2 Stars3 Stars4 Stars5 Stars (No Ratings Yet)
Loading...
By Patrick Dulmage Serves: 8 - 10
Prep Time: 1 hour Cooking Time: 12 minutes per batch Total Time: 1 hr 30 minutes

Chewy Chocolate Chip Cookies

Ingredients

  • 2 3/4 cups all-purpose flour
  • 2 1/2 sticks of butter, room temperature
  • 1 tsp salt
  • 1 tsp baking powder
  • 1 tsp baking soda
  • 1 tsp espresso
  • 1 tsp vanilla extract
  • 1 3/4 cups brown sugar
  • 2 eggs, room temperature
  • 12 oz bag chocolate chips

Instructions

1

Pre-heat the oven to 375 degrees

2

Sift the flour, baking powder, baking soda, espresso, and salt in a large bowl

3

Beat the butter and brown sugar with an electric mixture until creamy and fluffy - about 4 minutes

4

Be sure all the ingredients are thoroughly mixed. You may need to scrape down the sides of the bowl

5

Beat in the eggs one at a time, then add the vanilla

6

Reduce the speed of the mixer and slowly add in the dry ingredients

7

Once thoroughly mixed stop the mixer and fold in the chocolate chips by hand

8

Use a one ounce scooper or two spoons to portion the cookie dough onto the baking sheets

9

Bake for about 12 minutes

10

After they bake, remove the cookie sheet and let cool about 10 minutes. Then transfer the cookies to a wire rack to cool completely

11

If you are going to do the Pazookie, grease the skillet with butter then fill with cookie dough

12

Bake it for about 15 minutes

Notes

I bake each cookie sheet individually, alternating two or three baking sheets.

Desserts

Key Lime Pie

This has got to be one of my all-time favorite desserts. I LOVE Key Lime pie! Summer has arrived when I get a slice of that tangy lime goodness with the graham cracker crust! After trying a few different recipes, I think this is the one.

In the past, I tried using a store bought crust and it was pretty disappointing. My biggest tip for a good pie is make your own crust. I didn’t have access to fresh key limes, so I used the bottled stuff from Key West. The end result was tastier than many a disappointing key lime pie imposters I’ve had at restaurants.

There isn’t anything complicated about making this dessert. Treat yourself and your family by making this key lime pie.

Key Lime Pie

1 Star2 Stars3 Stars4 Stars5 Stars (No Ratings Yet)
Loading...
dessert
By unknown Serves: 8
Prep Time: 15 minutes Cooking Time: 20 minutes Total Time: 35 minutes

Key Lime Pie

Ingredients

  • Crust:
  • 4 tbsp unsalted butter
  • 8.8 oz Biscoff Cookies (1pkg) or equivalent amount of graham crackers
  • Filling:
  • 21 oz sweetened condensed milk (1.5 cans)
  • 2/3 cup key lime juice, fresh key limes or from bottle
  • 3 egg yolks
  • 2 tsp lime zest
  • Decoration:
  • whipped cream
  • lime slice

Instructions

1

Pre-heat oven to 350 degress

2

Add cookies to food processor and pulse until you have fine crumbs.

3

Drizzle in the melted butter and pulse until combined

4

Alternatively, put the cookies in a plastic bag and smash with a rolling pin. Mix the crumbs and melted butter in a large bowl.

5

Add the mixture to a 9" pie dish and distribute using a flat-bottomed glass or measuring cup to press the crumbs firmly down. Use your fingers to press the top down as the side is compressed.

6

Bake the crust for 10 minutes

7

While the crust is baking, zest two limes and set aside the zest

8

Squeeze the juice from the limes and strain out the seeds

9

Add the egg yolks and lime zest to bowl of stand mixer fitted with whisk attachment

10

Beat for about a minute

11

Pour in the sweetened condensed milk and mix on medium until fully incorporated

12

Scrape the bowl down and add the lime juice with mixer on low

13

Scrape the bowl down again if needed and mix again

14

Pour the filling into the pie crust. Jiggle it to get it level

15

Bake for 10 minutes

16

Cool on a wire rack for 20 minutes, then chill at least an hour

17

Top the pie with whipped cream - either dollups so that each slice has a dollop or two; OR put a ring of whipped cream around the crust

Desserts

Lemon Blueberry Bars

On the menu tonight, for dessert – Lemon Blueberry Bars! Yesterday, I made Chicken Parmesan. It made me think of my trip to Italy a few years ago. One of the places we went was Capri and one of the things it is known for are the lemons. I swear that I saw lemons as big as my head while we were there. I had never seen anything like it. It inspired me to make something lemony for dessert and I landed on lemon blueberry bars.

The chilled lemony goodness is perfect for a summer snack or dessert. They have a delicious shortbread crust and the lemon blueberry top is tart and sweet at the same time. The next time you need bring a dessert to a potluck or your next cookout, make these lemon blueberry bars.

Lemon Blueberry Bars

1 Star2 Stars3 Stars4 Stars5 Stars (No Ratings Yet)
Loading...
Dessert
By Patrick Serves: 8
Prep Time: 15 minutes Cooking Time: 50-60 minutes Total Time: 1hr 15 minutes

Lemon Blueberry Bars

Ingredients

  • Shortbread Crust
  • • 1/2 cup butter
  • • 1/4 cup granulated sugar
  • • 1/4 teaspoons salt
  • • 1 teaspoons vanilla extract
  • • 17 tablespoons all-purpose flour (1 cup + 1 tablespoon)
  • Filling
  • • 3 eggs
  • • 1 cup granulated sugar
  • • 4 tablespoons flour
  • • 1/2 cup lemon juice (need about 3 lemons)
  • • 1/2 – 1 cup fresh blueberries
  • • Powdered sugar to dust the bars

Instructions

1

Shortbread Base

2

• Preheat the oven to 335° and line the 9×9 pan with parchment paper

3

• In a mixing bowl, melt the butter by microwaving for 60-90 seconds

4

• Add the sugar, salt, and vanilla extract to the butter and whisk until the sugar has dissolved

5

• Sift in flour and whisk until the mixture becomes thick and looks like cookie dough

6

• Add the dough into the pan and using your hands or a rubber spatula, pat down the dough to an even thickness into the parchment paper. Brush down the sides so the sides don’t stick up

7

• Bake for 20-25 minutes, until shortbread is set

8

Filling

9

• While the shortbread is in the oven, whisk 3 eggs in a bowl

10

• Add sugar, flour, and lemon juice making sure to whisk each one in fully before adding the next

11

• Add blueberries and mix all together

12

Make the Lemon Bar

13

• When the crust is done, poke holes all over the surface with a fork

14

• Pour the filling on top of the crust and make sure the blueberries are spread evenly

15

• Bake again for 25-30 minutes, or until the middle of the lemon bar is set and doesn’t move when you gently shake the pan

16

• Cool at room temperature for at least an hour, until it’s completely cooled, then cool it in the fridge for at least 2 hours

17

• Before serving, dust the lemon bars with powered sugar

Desserts

Bourbon Pecan Pie

On The Menu Tonight – Bourbon Pecan Pie! My first attempt at making Pecan Pie. I swear I’m not a baker. I tried making pie because my wife needed to bring a dessert for a party at work. Since I hadn’t made this before, I requested she bring me home a slice so I could try it. Before I go on, let me say that I don’t usually test recipes on other people. 99 times out of a hundred, if you are eating my food I’ve made it before and I know it’s good – according to me. 🙂 When Audrey came home she said the pie was a big hit. She went on to say one of the people said it was the best Pecan Pie he’s had and he called himself a Pecan Pie aficionado. When I tried it, I had to agree that it was an excellent piece of pie. The only thing I could have added to make it better would be some ice cream. I hope that you’ll try this recipe and let me know what you think.

Bourbon Pecan Pie

1 Star2 Stars3 Stars4 Stars5 Stars (No Ratings Yet)
Loading...
Desserts Southern
By Patrick Serves: 8
Prep Time: 15 minutes Cooking Time: 1 hour Total Time: 1 hour 15 minutes

Patrick's Famous Bourbon Pecan Pie..

Ingredients

  • Pie Crust:
  • I cheated and used Marie Calendar’s pie crust.
  • Filling:
  • 1 Cup brown sugar
  • ½ teaspoon salt
  • 1 Cup corn syrup dark (you could use light too)
  • 5 tablespoons melted butter (unsalted)
  • 1 teaspoon vanilla
  • 2 tablespoons bourbon
  • 3 whole eggs beaten
  • 1 cup chopped pecans
  • About another cup un-chopped pecans for garnish

Instructions

1

Pre-heat oven to 375.

2

Rough chop 1 cup of the pecans.

3

Whisk the corn syrup, brown sugar, salt, melted butter, vanilla, and bourbon in a mixing bowl.

4

Beat the eggs in another bowl, then whisk into the corn syrup mixture.

5

Put some pecans in the bottom of your prepared pie crust, then pour the filling into the crust.

6

Put more pecans on top in a decorative pattern. Another option is cook the pie 20-25 minutes, remove and add the pecans in a decorative pattern and cover pie with tin foil to protect the crust from burning.

7

Return to oven for an additional 30-35 minutes. Test with a knife inserted to center of pie. It should come out clean. Total cook time between 40-50 minutes.

8

Serve with whipped cream or ice cream.