Browsing Category

Chicken

Chicken

Sheet-pan Mediterranean Chicken and Vegetables

Mediterranean Sheetpan Chicken and Vegetables

On the menu tonight – Sheet-pan Mediterranean Chicken and Vegetables!

Sheetpan meals are great for getting dinner on the table quickly without having to clean a bunch of pots and pans when you’re finished.

In this dish, I put the veggies on the sheetpan, sprinkled them with olive oil and seasoning and mixed everything up to season everything evenly. I put the chicken down next, seasoning both sides, then in to the oven. Other than some chopping to make sure the veggies cook evenly, that’s it.

Once you’re done, the only thing you have to clean is the sheetpan and the dishes you ate from. I hope you’ll try this dish and let me know how it turned out.

Sheet-pan Mediterranean Chicken and Vegetables

1 Star2 Stars3 Stars4 Stars5 Stars (No Ratings Yet)
Loading...

Sheet-pan Mediterranean Chicken and Vegetables

Ingredients

  • 2 lbs bone-in, skin-on chicken thighs
  • 1 red onion, cut in to 8 wedges
  • 1 lemon, zested and juiced
  • 1/4 - 1/2 cup Kalamata olives, pitted and halved
  • 1 cup cherry or grape tomatoes, halved
  • 14 oz jar artichoke hearts
  • 1-2 zucchini, diced
  • 2 Tbsp olive oil
  • 1 1/2 - 2 tsp Kosher salt
  • 1 1/2 - 2 tsp freshly ground black pepper
  • 1 tsp sweet paprika
  • 1-2 tsp garlic powder
  • 4-6 oz of feta cheese for garnish

Instructions

1

Pre-heat oven to 450 degrees

2

position rack in the middle of the oven (if two sheetpans won't fit on one shelf of your oven, position another rack just below middle rack)

3

Put all the ingredients on two sheet pans, sprinkle with olive oil and seasonings, then toss to evenly coat all the ingredients (you could also start with the ingredients in a bowl, then transferring to the sheet pans)

4

Bake for 20 minutes

5

Turn over the chicken and veggies, then put back in the oven for another 10-15 minutes

6

When the chicken is finished cooking, garnish with some crumbled feta and a sprinkle of lemon juice before serving

Notes

I put the chicken skin-side down first. This allows the skin to get nice and crispy after it is turned.

Chicken

Food Cart-Style Chicken Salad with White Sauce

Food Cart-Style Chicken Salad

On the menu tonight – Food Cart-Style Chicken Salad with White Sauce!

As many times as I’ve been to New York, I haven’t tried the food cart chicken. From what I’ve read, it’s usually served over / with rice. This recipe has the chicken over a bed of lettuce with onions and tomato. The dressing for the salad is the white sauce, made with Greek yogurt and a little mayonnaise along with some other things. As good as it is, it’s even better with a little harissa mixed in to give it some spicy heat.

Since I haven’t tried the authentic version created on the streets in New York, but this was pretty great. I’ll definitely be making this again. If you have had the authentic version, I hope you will try mine and let me know what you think.

Food Cart-Style Chicken Salad with White Sauce

1 Star2 Stars3 Stars4 Stars5 Stars (No Ratings Yet)
Loading...

Food Cart-Style Chicken Salad with White Sauce

Ingredients

  • Chicken:
  • 1.5 lbs chicken thighs (boneless and skinless)
  • Juice of half a lemon
  • 2 garlic cloves, minced
  • 2 tsp ground cumin
  • 1 tsp olive oil
  • 1 tsp Kosher salt
  • 1-2 tsp dried oregano
  • 1 tsp sweet paprika
  • 1 tsp ground turmeric
  • White Sauce:
  • 1 cup whole-mild yogurt
  • 2 Tbsp mayonnaise
  • 1 Tbsp apple cider vinegar
  • 1 tsp freshly squeezed lemon juice
  • 1/2 tsp Kosher salt
  • 1/2 tsp freshly ground pepper
  • Salad:
  • 6 cups chopped iceberg or romaine lettuce
  • 2 medium tomatoes, quartered
  • 1/2 red onion, sliced
  • Harissa, mild or hot (optional)

Instructions

1

Combine the lemon juice, minced garlic, cumin, olive oil, Kosher salt, oregano, paprika, and turmeric in a large mixing bowl

2

Stir to combine

3

Dry the chicken thighs with paper towels and then put in the bowl with the marinade

4

Make sure all the pieces of chicken are covered with the marinade

5

Let sit in the fridge, covered, for at least 15 minutes to overnight (overnight is best)

6

Prepare the white sauce

7

In a mixing bowl, combine the yogurt, mayonnaise, cider vinegar, lemon juice, Kosher salt, and black pepper

8

Stir to combine

9

Preheat a large pan over medium-high heat and preheat the oven to 375 degrees

10

Add about a tablespoon of olive oil to the pain

11

When the pan is ready, add the chicken taking care not to crowd the pan. Work in batches if you need to

12

Let the chicken cook about 4-5 minutes or until lightly browned

13

Flip the chicken pieces and cook another 5 minutes or until lightly browned. Don't worry if the thicker parts of the chicken aren't fully cooked yet

14

Transfer the cooked chicken to a rimmed baking sheet and cook the rest of the chicken thighs and transfer those to the baking sheet as well

15

Once all the chicken has been cooked in the pan, transfer the baking sheet to the oven

16

Bake for about 10-12 minutes to allow the chicken to finish cooking through

17

Remove from the oven and let rest a few minutes, then slice the chicken in to strips

18

Assemble the dish starting with a bed of lettuce, then the tomatoes and onion. Lay the chicken on top then put some of the white sauce on the side of the plate along with a little harissa (try it!)

Chicken/ Pork

Crock Pot Brunswick Stew

Brunswick Stew

On the menu tonight, Brunswick Stew!

Despite me ordering Brunswick Stew almost every time I go to a BBQ joint, I have never made it, until now. There a million different varieties, some of the older recipes I read include squirrel and opossum. I actually had a version that had squirrel and chicken in it and it was fantastic. The squirrel tasted like… you guessed it – chicken. I made mine with pulled pork, smoked chicken, and smoked sausage. I got the pulled pork, smoked sausage and smoked chicken from one of my favorite BBQ restaurants.

For the veggies, you can also use whatever you like, but the common theme is a tomato based sauce and almost always with lima beans, corn, and one or two other veggies. I had some canned green beans and corn that I wanted to use up, so I used those along with a freshly diced onion.

Since I used the Crock Pot and purchased the meats already prepared, this was one of the quickest and easiest meals that I’ve ever made. You simply put all the ingredients in the Crock Pot, set it on low for 4 hrs and that’s IT!

I hope you you’ll try my version and let me know what you think.

Brunswick Stew

1 Star2 Stars3 Stars4 Stars5 Stars (No Ratings Yet)
Loading...

Brunswick Stew

Ingredients

  • 1-2 lbs pulled pork
  • 1 lb smoked or shredded chicken
  • 1 lb smoked sausage
  • 1 28 oz can whole, crushed or diced tomatoes
  • 1 8 oz can tomato sauce
  • 2 Tbsp tomato paste
  • 1 Vidalia onion, diced
  • 1 cup of your favorite BBQ sauce
  • 1/2-1 cup of ketchup
  • 1 can corn (fresh or frozen would be great, about 1 cup)
  • 1 can green beans (Lima beans are more traditional, but I've seen plenty of recipes using a variety of different beans)
  • 2-3 Tbsp Worcestershire sauce
  • 2-3 Tbsp Sriracha or your favorite hot sauce (I used Sriracha)
  • 2-3 Tbsp brown sugar
  • Kosher salt and pepper to taste (I used about 2 Tbsp of each)

Instructions

1

Put all the ingredients in the crock pot, put on low for 4 hours

2

Serve and enjoy!

Chicken/ Soup

Thai Coconut Red Curry Potsticker Soup

On the menu tonight, Thai Coconut Curry Potsticker Soup!

I’ve made this a few times and it’s always a hit. This is similar to the other coconut curry soups that I’ve made, but this one has potstickers, which makes it an even easier soup to make because you aren’t cooking and de-boning chicken.

Some curries can be pretty spicy. This version doesn’t have a lot of spicy heat, but you could definitely add some Thai chilies, serrano peppers, fresno chili oil, or fresno chili peppers to this to add some heat.

Once you make this, you’ll wonder why you haven’t been making this part your regular meal rotation. Play around with the brand of red curry paste and try different varieties.

For the garnish, you can’t go wrong with some lime wedges or chopped scallions.

The next time you make a pot of soup, I hope you will try this recipe and let me know how it turns out.

Thai Coconut Curry Potsticker Soup

1 Star2 Stars3 Stars4 Stars5 Stars (No Ratings Yet)
Loading...

Thai Coconut Curry Potsticker Soup

Ingredients

  • 4 cups chicken broth
  • 2 cloves garlic, minced
  • 1" piece fresh, peeled ginger
  • 2 stalks lemongrass, cut into 3" sections
  • 1 tsp lime zest
  • 2 Tbsp red curry paste
  • 3 Tbsp fish sauce
  • 3 (13.5 oz) cans coconut milk
  • 1 Red bell pepper, diced
  • 1 Vidalia onion, diced
  • 1/2 lb fresh shiitake mushrooms, sliced (can substitute baby bella mushrooms)
  • 1 lb frozen chicken potstickers
  • 2 Tbsp fresh lime juice
  • 1/4 cup fresh cilantro, chopped

Instructions

1

In a large heavy pot, add the garlic, ginger, lemon grass, lime zest, red curry paste and chicken broth over high heat

2

Bring to a boil, then reduce to a simmer

3

Remove the ginger, and lemongrass from the soup using a slotted spoon

4

Add the fish sauce, coconut milk, bell pepper, onions, shiitake mushrooms, and frozen potstickers

5

Cook 8-10 minutes, making sure the potstickers are heated through

6

Stir in the lime juice and cilantro

7

Taste and adjust the seasoning as needed

8

Serve and enjoy!

9

Garnish the soup with Thai chili peppers, fresh cilantro leaves, scallions, and lime wedges

Notes

Depending on the brand of curry paste, you may need a little more.

Chicken/ Mexican

Chicken Bean and Cheese Enchiladas

On the menu tonight, Chicken Bean and Cheese Enchiladas!

I had some leftover chicken that I needed to do something with, so I decided to make enchiladas. When I was looking at recipes, I started on my own site because I know I’ve made a few varieties of enchiladas in the past. Surprisingly, I hadn’t made a chicken and bean version – until now!

Mrs wanted a version with red enchilada sauce, so that’s what she got. The entire dish went together pretty easily. There was minimal chopping and after that I mixed everything in a bowl to prepare for assembly. I used 6″ corn tortillas to wrap the filling.

The next time you’re in the mood for Mexican food, I hope you’ll try my version of Chicken Enchiladas!

Chicken Bean and Cheese Enchiladas

1 Star2 Stars3 Stars4 Stars5 Stars (No Ratings Yet)
Loading...

Chicken Bean and Cheese Enchiladas

Ingredients

  • 3 cups cooked and chopped chicken (I used chicken thighs, but a whole rotisserie chicken would be perfect)
  • 12 - 14 6 inch corn tortillas
  • 1/2 - 1 Vidalia onion, diced
  • 1 Jalapeno pepper, seeded and diced
  • 1 15 oz can re-fried beans
  • 3 cups Shredded Monterey Jack Cheese
  • 1 1/2 tsp oregano
  • 1/4-1/2 tsp cayenne pepper
  • 16 0z can red enchilada sauce
  • Kosher salt and freshly ground pepper to taste
  • Sour cream for service

Instructions

1

Pre-heat oven to 375 degrees

2

Pre-heat a medium pan over medium heat, add about a tablespoon of olive oil along with the onion and jalapeno

3

Cook until translucent, about 5-6 minutes, then set aside to cool

4

In a large mixing bowl, combine the re-fried beans, 1 cup of the shredded cheese, oregano, cayenne pepper, chopped chicken

5

Add the onions and jalapeno, stir to combine and season with a little Kosher salt and freshly ground pepper

6

Prepare a 13x9in baking dish with spreading enough of the enchilada sauce on the bottom of the baking dish

7

Prepare the tortillas by putting them on a plate and cover with a damp kitchen or paper towels, then microwave for 30 seconds to a minute to make them more pliable

8

Start filling the tortillas with approximately 1/4 cup of the filling. I used an ice cream scoop that was about 1/4 cup

9

Spread the mixture of the filling down the middle of the tortilla and roll as tightly as you can without breaking it

10

Place the filled tortilla in the baking dish, seam-side down, repeat with the rest of the tortillas, filling the baking dish

11

Spoon the rest of the enchilada sauce over each filled tortilla, making sure they all have some sauce on them

12

Sprinkle the remaining cheese over the enchiladas, then put the baking dish in the oven

13

Bake for about 30 minutes or until the cheese is bubbly and a little browned. Feel free to use the broiler if you like

14

Serve with a little sour cream and any other toppings you might like

Chicken/ Soup

Jalapeño Lime Chicken Soup

On the menu tonight, Jalapeño Lime Chicken Soup.

Tonight, I wanted to make a Mexican dish that didn’t have a ton of cheese and tortilla chips. Since it’s cooling off I thought soup would be nice. I wanted Mexican food, but something lighter and without a lot of cheese.

This soup goes together so quickly and easily, it will easily make it in to your regular rotation for meals. I used boneless, skinless chicken thighs, but you could rotisserie chicken to save some time.

If you want a hearty and tasty bowl of soup, I hope you’ll try this Jalapeño Lime Chicken Soup. Let me know if you make it!

Jalapeño Lime Chicken Soup

1 Star2 Stars3 Stars4 Stars5 Stars (No Ratings Yet)
Loading...

Jalapeño Lime Chicken Soup

Ingredients

  • 2 Tbsp extra virgin olive oil
  • 2 jalapeños, ribs and seeds removed, minced
  • 1/2 of a red onion, minced
  • 4 cups water
  • 1 teaspoon Kosher salt (more as needed)
  • 1 lb boneless skinless chicken thighs (or chicken breast)
  • 2 14-ounce cans white beans, drained (canellini or great northern)
  • 1 16-ounce jar salsa verde
  • Juice of 2 limes
  • Fresh cilantro, sour cream, and shredded cheese for serving

Instructions

1

Pre-heat a large pot over medium heat

2

Add the olive oil, onion and jalapeno. Cook 3-5 minutes until soft and translucent.

3

Add the water and salt. Bring to a boil.

4

Add the raw chicken. Cover and cook for 5-10 minutes.

5

Remove the chicken, set aside to cool.

6

Add the white beans and salsa to the pot. Simmer for 30 minutes

7

Shred/chop the chicken and add it back to the pot.

8

Just before serving, squeeze the juice of one lime into the pot.

9

Cut the remaining lime into wedges for serving.

10

Add the salt; taste and adjust as needed.

11

Serve with fresh cilantro, sour cream, and shredded cheese.

Chicken/ Chili

Chicken Chili with Ancho and Pasilla Chili Peppers

On the menu tonight – Chicken Chili with Ancho and Pasilla Chili Peppers!

We had some dried chili peppers in the pantry and I decided to include them in this recipe. I don’t use a lot of dried chilies in my cooking, so I did a little research on how to use them. Some people take off the stem and throw the whole pepper in hot water to reconstitute, then blend them. Others take off the stem, cut them open to get rid of the seeds, put them in water to reconstitute, then blend. Yet another option is to de-stem, de-seed, and finely chop or even grind and use them as you would any other dry spice. Knowing I would need some liquid for the chili, I opted to de-stem, de-seed, put them in the blender with some water and blend. I didn’t bother using hot water since they’d be going in to a pot of chili that would simmer for a while.

Other than the dried chilies, this batch is very similar to several other chilies that I’ve made. Once I tried the finished product, I will probably always incorporate dried chilies, they added SO much depth of flavor.

The next time you are making chili, I hope you’ll try my recipe and let me know what you think!

Chicken Chili with Ancho and Pasilla Chili Peppers

1 Star2 Stars3 Stars4 Stars5 Stars (No Ratings Yet)
Loading...

Chicken Chili with Ancho and Pasilla Chili Peppers

Ingredients

  • 1 lb ground chicken (light or dark meat, whatever your preference)
  • 1 dried Ancho Chili Pepper
  • 1 dried Pasilla Chili Pepper
  • 1 Vidalia onion, diced
  • 1 Jalapeno, finely diced
  • 3 cloves garlic, minced
  • 2 cans tri-blend beans (you could use whatever bean you like, including Great Northern, Cannellini, Kidney, etc)
  • 1/4 cup masa harina (optional, use this if you want a little thicker chili)
  • 1 can diced tomatoes or 1 can Rotelle tomatoes
  • 1 can tomato sauce
  • 2 Tbsp chili pepper
  • 1 tsp Oregano
  • 1 Tbsp Cumin
  • 1/4 tsp Cayenne pepper
  • 1 tsp Kosher salt
  • 1 tsp freshly ground pepper
  • 1-2 Tbsp olive oil
  • Garnish:
  • chopped scallions
  • diced red or white onion
  • grated cheddar cheese (I used medium cheddar)
  • sour cream

Instructions

1

Prepare the dried chili peppers, cut off the stems, de-seed, rough chop and put them in a blender with 2 cups of water

2

Blend the chilies until smooth and you don't see any chili pieces

3

Pre-heat a large pot over med-high heat

4

Add the olive oil, the onion, and jalapeno. Cook 3-5 minutes

5

Add the dry spices to the pot and mix them in with the onion and jalapeno to bloom them, just a minute or two

6

Add the chicken and break it up so it can caramelize in the pot, 3-5 minutes

7

Add the beans, tomato sauce, tomatoes, blended chili peppers, and garlic. Mix to combine

8

Let the mixture come to a boil, then reduce to a simmer

9

Keep a cup or two of water handy in case it starts to reduce too much

10

Simmer at least 30 minutes

Notes

When I'm preparing to cook, I will pre-measure the dry spices in a small bowl. That way, you don't waste time searching for this or that spice and measuring when you need it. The last thing you want to do is accidentally dump too much of one of the spices in to the pot.

Chicken

Pan Roasted Chicken with Summer Vegetables

On the menu tonight – Pan Roasted Chicken with Summer Vegetables!

It only takes about an hour for this really simple and delicious meal to come together.

The recipe that inspired this dish calls for chicken breast, but I prefer thighs. I think the thighs are more flavorful, they don’t dry out as easily as the chicken breast, and since they are usually a little smaller, I think they make portioning easier. But you do you! 🙂

One of the things I like most about this dish is that there isn’t really anything fussy you need to do as far as technique. It’s a pretty rustic dish so the cuts on your veggies don’t have to be exact. That said, it helps if the veggies are cut to similar sizes so they cook evenly.

I hope you will try this dish and let me know what you think!

Pan Roasted Chicken with Summer Vegetables

1 Star2 Stars3 Stars4 Stars5 Stars (1 votes, average: 5.00 out of 5)
Loading...

Pan Roasted Chicken with Summer Vegetables

Ingredients

  • 1.5 - 2lbs chicken thighs (bone-in, skin on)
  • 3 Tbsp olive oil, divided
  • 2 Tbsp Herbes de Povence (if you don't have this, you can make it yourself with equal parts dried rosemary, thyme, oregano, savory, and marjoram)
  • 6 cloves garlic, smashed and peeled
  • 1 medium onion, halved and sliced about 1/4 in thick
  • 1 yellow, orange, or red bell pepper, sliced in to strips
  • 1 pint grape tomatoes
  • 1 small zucchini halved lengthwise and sliced crosswise about 1/4 in thick OR slice 1/4 in rounds
  • 1/4 cup capers drained, plus 1 Tbsp of the brine
  • 1/2 cup dry vermouth
  • 1 cup lightly packed fresh basil, torn (optional)
  • Kosher salt
  • Freshly ground pepper

Instructions

1

Pre-heat the oven to 475 degrees with the rack in the middle of the oven

2

Season the chicken on both sides with Kosher salt and freshly ground pepper and set aside

3

In a large mixing bowl, stir together two tablespoons of extra virgin olive oil, the herbes de Provance, 1/2 tsp Kosher salt, and 1 tsp of freshly ground pepper.

4

Add the garlic, onion, bell pepper, tomatoes, zucchini, and capers (including the brine) and set aside.

5

Pre-heat a 12 cast iron or oven-safe skillet over med-high heat

6

Add a Tbsp of extra virgin olive oil and when it shimmers, add the chicken thighs with the skin side down

7

Let it go - DO NOT TOUCH for 5-8 minutes to let the skin get nice and crispy

8

Remove the chicken and put on a large plate

9

Pour all but about a tablespoon of the oil and fat in the pan to a bowl, then add the vermouth to the pan

10

Bring the vermouth to a boil over med-high heat and scrape up any brown bits from the pan

11

Reduce to about two tablespoons, about 2 minutes

12

Add the vegetables to the pan and stir them around to an even layer

13

Let the veggies cook for about 2-3 minutes, give them a stir and then start adding the chicken back to the pan

14

Put the chicken in the pan, skin side up and pour in any juices from the plate

15

Transfer the skillet to your pre-heated oven and cook for 25-30 minutes (check the thickest piece has a temp of about 160 degrees F)

16

Remove the pan from the oven, don't forget that handle will be HOT, and either transfer to a serving platter

17

Set the skillet over high heat to let the juices thicken and reduce a little, about 2 minutes

18

Taste and season with salt and pepper if needed

19

Pour over the vegetables

20

Sprinkle the entire dish with the torn basil if using

Chicken

Chicken Enchiladas with Homemade Green Enchilada Sauce

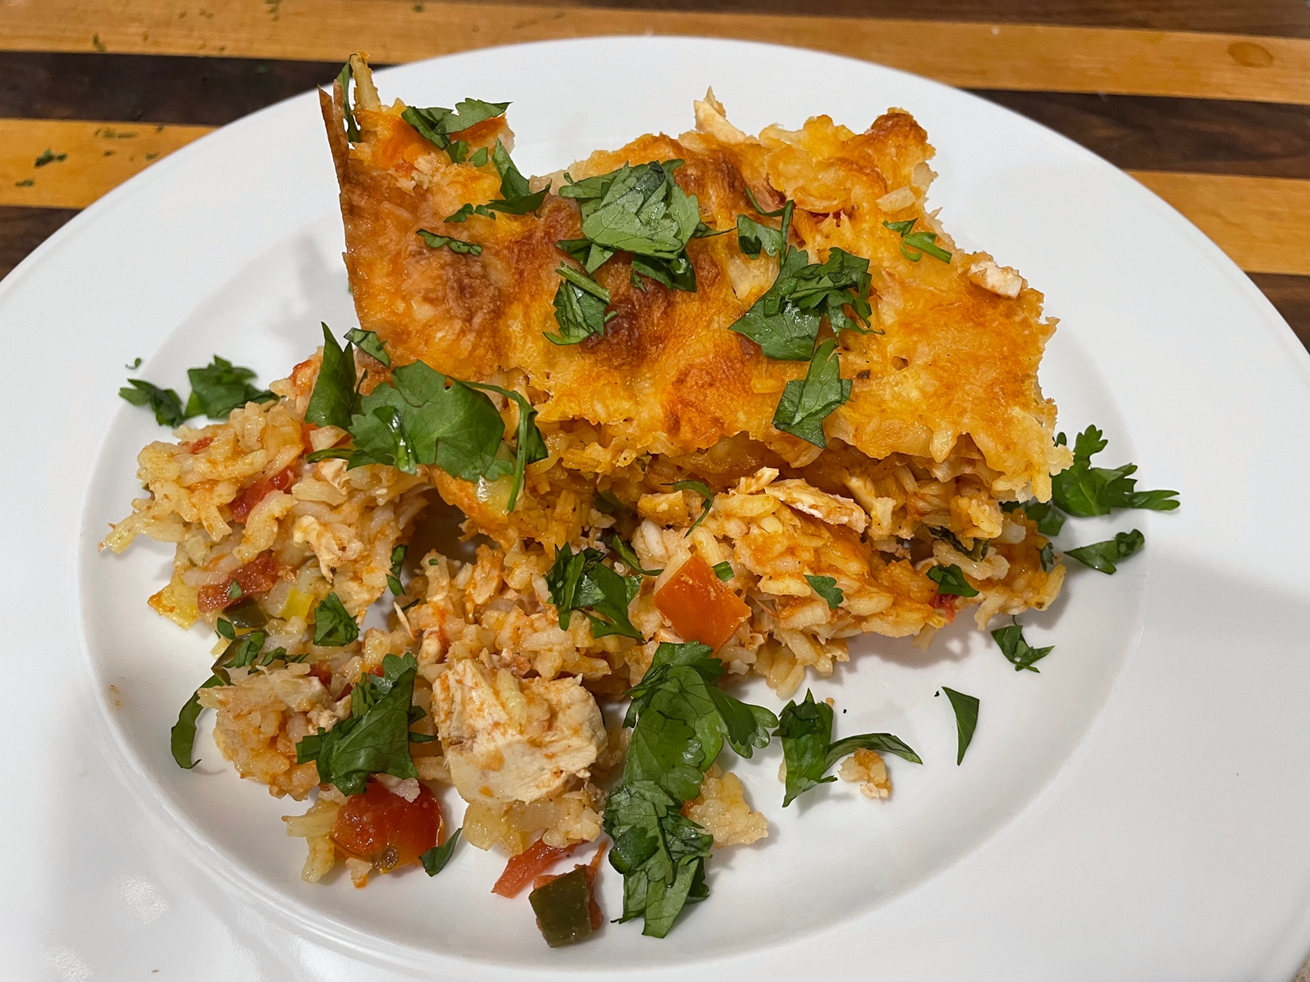
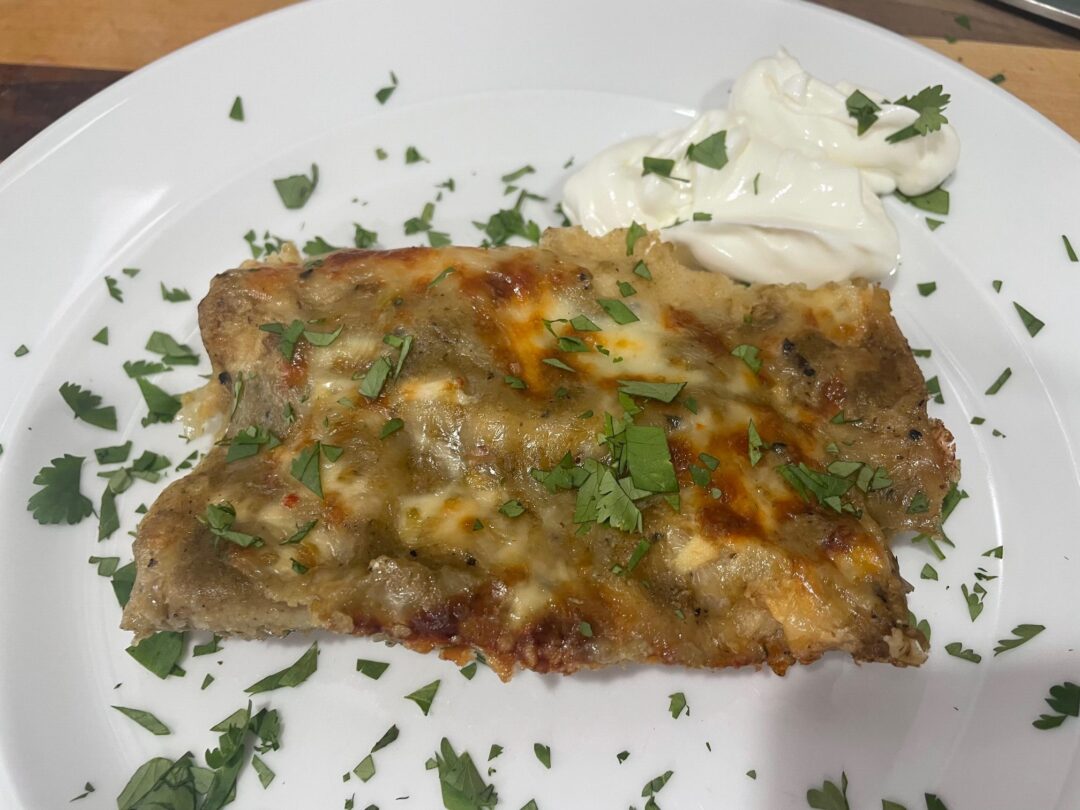
On the menu tonight, Chicken Enchiladas with Homemade Green Enchilada Sauce.

This recipe uses a couple of shortcuts that allow you to make a batch of enchiladas for a crowd without spending all day in the kitchen. This meal was every bit as good as anything you will get your local Mexican restaurant. Mrs rated this one as BEST EVER! She liked it so much that I decided to add a “Best Ever” classification.

One of the best things about this dish is that you probably have everything you need in your pantry and if you don’t you can easily get any of the ingredients. The next best thing is that there isn’t anything difficult or fussy in putting the meal together.

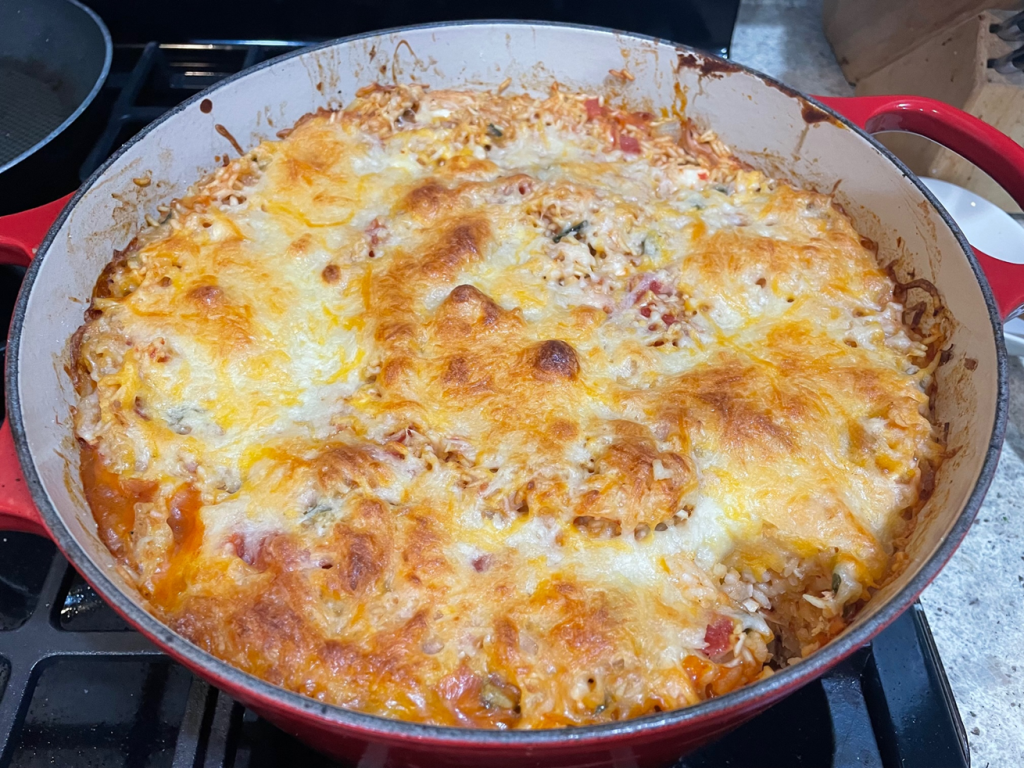
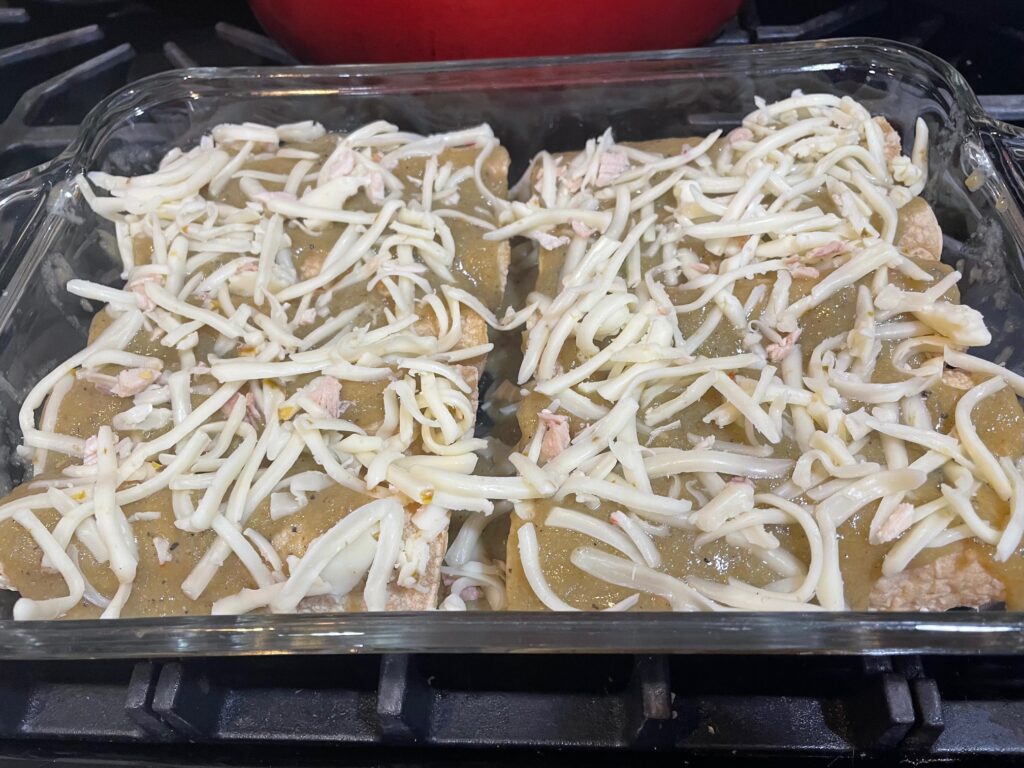
Once you have the enchilada mixture ready, start filling the enchiladas evenly and putting them seam-side down in a baking dish. Once they are all filled, spoon the enchilada sauce over the enchiladas and then evenly spread the grated Pepper jack cheese.

Chicken Enchiladas with Homemade Green Enchilada Sauce

Bake the enchiladas for 30 minutes. If the cheese isn’t golden and bubbly, put under the broiler for about 2 minutes.

The next time you are in the mood for Mexican, I hope you will try these enchiladas.

Chicken Enchiladas with Homemade Green Enchilada Sauce

1 Star2 Stars3 Stars4 Stars5 Stars (1 votes, average: 5.00 out of 5)
Loading...

Chicken Enchiladas with Homemade Green Enchilada Sauce

Ingredients

  • Enchiladas:
  • 12 6" corn tortillas (get the best you can find or make them)
  • 1-1.5 lbs chicken (recommend rotisserie chicken for a shortcut), cubed
  • 8 oz Pepper jack cheese, grated (grate it yourself, don't buy the pre-grated)
  • 1/2 cup sour cream
  • 2 green onions, sliced
  • 1/4 cup fresh cilantro, chopped
  • 1 tsp garlic powder
  • 1 tsp cumin
  • 1/2 tsp Kosher salt
  • 1/4 tsp cayenne pepper (more if you like it hotter)
  • Enchilada Sauce:
  • 8 oz green chilies (recommend hatch green chilies)
  • 2 Tbsp olive oil
  • 1 cup water
  • 2 Tbsp flour
  • 1 tsp cumin
  • 1 tsp onion powder
  • 1 tsp garlic powder
  • 1/2 tsp Kosher Salt

Instructions

1

Prepare the Enchilada Sauce:

2

Add the green chilies and water to a blender, blend until smooth

3

In a small sauce pan, add the olive oil, flour, and spices

4

Whisk until smooth, when it starts to bubble, slowly add the chilies and water and continue whisking

5

Bring the mixture to a simmer and then remove from the heat and set aside

6

Preheat the oven to 350 degrees

7

Prepare the Enchilada Mixture:

8

In a large mixing bowl, add the cooked, cubed chicken, sour cream, half of the Pepper jack cheese, cilantro, green onions, and spices

9

Gently mix to combine

10

Put it all together:

11

Preheat a medium pan over med-high heat

12

Add 1 to 2 tortillas to the pan and heat them for about 60 seconds or until pliable

13

Set the heated tortillas on a plate with foil so you can cover them as you prepare the rest

14

Once all the tortillas are heated, get a 13x9 baking dish and start filling the tortillas with the mixture

15

Fill a 1/4 cup measuring cup with the chicken mixture and evenly distribute on a tortilla

16

Roll the tortilla and place, seam-side down in the baking dish

17

Repeat until all the tortillas have been filled and rolled

18

Spoon the enchilada sauce over each tortilla

19

Evenly spread the rest of the grated Pepper jack cheese on top

20

Put in the oven for 30 minutes

21

If the cheese isn't slightly browned on top, put under a high broiler until the cheese is slightly browned (about 2 minutes)

22

Garnish with chopped cilantro and / or sliced green onions and serve with sour cream

Chicken

Grilled Chicken Thighs with Spicy Peanut Lime Sauce

On the menu tonight – Grilled Chicken Thighs with Spicy Peanut Lime Sauce!

If you are looking for a way to spice up your chicken thighs, look no further. While your chicken is cooking on the grill, seasoned with salt, pepper, onion and garlic powder, make the sauce.

The sauce has tamari (you can substitute soy sauce if you don’t have any tamari), honey, peanut butter, lime juice, sambal chili paste (you can substitute sweet chili sauce if you want less heat), and finely chopped scallions.

Once your chicken has finished grilling, drizzle this yummy sauce over it and serve a little more in a ramekin on the side for dipping. Top it off with some fresh cilantro and chopped peanuts.

Grilled Chicken Thighs with Spicy Peanut Lime Sauce

1 Star2 Stars3 Stars4 Stars5 Stars (No Ratings Yet)
Loading...

Grilled Chicken Thighs with Spicy Peanut Lime Sauce

Ingredients

  • 4 - 6 bone-in skin-on chicken thighs
  • 1/4 cup smooth peanut butter
  • 2 Tbsp tamari
  • 2 limes, zested and juiced
  • 2 Tbsp honey
  • 2 Tbsp Asian chili paste, like sambal oelek (for less heat use a sweet chile sauce)
  • 3 - 4 scallions, finely chopped
  • 1/4 cup chopped peanuts
  • 1/3 cup chopped fresh cilantro
  • Spice Mixture
  • 2 Tbsp ea Kosher salt,black pepper, onion and garlic powder

Instructions

1

Pre-heat your grill or oven (pre-heat to 350 degrees if baking)

2

In a medium mixing bowl, combine the salt, pepper, onion and garlic powder

3

Pat the chicken thighs with a paper towel, then season both sides liberally with the spice mixture

4

Put the chicken on the grill, skin side down

5

Once the chicken is on the grill, start on the sauce

6

In a medium mixing bowl, whisk together the peanut butter, tamari, lime zest and juice, along with the chili paste, honey and scallions

7

Start by gently breaking down the peanut butter with the whisk. As the peanut butter breaks down, it will get easier to whisk

8

Once the chicken is about half-way cooked, flip it so the skin side is up

9

When the chicken is done (about 165 degrees internal temp), put it on a platter, drizzle the sauce you made along with the cilantro and chopped peanuts

10

Serve right away and enjoy!