Browsing Category

Chicken

Chicken

Oven “Fried” Chicken

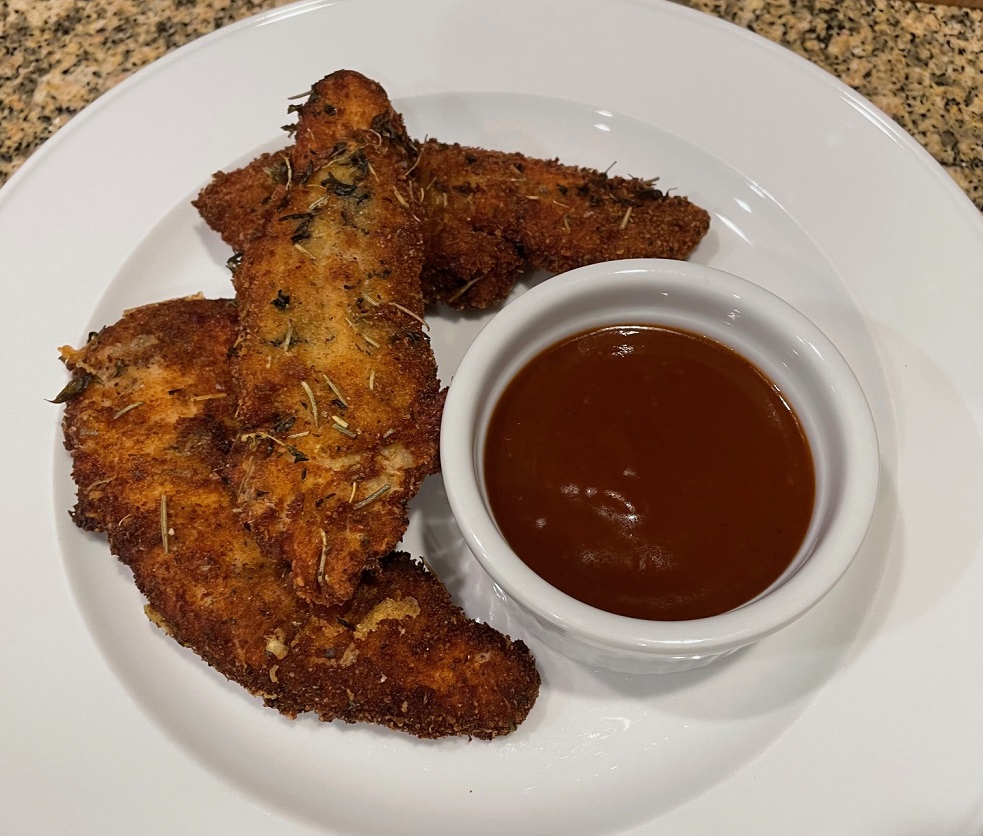
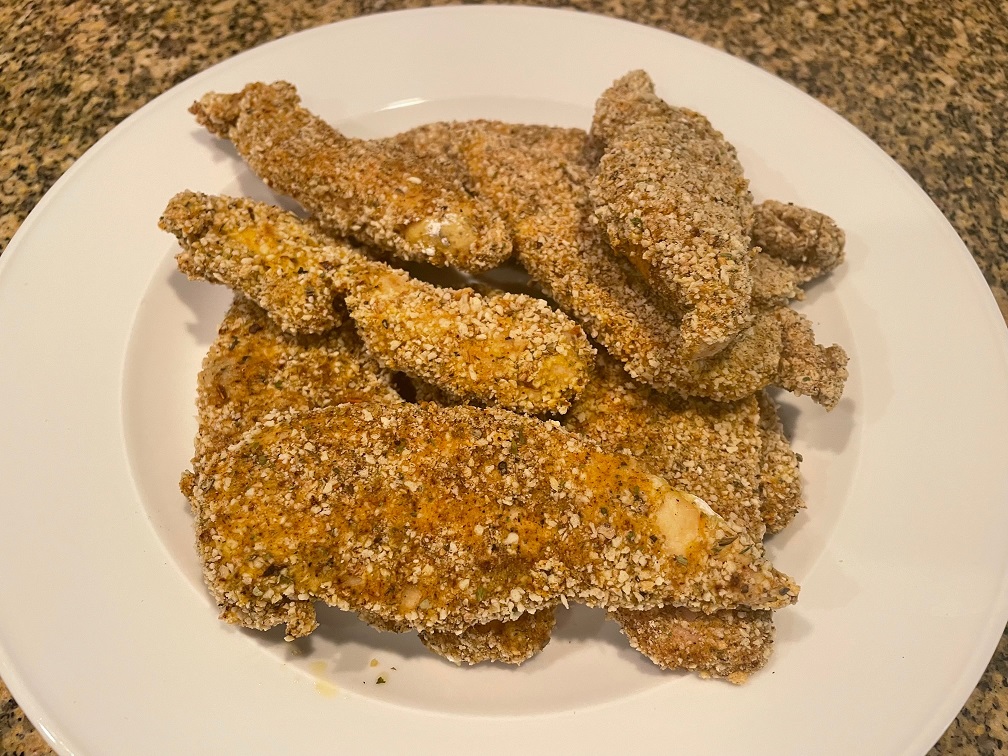
On the menu tonight – Fried Chicken! It’s not really fried, it’s oven “fried” chicken.

I wanted fried chicken, but I didn’t want stand over a pan of hot oil at the end of the day. To get close to the same flavor, I prepared the chicken like I would have if I was going to fry it, but I baked it instead.

It came out really good! Since I used bread crumbs for the coating and didn’t actually fry it, the coating was a little on the dry side. I kind of expected that to happen as the chicken didn’t get a dunk in hot oil. The rest of the familiar flavors were there. I added some Tabasco to my egg wash to give it a little kick. I also used a BBQ rub in the breadcrumb mixture and that has a little bit if cayenne pepper. The end result was fantastic! There’s a little heat, but I wouldn’t even call it a medium heat.

What I love most about this meal is how quickly it came together. I put some flour seasoned with a little salt and pepper in one pan, a few whisked eggs with some Tabasco in another pan, and Italian bread crumbs with some onion powder, garlic powder, and BBQ rub in another pan. I prepped the chicken just as I would have if I were going to fry it, coating it in the flour, dipping in the egg mixture, then coating with the bread crumbs and setting aside. Setting the chicken aside for a bit to let that coating dry a little is key – don’t skip that step. If you like a thick crust, repeat the process.

Because you set the chicken aside to dry for a bit, it’s a great make-ahead meal. You can get the chicken prepped and coated, waiting in the fridge. When you’re ready to cook, pull it out to let it come to room temperature before putting it in the oil or oven.

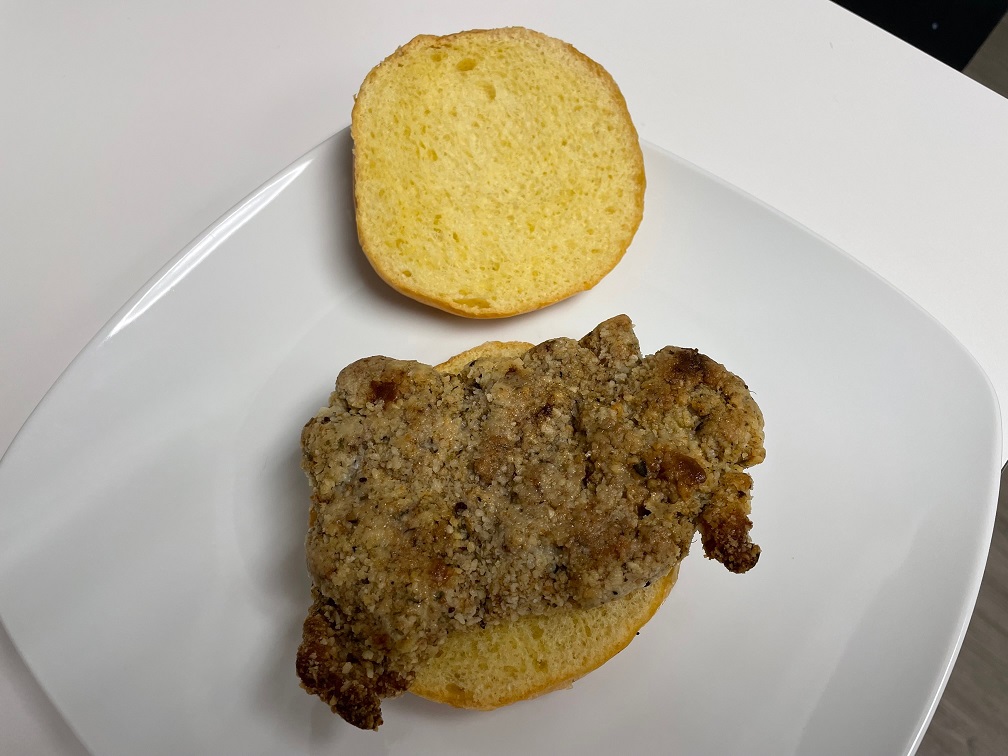
When it comes out of the oven, let it rest a few minutes before serving. I made a mix of tenders and thighs. You can serve all of it on it’s own with dipping sauces and sides, or you could make your own chicken biscuits and sandwiches.

Chicken Tenders
Chicken Thighs
Chicken Sandwich

I hope you’ll try my Oven “Fried Chicken”!

Oven Fried Chicken

1 Star2 Stars3 Stars4 Stars5 Stars (No Ratings Yet)
Loading...
By Patrick Dulmage Serves: 4
Prep Time: 30 minutes Cooking Time: 35 minutes Total Time: 65 minutes

Oven Fried Chicken

Ingredients

  • 1.5 lbs chicken thighs (boneless and skinless)
  • 2-3 eggs, whisked
  • 1 cup AP flour
  • 2ish cups of Italian bread crumbs (error on the side of too much bread crumbs. I'd rather use the leftover in something else or throw it away than not have enough to coat the chicken)
  • 1 tsp Kosher salt
  • 1 tsp freshly ground black pepper
  • 2 tsp garlic powder
  • 2 tsp onion powder
  • 2 tsp BBQ rub (store bought or make your own)
  • Tabasco sauce - a few dashes

Instructions

1

Dry off the chicken

2

Get a pan/plate with the flour and season it with the Kosher salt and ground pepper

3

Get a pan/bowl with the whisked eggs and add a few dashes of Tabasco sauce

4

Get a pan/plate with the Italian bread crumbs, BBQ rub, garlic powder, and onion powder

5

Dredge the chicken in the flour, shake off the excess

6

Dredge the chicken in the egg mixture, let the excess drip off

7

Dredge the chicken in the bread crumb mixture

8

Set the coated chicken on a wired rack or plate

9

Repeat the process for the rest of the chicken

10

If you like a thicker crust on your chicken, repeat the coating process after the chicken has had a few minutes to dry a little

11

Put the coated chicken in the fridge for at least 20 minutes

12

Pre-heat the oven to 350 degrees

13

Put the chicken on a baking sheet and bake for about 35 minutes (Note that I used boneless chicken, if using bone-in chicken it will take longer)

14

When finished baking, let it rest for 5 minutes before serving

15

Notes

I prefer chicken thighs for fried chicken. Thigh meat is more flavorful and forgiving, it won't dry out as much as say a chicken breast. In this recipe, I used boneless and skinless because that's what was in my fridge. If you use bone-in and skinned chicken, you will want to add some time to the cook. I'd have added about 12-15 minutes to the cook time in the oven if I'd have used bone-in chicken thighs.

Chicken/ PartyFood

Spicy Buffalo Chicken Enchiladas with Shredded Iceberg Lettuce

On the Menu tonight – Spicy Buffalo Chicken Enchiladas!

When I saw Katie Lee Biegel make this on The Kitchen, I had to add this one to my Superbowl menu instead of chicken wings. There is a lot of help from the store in this recipe too, which makes it a great dish to make anytime because it comes together so fast. By using a rotisserie chicken, you simply pull the meat off the bones and chop it to bite-sized pieces. Mix in the shredded Monterey Jack cheese with the chicken in a large mixing bowl. When the buffalo sauce is ready, mix a cup of that in as well.

With the buffalo chicken mixture ready, you are ready for assembly. When Katie made her version, she cut the enchiladas into pinwheels. I did about half of the enchiladas into pinwheels and the rest simply cut the enchiladas in half. The pinwheels are great for a party and the half-sized pieces are great for lunch or dinner. Once all the enchiladas are assembled, pour the rest of the buffalo sauce over them along with the rest of the shredded Monterey Jack cheese. Bake them and serve with the finely shredded iceberg lettuce along with crumbled blue cheese and either blue cheese or ranch dressing.

Now that you have the technique down, you can modify it to an endless variety of enchiladas. I hope you will try this version and let me know what you think.

Spicy Buffalo Chicken Enchiladas

1 Star2 Stars3 Stars4 Stars5 Stars (No Ratings Yet)
Loading...
By Katie Lee Biegel Serves: 12

Spicy Buffalo Chicken Enchiladas

Ingredients

  • 1 Rotisserie chicken, pulled from the bone and chopped
  • 1 stick butter
  • 1 lb grated Monterey Jack cheese
  • 2 cups mild red enchilada sauce
  • 3/4 cup hot sauce (Frank's Red Hot recommended)
  • 8 10-inch flour tortillas
  • 1/2 head iceberg lettuce, finely shredded
  • 1/2 cup Ranch dressing
  • 1/2 cup blue cheese crumbled

Instructions

1

Pre-heat oven to 350 degrees

2

Butter a 13x9 baking dish

3

Add the chicken and 2 1/2 cups of the shredded Monterey Jack cheese to a large mixing bowl

4

Heat the butter, enchilada sauce and hot sauce and in a small saucepan over medium heat until the butter melts

5

Remove from the heat

6

Transfer 1 cup of the sauce to the bowl with the chicken

7

Toss to fully coat

8

Ladle 1/2 cup of the sauce into the bottom of the prepared baking dish

9

Spread a heaping 1/2 cup of the chicken mixture evenly onto a tortilla, then roll it up (If you’d like, trim the round ends of the tortilla that are unfilled and reserve for another use)

10

Cut the rolled tortilla into 6 pinwheels

11

Place each pinwheel cut-side down in the baking dish

12

Repeat with the remaining tortillas and chicken mixture

13

Pour the remaining sauce over the tortillas and sprinkle the remaining Monterey Jack cheese on top

14

Bake until the cheese is melted and bubbling, 15 to 20 minutes

15

Meanwhile, toss the lettuce with the ranch dressing in a large bowl

16

Sprinkle the blue cheese crumbles on top of the enchiladas

17

Serve immediately with the salad

Chicken/ Leftovers

Chicken Parmigiana made with Chicken Tenders

Happy New Year’s!! On the menu tonight – Chicken Parmigiana!

Remember the Parmesan and Herb Chicken Tenders I made recently? Well, I had some leftover and decided to make one of my suggestions, Chicken Parmigiana.

Since I already made the chicken tenders, all I had to do for this dish was put them in the dish with a few dollops of sauce and some grated cheese. Oh my GOSH was it delicious!

I didn’t even fire up my full sized oven. I cooked the entire thing in my toaster oven. Most of my dishes are made for multiple people. This dish was for one person. That said, you could easily up the number of chicken tenders to feed however many people you are cooking for.

I hope the next time you crave chicken Parmigiana, you’ll try my recipe.

Chicken Parmigiana made with Chicken Tenders

1 Star2 Stars3 Stars4 Stars5 Stars (No Ratings Yet)
Loading...
By Patrick Dulmage Serves: 1
Prep Time: 5 Cooking Time: 20 minutes Total Time: 25 minutes

Chicken Parmigiana made with Chicken Tenders

Ingredients

  • 3 Chicken Tenders, pre-cooked
  • 1/2 cup marinara sauce
  • 1/2 cup mozzarella, grated
  • 1/4 ish cup Parmesan cheese

Instructions

1

Pre-heat the oven to 350 degrees

2

Put the pre-cooked chicken tenders in a baking dish

3

Evenly spread some of the mozzarella cheese on the chicken

4

Dollop the marinara sauce on each piece of chicken

5

Evenly spread the rest of the mozzarella and Parmesan on the chicken

6

Bake for 20 minutes

7

Then put under a high broiler until the cheese is golden brown

8

Serve immediately with garlic bread

Notes

This dish assumes you have pre-cooked chicken tenders. For the best results, I'd recommend making the tenders yourself, using my recipe of course! 😉 You could also use the chicken tenders in the deli area of your market, or even frozen breaded chicken tenders. For the last two options, I'd recommend seasoning them with Italian seasoning.

Chicken

Parmesan and Herb Chicken Tenders

On the menu tonight – Parmesan and Herb Chicken Tenders!

While you could certainly have these tenders along with some BBQ sauce, they would be delicious. What am I saying? They WERE delicious! I had to have one even before I took the picture. BUT, you could also turn them into chicken Parmesan. Or, you could let them cool off and put them over a salad.

They turned out so flavorful and juicy. Because I didn’t fry them too long and then finished them in the oven, I controlled how dark the bread crumbs got AND they didn’t dry out.

I think it took longer to set up the flour, egg, and bread crumb stations than it did to actually cook the tenders!

The other great thing about this dish is they would freeze really well. I hope you will pick up some chicken tenders and make this dish. Write and tell me how you liked them and whether you had them as is or if you went in another direction.

Parmesan and Herb Chicken Tenders

1 Star2 Stars3 Stars4 Stars5 Stars (No Ratings Yet)
Loading...
By Patrick Dulmage Serves: 6
Cooking Time: 30 minutes

Parmesan and Herb Chicken Tenders

Ingredients

  • Peanut Oil for frying
  • 1 1/2 lb chicken tenders
  • 1 cup all purpose flour
  • 2-3 large eggs beaten with 1/4 cup water
  • 1 Tbsp seasoned salt
  • 2 tsp freshly ground pepper
  • Breading:
  • 1 1/2 Italian bread crumbs
  • 1 cup grated Parmesan cheese
  • 1 Tbsp thyme, dried
  • 1 Tbsp rosemary, dried
  • 1 Tbsp onion powder
  • 4 cloves garlic, minced OR 1 Tbsp garlic powder

Instructions

1

Pre-heat the oven to 350 degrees

2

In one pie tin or plate, add the flour, the seasoned salt, and pepper, then mix to combine

3

In another pie tin or plate, add the bread crumbs, Parmesan cheese, onion powder, thyme, garlic, and rosemary

4

On yet another plate, put the chicken on it and pat it dry

5

Season the chicken with seasoned salt and pepper

6

Have a sheet pan with a wire rack on it at the ready

7

Are you ready? Here we GO!

8

Coat each piece of chicken in the flour (I used tongs to try to keep my hands clean)

9

Then dip the chicken pieces in the egg and then roll in the bread crumb/cheese mixture

10

Let the chicken rest on the wire rack a few minutes after they are all done. You want the coating to get a little tacky on the chicken so it sticks better

11

As the chicken rests, put about a 1/2 inch of oil in a cast iron skillet and heat to 350 degrees

12

When the oil comes to temperature, add 2-3 pieces at a time. Place them CAREFULLY in the oil, letting the tender slide in the oil away from from in case it splatters

13

Cook each piece until it is golden brown and then remove to the wire rack

14

Continue in batches until all the chicken is cooked

15

Place the sheet pan of chicken into the oven for about 10 minutes to ensure it is cooked through

16

After the timer goes off, remove from the oven and serve

Notes

Bring the chicken to room temperature, approximately 30 minutes to an hour before cooking. Don't worry, it's OK. Once the chicken tenders are cooked, you have SO many choices. You could serve as is with some different dipping sauces (BBQ, Ranch, Honey mustard...). Another option is to make little chicken Parmesans, OR you could serve them cold over a salad. Those are just a few options I thought of off the top of my head.

Chicken

Food Court Bourbon Chicken

On the menu tonight – Food Court Bourbon Chicken!

This is one of my guilty pleasures. I can’t tell you how many times I have ordered this from the food court in the building I used to work. Funny thing is, as much as I loved it, I never made it – until now. It has been too long since I have had this delicious Americanized Chinese food.

The thing I remember most about getting it at the food court is the person serving it always has that little scoop – it’s always the same type scoop no matter where I have been. When you order it, they move the bourbon chicken around in the pan a few times like they are trying to get you the biggest scoop they can. You’re thinking “Oh yeah! Load me up!” BUT, when it’s time to put it in the styrofoam container that darn scoop is mostly full if you’re lucky! They start putting a few pieces of the chicken on the rice and now you’re thinking “What happened to those heaping scoops I saw you moving around???!!!…” LOL I digress, good times.

It didn’t take long to find recipes on Pinterest for copy cat versions, so full disclosure when I say I did not craft this recipe. The final product was pretty good, definitely better than some food court chicken that I have had, but I’m going to work on this one. It tasted like something was missing.

When I make it next time, I will season the chicken first. Another change I will make is to marinade the chicken as well for at least an hour. If you have a version of bourbon chicken, I would like to hear how you make your version.

Food Court Bourbon Chicken

1 Star2 Stars3 Stars4 Stars5 Stars (1 votes, average: 5.00 out of 5)
Loading...

Food Court Bourbon Chicken

Ingredients

  • 1 Tbsp olive oil
  • 2 lbs chicken thighs, boneless and skinless
  • 1 tsp ground ginger
  • 1/2 tsp garlic powder
  • 1/4 tsp black powder
  • 1/3 cup soy sauce
  • 1/3 cup bourbon
  • 1/2 cup water
  • 1 tsp rice vinegar
  • 1/2 cup brown sugar, tightly packed
  • 1 tsp cornstarch, dissolved in 3 Tbsp water
  • 1 cup rice

Instructions

1

Prepare the rice per package instructions and set aside

2

Cut the chicken into bite sized pieces, about 1 inch

3

In a bowl, combine the ginger, pepper, soy sauce, bourbon, water, garlic, vinegar, and brown sugar, then set aside

4

In a large sauce pan, pre-heat over medium high heat

5

Add the chicken and cook until the chicken starts to brown - about 8 minutes. Do it batches if needed, don't crowd the pan

6

Add the bourbon mixture and stir well

7

Bring it to a boil and then lower the temperature to medium and then simmer, uncovered, about 15 minutes.

8

Allow time for the alcohol to cook off

9

Add the cornstarch slurry and stir. The sauce will quickly start to thicken

10

Serve over rice

Notes

As mentioned above, I recommend seasoning the chicken first with salt and pepper first. I would also recommend marinading the chicken in the liquid mixture for at least an hour. Next time, I think I will add about a 1/2 tsp of sesame oil.

Chicken

Citrus Marinated and Glazed Roasted Chicken with Rice

On the menu tonight – Citrus Glazed Roasted Chicken!

It’s getting colder outside, but I wanted to a summery bright dish to give one more shout out to summer. I also wanted to do something different than a lemon chicken, though there is lemon in this recipe.

As the title says, the chicken is glazed. I don’t usually take the time to make a separate glaze but this time I tried it and I’m glad I did. That glaze adds another great level of flavor. For the citrus, I used freshly squeezed orange and lemon juice along with the zest.

I let the chicken marinade over night which resulted in really juicy and flavorful chicken.

Citrus Glazed Chicken

One thing that didn’t turn out as well as I would have liked is the chicken skin. I would have liked the skin to be crispier. Even though I took the time to remove the excess liquid, the skin still didn’t crisp up. Next time, I will put the chicken under the broiler the last 5-10 minutes. Or, I may just grill the chicken next time instead of baking it. In any event, the chicken was still delicious.

I hope you will make your version and let me know it turns out.

Citrus Marinated and Glazed Roasted Chicken

1 Star2 Stars3 Stars4 Stars5 Stars (No Ratings Yet)
Loading...
By Patrick Dulmage Serves: 6-8
Prep Time: 15 minutes Cooking Time: 1 hour Total Time: 1 hour 15 minutes

Citrus Marinated and Glazed Roasted Chicken

Ingredients

  • 3-4 lbs chicken thighs (skin-on and bone-in)
  • 2 oranges, zested and juiced
  • 1/2-1 lemon, zested and juiced
  • 3 Tbsp basalmic vinegar
  • 1 Tbsp celery seed
  • 2 tsp black pepper
  • 1 tsp kosher salt
  • 1/4 red onion, finely chopped
  • 1 tsp freshly chopped mint
  • 1 1/2 Tbsp freshly chiffonade basil
  • 3/4-1 cup Mojo marinade
  • Glaze:
  • 1 Tbsp olive oil
  • 1 Tbsp shallot, minced
  • 1 tsp ginger, minced
  • 1/2 cup orange marmelade
  • 1/4 cup sweet chili sauce
  • 1/4 cup reserved marinade, strained

Instructions

1

Combine all the ingredients in a zip lock type bag

2

Massage and mix the chicken with the marinade before letting rest in the refrigerator at least 4 hrs

3

Let chicken come to room temperature prior to cooking, about 30-60 minutes

4

Preheat the oven to 350 degrees

5

Put the chicken in a 13x9 baking dish, skin side down. Reserve some of the marinade for basting

6

Bake the chicken for 45 minutes, then baste with the glaze, turn each piece over and glaze that side

7

Bake an addition 30 minutes, basting every 10 minutes

8

Make the glaze after you put the chicken in the oven:

9

Heat a small sauce pan over medium-high heat with olive oil

10

Add the shallots and ginger, saute for 3-4 minutes

11

Add the remaining ingredients, reduce heat to a simmer

12

Cook for 15 minutes or longer, it should have thickened

13

Before you baste for the first time, there will likely be a lot of liquid in the bottom of the baking dish. To get a nice glaze, you will want to get that liquid out of there so the glaze can really thicken.

Chicken

Pollo al Horno / Roasted Chicken with Roasted Potatoes

Pollo al Horno

On the menu tonight – Pollo al Horno… Roasted Chicken!

I came across this dish while I was in El Salvador. On my last day there, the house keeper made this for me and it was one of the best chicken dishes I’ve had. I asked her how she made it, which was a challenge because she didn’t speak English and my Spanish is marginal at best. Luckily for me, she wrote out the recipe – but it was all in Spanish. I brought what she wrote to work with me and asked my colleagues to help translate. It must have been pretty comical watching about 5 IT guys reading over what she wrote and trying to figure out what this or that word in English was.

My version was fantastic! It was juicy and flavorful. The potatoes get some of that chicken flavor from the juices as it bakes. While I think we came pretty close, my version still isn’t as good as what Anna made.

If you want to try a different take on a roasted chicken, I hope you will try my interpretation of an El Salvadorian Pollo al Horno.

Pollo al Horno / Roasted Chicken

1 Star2 Stars3 Stars4 Stars5 Stars (No Ratings Yet)
Loading...
By Patrick Dulmage Serves: 4-6
Prep Time: 15min Cooking Time: 3 hrs Total Time: 3hrs 15min

Pollo al Horno / Roasted Chicken

Ingredients

  • 1 whole chicken (3-4 lbs)
  • 2 Tbsp Complete Seasoning (Badia brand)
  • 1 Tbsp Granulated garlic
  • 1 tsp black pepper
  • 2 tsp mustard (I used honey mustard)
  • 1/4 cup soy sauce
  • 1/4 cup Worcestershire sauce
  • 1 Tbsp cumin
  • 1 Tbsp hot sauce
  • Kosher salt to taste
  • 1 Tbsp chicken powder (tried substituting Chicken flavored Better Than Bullion )
  • Potatoes:
  • 1.5 lbs small potatoes (fingerling, Yukon, red potatoes, your choice), halved/quartered depending on size

Instructions

1

Pre-heat oven to 325 degrees

2

In a large mixing bowl, combine the Complete seasoning, garlic, black pepper, mustard, soy sauce, Worcestershire sauce, cumin, and hot sauce

3

Marinade the chicken in the mixture for at least an hour

4

In a large mixing bowl, add the small potatoes, olive oil, and Kosher salt

5

Fill the cavity of the bird with the cilantro, celery, basil, mint, garlic, and onion

6

Scatter the potatoes around the chicken on the baking sheet

7

Bake on a rimmed baking sheet covered with foil for 2 hours

8

Uncover the bird and bake an additional hour

9

Let rest 10-15 minutes before serving

Casserole/ Chicken/ Soup

Skillet Chicken and Dumplings

On the menu today – Skillet Chicken and Dumplings!

The last time I made chicken and dumplings, it was a disaster. It was my first attempt and I didn’t let the dumplings cook long enough. As a result, the dumplings were awful. With the weather getting cooler, I decided to try it again. This time I took a shortcut and used biscuits instead of making the dumplings myself.

This dish is a complete success! One bite with the chicken, a bit of dumpling, and of course the thick sauce… it’s like a nice warm hug. YUM!

You get a bonus recipe on this post. I’m also including a recipe for homemade chicken stock. How many times do you buy a rotisserie chicken from the grocery store? I buy them pretty frequently, but I had been throwing away the bones – don’t do that. Use the bones along with the other things I will list in the recipe and make your own chicken stock. It’s really easy and taste so much better than store bought. No judgement if you decide to use store bought stock for your version of chicken and dumplings.

Let me know how your version turns out!

Skillet Chicken and Dumplings

1 Star2 Stars3 Stars4 Stars5 Stars (No Ratings Yet)
Loading...
By Patrick Dulmage Serves: 8-10
Prep Time: 15 minutes Cooking Time: 40 minutes Total Time: 55 minutes

Skillet Chicken and Dumplings

Ingredients

  • 1 rotisserie chicken, pulled from the bone and cubed - discard the skin (about 4 cups)
  • 1 Vidalia Onion, diced
  • 3 stalks celery, diced
  • 1 carrot, diced
  • 1 tsp thyme
  • Kosher salt
  • Freshly ground pepper
  • 4 Tbsp butter
  • 32 oz chicken stock, homemade or store bought
  • 1 16.3 oz container of refrigerated biscuit dough
  • 1/4 cup stone-ground corn meal
  • 1/3 cup flour
  • 2 tsp paprika
  • 1/4 cup fresh parsley, finely chopped

Instructions

1

In a medium mixing bowl, mix the corn meal, paprika, and about a half teaspoon of salt

2

Open the tube of biscuits and cut each one into bite sized pieces

3

Toss the biscuit pieces in the corn meal mixture and set aside

4

In a large cast iron skillet, heat the butter

5

Add the onion and cook until translucent, about 5 minutes

6

Add the flour and mix with the onions and let cook another 3-5 minutes

7

Slowly add the chicken stock and stir constantly to thoroughly combine all the ingredients

8

Season with salt and pepper and bring to a boil

9

Reduce the heat to a simmer, then add the chicken, half of the parsley, carrot, and celery

10

Cover the chicken mixture with the biscuit pieces and then cover

11

Cook for about 25 minutes on low

12

The "dumplings" should be light, fluffy, and fully cooked

13

Garnish with the rest of the parsley

14

Let it cool at least 5 minutes before serving

Chicken/ Soup/ Stock

Quick Homemade Chicken Stock

On the menu today – Quick Homemade Chicken Stock!

How many times do buy a rotisserie chicken and then throw away the bones and carcass? That is exactly what I have been doing for years. Recently, I figured I would make use of that carcass and make a batch of chicken stock.

This is so easy to make and then you have it to use right away or freeze and have it on hand.

To make this chicken stock, all you need are the bones/carcass from a rotisserie chicken, an onion, one clove of garlic, a carrot or two (depending on size), three stalks celery, 8-10 peppercorns, 8 sprigs of parsley (use dry if you don’t have fresh), and two bay leaves.

Throw all that into a large stock pot and cover with water. How much water? I don’t know, you have to cover what you put in the pot. Bring that mixture to a boil and then drop the heat to a simmer for an hour and a half. That’s it!

Now that you have this lovely, delicious stock, you could use it right away or freeze it. If you freeze it, you could freeze it ice cube trays for the times you just need a little chicken stock or in pre-portioned containers.

I hope you start making your own chicken stock. It is much tastier and better for you since you know what ingredients are in it. Let me know how your version turns out.

Quick Homemade Chicken Stock

1 Star2 Stars3 Stars4 Stars5 Stars (No Ratings Yet)
Loading...
By Patrick Dulmage Serves: 8-10
Prep Time: 10 minutes Cooking Time: 1 hour 30 minutes Total Time: 1 hour 40 minutes

Quick Homemade Chicken Stock

Ingredients

  • Bones/carcass from one rotisserie chicken
  • 1/2 - 1 onion, halved
  • 1 Clove of garlic, halved
  • 1-2 Carrots (depending on size)
  • 3 Celery stalks
  • 8-10 peppercorns
  • 8 sprigs of parsley (use dry if you don't have fresh)
  • 2 Bay leaves

Instructions

1

Put all the ingredients in a large stock pot, preferably a heavy cast iron one

2

Cover the ingredients with water, amount will vary based on size of pot and what you have in it

3

Bring to a boil, then simmer for 1 and a half hours

4

As it simmers, skim the scum from the top

5

Once finished, remove the bones and other solids

6

Let it cool and store in the fridge or freezer

7

The following day, you can skim more of the chicken fat from the top

Notes

Freeze the stock in pre-measured sizes (1 cup, etc) to make it easy to pull exactly what you need for your next dish. You could also fill an ice cube tray with the stock and freeze it for smaller portions.

Casserole/ Chicken

Chicken and Tater Tot Hotdish

On the menu tonight – Chicken and Tater Tot Hotdish! What’s a hot dish? It’s a mid-west casserole that contains a protein, starch, a creamed soup, and a vegetable. In this version, think chicken pot pie but the crust is tater tots!

If you like chicken pot pie, but are intimidated by making the crust, this is the one to try! Start by giving the tots a pre-cook in the oven. I like really crispy tots and since they won’t be fried, this your chance to get them crispy.

While the tots are in the oven, sauté the onion until translucent, about 4-5 minutes. Then add some flour and butter to the pan to make the roux. Let the flour cook 2-3 minutes and begin adding the milk, whisking as you go to avoid clumps.

Instead of chopping carrots, I used a pea and carrot mix from the frozen section to save a little time. Add that to the mix along with the chicken, bouillon, and other seasonings. Let everything simmer 10-15 minutes, until the chicken cooks through.

Transfer the mix to a baking dish and cover with the tots. Put the baking dish in the oven and bake for about 30 minutes. Let me know how your version of this hot dish turns out!

Chicken and Tater Tot Hotdish

1 Star2 Stars3 Stars4 Stars5 Stars (No Ratings Yet)
Loading...
By Patrick Dulmage Serves: 8-10
Prep Time: 15 minutes Cooking Time: 1 hour Total Time: 1 hour 15 minutes

Chicken and Tater Tot Hotdish

Ingredients

  • 2 Tbsp Butter
  • 1lb chicken thighs, cut into bite-sized pieces
  • 1 Vidalia Onion, finely diced
  • 1 16 oz pkg frozen peas and carrots
  • 1/4 cup all purpose flour
  • 2 cups milk, room temp
  • 1 tsp Better Than Bouillon, Chicken broth
  • 1 tsp dried Thyme
  • 1 tsp dried (or fresh) Rosemary, finely chopped
  • 1 bag Tater Tots

Instructions

1

Pre-heat the oven to 400 degrees

2

Put the tater tots on an oiled baking sheet, bake for about 20-25 minutes to make sure they are crispy

3

While the tots bake, pre-heat a large skillet with some butter and the onions. Cook about 5 minutes

4

Add the flour to the pan along with some more butter to make the roux

5

Stir the flour, butter, and onions around for 2-3 minutes, then slowly whisk in the milk

6

Continuously stir to avoid clumps in the sauce

7

Add the chicken, bouillon, carrot/pea mix, thyme, and rosemary to the sauce

8

Simmer for about 10-12 minutes to cook the chicken through, then transfer to a baking dish (13x9)

9

Cover the mixture with the tater tots and put in the oven for about 30 minutes