Browsing Category

Vegetarian

Polish/ Vegetarian

Pierogi with Potato, Onions, and Cheese

On the menu tonight – Pierogi with Onions!

I love pierogi! There’s something great about the browned butter, sauteed onions, the slight crisp on the outside and the pillowy goodness inside. But, unless you have a machine or some help, they can be time consuming to make – especially the filling and folding part of the process.

Since nobody in my immediate circle is making pierogi for me and since there isn’t a restaurant nearby that serves them, I figured I better get to it and make some!

After suffering from severe analysis paralysis on how to make the dough, I ultimately went with one of the simplest dough recipes I could find. The recipe claims it’s grandma’s recipe. I can’t vouch for the validity of that, but I can say that I was really happy with the way they turned out. There were recipes that used a whole (beaten) and others that use a whole egg and an egg yolk. Some used a leavener and others didn’t. Grandma’s recipe used a single egg and no leavener – keep it simple, right?

Once the dough dilemma was solved, what would I fill them with? I opted for a potato, cheese, and onion filling. I saw recipes that included sauerkraut, and other things. I’d like to try the sauerkraut version, but that will have to be another time. Today, it was the potato, cheese, and onion filling.

With the decisions locked in, it was time to cook! I made the mashed potatoes first. Russet potatoes are the preferred type for pierogi – at least according to all the recipes I looked at. I didn’t skimp on the butter, sour cream, etc. I wanted the most decadent mashed potatoes I could make. For the cheese, I went off script and used Velveeta. While it isn’t traditional, it melts fantastically. I also added sauteed onions to the potato mixture. I did a fine dice on the onions and got them nice and brown with some crispy bits in there too.

When I made the dough, another decision I had to make was hand kneading or stand-mixer kneading. After all the other work that goes in to making this dish, I took the help from my stand-mixer for kneading the dough. After letting it rest, I rolled it out as thin as I could get it and used a 3″ biscuit cutter to cut my rounds. There’s some mild debate about the size cutter, but 3″ seems to be the most popular. By all means, use whatever size cutter YOU like! 🙂 Just know that your cooking time may vary a little depending if you go bigger or smaller.

Pierogi dough

Since this was my first batch, I went pretty small – 2 cups of flour. That yielded 20 pierogi for me. I still have a LOT of filling left, so I guess I’m making more soon and put in the freezer. If you haven’t made these before, I’d recommend going with a small batch to get your process down. As an example, once you cut the dough round, how will you fill it with the potato mixture? I used a couple of spoons to meter out the proper amount. I have a small ice cream scoop that I use for cookies, but it was a little too big for this application. I think the next time I make them, I’ll put the potato mixture in a ziplock bag, cut a corner off and use it like a piping bag.

Sealing the pierogi. Oh man… you can’t over-fill them or you have a big mess in the boiling water. So, start on the light side of how much filling you add. I stretched each dough round a little bit by hand, kind of like a very small pizza, to hedge my bets on the filling fitting without being too much. I started by folding it over in the middle. I let the weight of the filling stretch the dough a little more, which gave me some wriggle room to pinch more of the little dumpling closed. One closed all the way, I set it down on a parchment lined baking sheet and crimped it with a fork to seal it really well. Oh, I went round and round on whether to use water or an egg wash on the inside edges to help seal it. I went rogue and didn’t use ANYTHING!

When cutting the rounds out with the biscuit cutter, you want to get as close as you can to the edges of the dough and the edge of your last cut. Why? Because once you cut as many rounds as you can with your biscuit cutter, you’ll want to gather up the remaining dough and roll it out a second time to get some more dough rounds.

Once all the pierogi have been assembled and crimped, I put them in the fridge for about 15-20 minutes. I used that time to clean up a little and get the water boiling. I also cut some onion slices to saute in butter and serve over the cooked pierogi.

Sealed Pierogi

After reading all that I went through, you can see that this is NOT a 30 minute meal. If you can get some kitchen help to take on any of the tasks, it will go much quicker. Once you get the process down, I’d recommend making bigger batches so you can freeze some for another time.

The next time you are craving some delicious pierogi – I hope that you will try my recipe!

Pierogi with Potato, Onions, and Cheese

1 Star2 Stars3 Stars4 Stars5 Stars (No Ratings Yet)
Loading...

Pierogi with Potato, Onions, and Cheese

Ingredients

  • 5 or 6 Russet potatoes, peeled and cut into even-sized pieces for boiling
  • 1 Vidalia onion
  • 1/2 cup of whole milk
  • 4-6 ounces of Velveeta cheese (I cut three or four thick slices with a wire cutter and then cubed that)
  • 1/2 cup sour cream, plus more for serving
  • 4 ounces (half a stick) of butter
  • 2-3 Tbsp Kosher salt
  • 1-2 tsp white pepper
  • Dough:
  • 2 cups all-purpose flour
  • 1 whole egg, beaten
  • 1/8 tsp Kosher salt
  • 1/2 cup water (you may need more or less depending on the humidity)

Instructions

1

Fill the pot you intend to cook the potatoes about half way with water

2

Peel and cut the potatoes to size and then put them in the pot

3

Once all the potatoes are in the pot, put on high heat and bring to a boil

4

Reduce the heat to a strong simmer and cook until the potatoes are fully cooked, approx 6-8 min from reducing the heat (test with a fork, it should go in easily without breaking up the potato)

5

While the potatoes cook, I prepared the onion and cheese.

6

In a medium saute pan, over medium heat, I added about a tablespoon of butter and the diced onions

7

I cut the Velveeta into cubes

8

When the potatoes are finished cooking, drain them. I dump the water and potatoes in a colander so that I can add the milk to the pot (you really should heat the milk first, but I was already using enough pots and pans). Start with about about 1/4 cup of the milk and add the butter to the pot

9

Use a ricer to rice the potatoes into the pot with the milk and butter (if you don't have a ricer, just put the potatoes back in the pot and use a potato masher. The ricer just ensures a really creamy mashed potato)

10

Mix the milk and butter with the potatoes. Add the sour cream and cheese, then mix to combine

11

At this point add the white pepper, and see how the consistency is. If it's too thick, add some more of the milk

12

Add the sauteed onions to the potato mixture and incorporate those as well

13

Taste and see if it needs anything, like more salt

14

Once it tastes how you want it, start on the dough and allow the potatoes time to cool a bit

15

In a stand-mixer with the dough hook, add the flour, salt, egg, and about half of the water

16

Turn on the mixer on low to incorporate the ingredients, adding water to get the proper consistency. You want the dough to pull away from the sides of the mixer

17

Knead in the mixer until the dough is firm and well mixed, for about 5 minutes

18

Let the dough rest at least 10 minutes

19

Put the dough on the counter top and start rolling it out to about 1/8" thickness

20

Once it's rolled out, start cutting the dough rounds with your biscuit cutter

21

Before you fill, I gently stretched the round out a little bit bigger to make sure I had some room to seal the edges

22

Using a teaspoon, gently put a small dollup of potato mixture on the cut dough and begin sealing it.

23

I folded the round in half and let the weight of the filling stretch it out a little bit more. Then, I worked my way down each side, pinching it closed

24

I put the now-sealed pierogi on a parchment lined baking sheet and sealed it one more time with a fork

25

Continue until all the dough has been used

26

Once finished assembling, put the baking sheet in the fridge for about 10-15 minutes. At this point, you could freeze them (Leave on the baking sheet until fully frozen before transferring to a baggie)

27

Bring a pot of water to a boil and add 2-3 tablespoons of Kosher salt

28

Using a spider or slotted spoon, gently lower the pierogi in the boiling water and let them cook for 3 - 4 minutes.

29

While they boil, pre-heat a medium saute pan with a tablespoon of butter and about a quarter of an onion halved and thinly sliced

30

When the pierogi have finished boiling, use your spider to remove them and add them directly to the saute pan

31

Cook them until you get a little golden crust on one side (I like to crisp up both sides)

32

Once they are cooked to your liking and the onions have browned a little, remove from the heat and serve

33

I always have some sour cream to put on the plate along with the pierogi.

34

Enjoy!

Side Dishes/ Vegetarian

Spinach Pie

On the menu tonight – Spinach Pie!

This recipe came from my wife’s grandmother. She would make this dish during Passover and Hannukah. It calls for mazto meal instead of bread crumbs along with an egg for the binder.

While there aren’t a lot of ingredients, it’s full of flavor from the spinach, onions, and seasoning. It’s so good that you could use this as a side dish during Thanksgiving (anytime really), or by itself as a light lunch.

I hope that you will give this dish a try. Let me know how your version turns out!

Spinach Pie

1 Star2 Stars3 Stars4 Stars5 Stars (1 votes, average: 5.00 out of 5)
Loading...

Spinach Pie

Ingredients

  • 2 bags chopped spinach, from frozen food section
  • 1 medium onion, diced
  • 1 cup matzo meal
  • 1-2 eggs, beaten
  • 1 Tbsp Kosher salt
  • 2 tsp onion powder
  • 2-3 tsp freshly ground pepper
  • 1-2 Tbsp olive oil

Instructions

1

Thaw the spinach and squeeze out the excess water using a clean kitchen towel

2

Pull apart the now compressed spinach in to a large mixing bowl

3

In a 12" skillet, pre-heat over medium heat

4

Add the olive oil and the diced onion

5

Saute the onions until translucent

6

Season with a little salt and pepper

7

Once cooked, cut the heat and set aside to cool

8

Add the cooked onions to bowl with the spinach

9

Season with salt, pepper, and onion powder

10

Add the matzo meal, beaten egg, and stir to combine

11

Bring the skillet back to med or med-high heat along with some olive oil

12

Spread out the spinach mixture in the pan and press it down with a spatula

13

Have a dinner plate or something similar near by in order to help you flip the mixture over

14

Cook the mixture for 5-8 minutes. At the 5 minute mark, gently lift up a section to see if it has browned sufficiently. You want it to be lightly browned

15

Once you are satisfied that side has cooked enough, carefully put your dinner plate on top of the spinach and turn it over

16

Take another look at the pie, it should be lightly browned

17

Add a little more oil to the pan and then gently slide the pie back in to the pan to cook the other side

18

Gently press down on the mixture with the spatula

19

After another 5-8 minutes, take a peek and see if it has cooked to your liking

20

Once done use your plate again to take the pie out of the pan

21

Season immediately with a little salt and freshly ground pepper

Fish/ Vegetarian

Red Pepper Jelly Glazed Salmon with Roasted Vegetables

On the menu tonight, Red Pepper Glazed Salmon with Roasted Vegetables!

So, you’ve used red pepper jelly with cream cheese and crackers, but what ELSE can you use it for? A glaze for fish or chicken! This was a nice change from some of the usual ways I make salmon. The pepper jelly gives it a little bit of spice without being too hot.

There isn’t a lot of preparation required for this meal. I cut the ends off of the Brussel sprouts, then cut them in half. For the potatoes, I used the baby Yukon golds. I cut those in half or quarters, depending on the size of the potato. I had to mix the glaze for the salmon, but there aren’t too many ingredients for that either.

The cooking of this dish is broken in to three parts, the potatoes, the Brussel sprouts, and then the salmon. Starting with the potatoes, cook them for 15 minutes. Pull from the oven, turn them over so each side gets nice and golden brown. Add the Brussel sprouts to the sheet pan, cook for another 15 minutes. Once the time goes off again, add the salmon to the middle of the sheet pan and cook for, you guessed it, another 15 minutes. Check the salmon at about 12 minutes. The salmon will take about 12-20 minutes, depending on your oven. That’s IT!

This is a fantastic meal for two or you can scale it up for however many people you need to feed. Try it and let me know what you think of my Red Pepper Jelly Glazed Salmon!

Red Pepper Jelly Glazed Salmon with Roasted Vegetables

1 Star2 Stars3 Stars4 Stars5 Stars (1 votes, average: 5.00 out of 5)
Loading...

Red Pepper Jelly Glazed Salmon with Roasted Vegetables

Ingredients

  • 24 oz Salmon, either one big piece or 6 oz portions already cut
  • 1lb Yukon gold or baby Yukon gold potatoes - cut in half or quarters, depending on the size.
  • 1 lb Brussel sprouts, trimmed and cut in half. (I like the crispy bits on the outside and I despise the horsradishy taste if they are too big)
  • 4 -6 sprigs fresh thyme
  • 1 Tbsp olive oil
  • Kosher salt and freshly ground pepper to taste - enough for each component of the dish
  • Glaze:
  • 1/3 cup red pepper jelly
  • 2 Tbsp Balsamic vinegar
  • 1 Tbsp Dijon mustard
  • 2 tsp fresh or dry thyme (If using dry, start with 1 tsp)

Instructions

1

Pre-heat oven to 425 degrees

2

Prepare the potatoes:

3

In a large mixing bowl, add the potatoes, olive oil (enough to lightly coat the potatoes), salt, pepper, and some dried thyme

4

Toss to coat all the potatoes

5

Put the potatoes on a half-sized sheet pan, evenly so they have plenty of room

6

Bake for 15 minutes

7

Prepare the Brussel sprouts:

8

In the same mixing bowl you used for the potatoes, add the Brussel sprouts with some additional olive oil, salt and pepper

9

Toss to coat all the Brussel Sprouts

10

At the 15 minute mark, pull the potatoes from the oven, push them to one side of the baking sheet, then add the Brussel Sprouts

11

Bake for another 15 minutes

12

Prepare the salmon:

13

In a small mixing bowl, add the red pepper jelly, Balsamic vinegar, Dijon mustard, and thyme. Mix thoroughly

14

Brush the salmon with the mixture

15

At the 15 minute mark, pull the veggies from the oven, push the sprouts to the other side of the sheet pan, leaving enough room in the middle for the salmon. Add the salmon to the sheet pan, bake for another 15 minutes

16

When the timer goes off, pull from the oven and serve

Seafood/ Vegetarian

Sweet and Sour Glazed Shrimp over Basmati Rice

On the menu tonight Sweet and Sour Glazed Shrimp over Basmati Rice!

Whenever I order Chinese food, I’m a sucker for sweet and sour anything! We had had some shrimp in the freezer and I thought I’d make some sweet and sour shrimp. Since shrimp cooks really quickly, this was a really quick meal to make. What made it even easier was using microwave rice – it cooks in 90 seconds!

The next time you are thinking about ordering from your favorite Chinese delivery place, consider making my Sweet & Sour Glazed Shrimp over Basmati Rice!

Sweet and Sour Glazed Shrimp over Basmati Rice

1 Star2 Stars3 Stars4 Stars5 Stars (No Ratings Yet)
Loading...

Sweet and Sour Glazed Shrimp over Basmati Rice

Ingredients

  • 1/4 cup sweet and sour chili sauce
  • 1/4 cup ketchup
  • 2 tsp soy sauce
  • 1/4 tsp crushed red pepper flakes
  • 1 1/4 - 1 1/2 lb shrimp, peeled and de-veined
  • 1 Tbsp oil, peanut or any high temp neutral oil
  • Kosher salt and freshly ground pepper to taste
  • 2-3 scallions finely chopped, keep the white and green parts separate
  • 1-2 garlic cloves, minced or finely chopped
  • 1 tsp grated fresh ginger (ginger in the tube is an OK substitute. found in the refrigerated produce section)
  • 3 Tbsp rice wine vinegar
  • Cooked rice, for serving (as a shortcut, I'll use the microwave rice. it cooks in 90 seconds, pretty hard to go wrong with that!)

Instructions

1

Pre-heat a large cast iron pan over med-high heat

2

Add the oil

3

Season the shrimp with Kosher salt and freshly ground black pepper

4

add the seasoned shrimp to the pan, cook about 90 seconds on each side and then transfer them to a plate and set aside

5

Add the white part of the scallions, the garlic, and the ginger.

6

Cook for about a minute, then add the rice wine vinegar

7

Scrape up any bits stuck to the pan, then add the sweet & sour sauce, ketchup, soy sauce, and red pepper flakes

8

Stir to combine, then add the shrimp back along with the green parts of the scallions

9

Once the shrimp are glazed, remove from the heat and serve over the cooked rice

Sandwiches/ Vegetarian

Sourdough Grilled Cheese with Havarti Cheese and Chopped Broccoli

On the menu tonight, Sourdough Grilled Cheese with Havarti Cheese and Chopped Broccoli!

If you are having tomato soup, you need a grilled cheese sandwich, right? Well, here you go! The sandwich is just as special as the soup. I used sourdough bread with Havarti cheese and to make it a little different, I added some chopped steamed broccoli. I served this with a bowl beautiful homemade tomato soup.

Tomato Soup w Roasted Vegetables

I’d like to write a long story and description about how I made the sandwich, but it’s a grilled cheese. I buttered the bread, put buttered side down on the panini press, added a few slices of Havarti cheese, then added some chopped broccoli, a couple more slices of cheese, topped it off with another piece of buttered bread and let the panini press down. OH! The panini press was cold during assembly. I didn’t turn it on until the sandwich was assembled.

Once the sandwich was sufficiently grilled – you be the judge of what is sufficient for you. I prefer lightly grilled.

I hope the next time you are in the mood for a grilled cheese sandwich, you will try my version!

Sourdough Grilled Cheese with Havarti Cheese and Chopped Broccoli

1 Star2 Stars3 Stars4 Stars5 Stars (No Ratings Yet)
Loading...

Sourdough Grilled Cheese with Havarti Cheese and Chopped Broccoli

Ingredients

  • Two slices of good quality sourdough bread
  • 4-6 slices of Havarti cheese
  • 1/4 cup of steamed broccoli, chopped
  • 2 Tbsp room temperature butter

Instructions

1

Butter one piece of the sourdough and set it on the panini press (cold, not turned on panini press).

2

Add 3-4 slices of the Havarti cheese

3

Carefully add the chopped broccoli

4

Top the broccoli with the rest of the Havarti

5

Add the top to the sandwich and butter the top

6

Close the panini press and turn on

7

Toast until the bread is toasted to your liking and the cheese is suffiently melted

Soup/ Vegetarian

Tomato Soup with Roasted Tomatoes, Onions, and Garlic

On the menu tonight – Tomato Soup with Roasted Tomatoes, Onions, and Garlic!

Tomato Soup w Roasted Vegetables

It was kind of chilly today, so I decided to make soup and a sandwich. The sandwich was a grilled cheese with Havarti and broccoli on sourdough bread.

Grilled Cheese with Chopped Broccoli

The roasted vegetables gave the soup a really rustic look and taste. I hope that the next time you want soup and a sandwich, you’ll try my Tomato Soup!

Tomato Soup with Roasted Tomatoes, Onions, and Garlic

1 Star2 Stars3 Stars4 Stars5 Stars (No Ratings Yet)
Loading...

Tomato Soup with Roasted Tomatoes, Onions, and Garlic

Ingredients

  • 2 lbs plum tomatoes
  • optional - 1 cup grape tomatoes (I had some I needed to use up)
  • 1 medium onion, quartered
  • 1 carrot, rough chop
  • 1 stalk celery, rough chop
  • 3 cloves of garlic
  • 32 oz vegetable or chicken stock (I used vegetable stock)
  • 3 sprigs thyme
  • 2 bay leaves
  • 12 basil leaves
  • 1 Tbsp dried parsley
  • 1 Tbsp butter
  • 1 Tbsp olive oil
  • Kosher salt to taste

Instructions

1

Preheat oven to 350 degrees

2

Start a pot of boiling water

3

cut a cross on the bottom of each of the tomatoes (so you can easily peel the skin off)

4

Put the grape tomatoes and onion a baking sheet

5

Wrap the garlic (I used an entire head so I'd have left over roasted garlic) in tin foil with olive oil and put the garlic pouch on the baking sheet

6

Put in the oven for about 25 minutes, cook longer if it doesn't have the char you want

7

Carefully put the tomatoes in the boiling water (I used a spyder). Let them sit 3-5 minutes, then pull them out and them cool

8

Once cool enough to handle, carefully peel the skin off the tomatoes

9

Heat a large Dutch oven over med-high heat

10

Add the butter and olive oil along with the celery and carrot. Cook for about 8 minutes

11

Add the roasted veggies along with the tomatoes, and vegetable stock along with the parsley, thyme, basil, and bay leaves

12

Bring to a boil, then reduce to a simmer

13

Cook about 30 minutes

14

Taste and adjust the seasoning as needed

15

Use an immersion blender to smooth out the soup (You pour the soup in a regular blender if you don't have an immersion blender)

16

Serve with a grilled cheese sandwich. The one I served was a grilled cheese on sourdough bread, using Havarti cheese and chopped cooked broccoli.

Side Dishes/ Vegan/ Vegetarian

Balsamic Glazed Roasted Brussel Sprouts with Onions and Shallots

On the menu tonight, Balsamic Glazed Roasted Brussel Sprouts with Onions and Shallots!

If you think you don’t like brussel sprouts, try this recipe. While simple, the recipe is REALLY flavorful and So easy to make. The only ingredients you need are brussel sprouts, Vidalia onion, shallot, olive oil, balsamic vinegar, Kosher salt and pepper.

When you aren’t sure what side dish to serve, I hope that you’ll give this recipe a try.

Balsamic Glazed Roasted Brussel Sprouts with Onions and Shallots

1 Star2 Stars3 Stars4 Stars5 Stars (No Ratings Yet)
Loading...

Balsamic Glazed Roasted Brussel Sprouts with Onions and Shallots

Ingredients

  • 1 lb brussel sprouts, quartered
  • 1/2 - 1 Vidalia onion, sliced thinly
  • 1 shallot, thinly sliced
  • 1/4 cup olive oil
  • 1/4 cup balsamic vinegar
  • Kosher salt
  • Freshly ground black pepper

Instructions

1

Pre-heat oven to 350 degrees

2

Put the quartered brussel sprouts on a large, rimmed sheet pan

3

Add the sliced Vidalia onion, and sliced shallot to the sheet pan

4

Drizzle the veggies with olive oil and toss to coat everything with olive oil

5

Season with Kosher salt and freshly ground pepper

6

Put in the oven for about 25-30 minutes

7

If the veggies looked cooked to your liking, take sheet pan out of the oven and drizzle with the balsamic vinegar

8

Serve and enjoy!

PartyFood/ Side Dishes/ Uncategorized/ Vegetarian

Boiled Peanuts

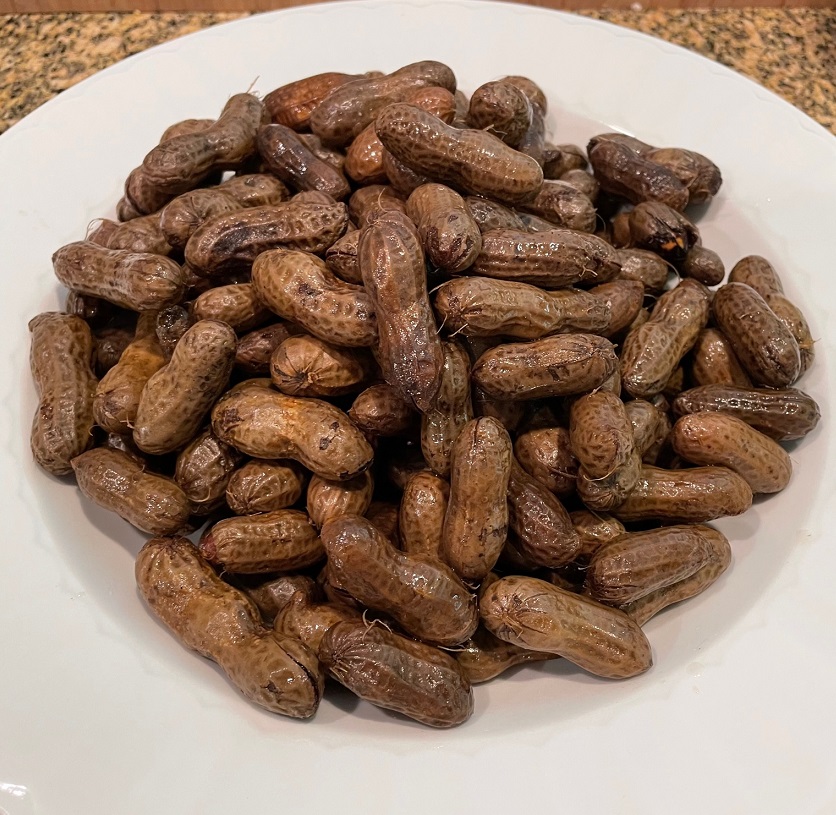
On the snacking menu for tonight – Boiled Peanuts!

Boiled peanuts are definitely one of those things that get really mixed results when you mention them. “What are boiled peanuts?” “That sounds gross…” “Yum! If you are from the South, you’ve likely had had boiled peanuts. If you are from the South and haven’t had boiled peanuts, please mail your Southern card to… I’m just kidding.

Seriously though, if you are from the South, even if you haven’t tried boiled peanuts, you HAVE seen the roadside stand with the guy sitting next to a half barrel or converted beer keg sitting over a low burning fire filled with boiled peanuts. You buy some, and the guy ladles out your peanuts into a styrofoam cup. I mentioned the ladle. The ladle used to get the peanuts is something to watch out for as your purchase is being prepared. It’s almost always a jerry-rigged device with holes drilled in so the water from the barrel or keg can drain as they get your boiled peanuts.

Oh, definitely strike up a conversation with the person at the stand. For me, half the fun of the drive to wherever it is I’m going is stopping to get some boiled peanuts and chatting with the person at the stand. You may also buy some fresh fruit, produce, and / or BBQ as well before you continue on your way.

If you’ve never tried boiled peanuts, I hope the next time you plan to have people over for a game or the holidays you will make a batch of boiled peanuts for your guests to snack on.

Boiled Peanuts

1 Star2 Stars3 Stars4 Stars5 Stars (No Ratings Yet)
Loading...
By Patrick Dulmage Serves: unknown
Prep Time: 5 minutes Cooking Time: 8-9 hrs Total Time: 8-9 hrs

Boiled Peanuts

Ingredients

  • bag of green peanuts
  • Kosher Salt
  • Filtered / Bottled Water (tap water has chlorine and other chemicals that don't taste so great)

Instructions

1

Spread out the peanuts from the bag and remove any rotten or moldy peanuts

2

Fill a crockpot about 3/4 full with peanuts

3

Pour in enough water in to the crockpot that the peanuts begin to float and then pour some more. The water will evaporate, so I fill it as high as I can but still able to close the lid

4

Pour in 4 palm-fulls of Kosher salt and stir it in. If you have never made them before, start with 3 palm-fulls if you are nervous they will be too salty

5

Set the crockpot on high for 4 hrs.

6

Once the 4 hrs are up, lower the temperature to low and let it go another 4 - 5 hrs. At the 4 hour mark, taste a few to see if they are the consistency you want. I like mine with a little bite to them... too mushy and you can't get them out of the shell.

7

Once finished, cut the heat, drain, and transfer to another container.

8

Serve hot

Notes

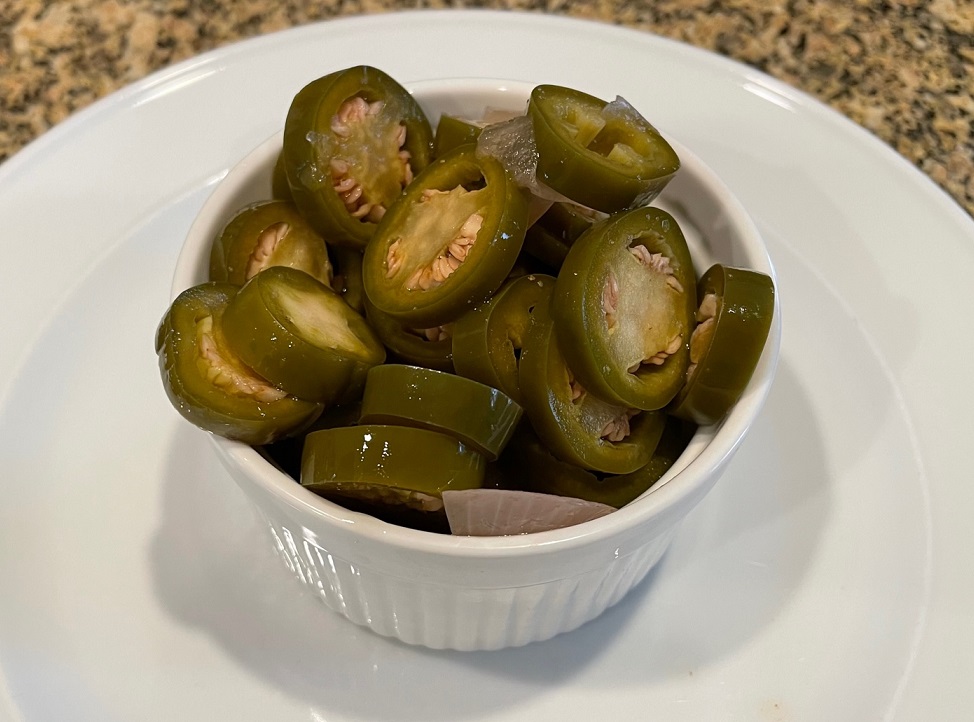
They are great hot, warm, or even cold. They store well in the fridge a few days, if they last that long. You can add flavorings too. You can add some sliced jalapeno, or hatch chilies, or Old Bay Seasoning. When I've done Old Bay, I'll add two spoonfuls (like a cereal spoon) of the Old Bay at the beginning with the salt

Side Dishes/ Vegetarian

Scalloped Potatoes au Gratin with Smoked Gouda and Cheddar Cheese

On the menu tonight – Scalloped Potatoes au Gratin!

I’ve seen so many pictures of Scalloped Potato dishes that I decided to make it. This isn’t a difficult dish to make, but it looks awesome – especially if you take the time to arrange the potato slices neatly. I didn’t have the time to arrange the slices in any particular shape this time.

The trick to this dish is getting the slices the same thickness. Take the help from your food processor or box grater to get perfectly uniform slices – about 1/8″. From there, all you have to do is add the cream and other ingredients to a large pan and cook the potatoes about 15 -18 minutes. Then, transfer the ingredients to your baking dish and bake. That’s it!

So, the next time you are serving potatoes, consider making them a little fancy and try my Scalloped Potatoes!

Scalloped Potatoes au Gratin with Smoked Gouda and Cheddar Cheese

1 Star2 Stars3 Stars4 Stars5 Stars (3 votes, average: 4.33 out of 5)
Loading...
side dishes
By Patrick Dulmage Serves: 12
Prep Time: 15 minutes Cooking Time: 30 minutes Total Time: 45 minutes

Scalloped Potatoes au Gratin with Smoked Gouda and Cheddar Cheese

Ingredients

  • 2 1/2 - 3 lbs Russet or Yukon Gold Potatoes, sliced about 1/8" thick
  • 1 onion, finely chopped
  • 2 cups heavy cream
  • 1 Tbsp chicken bouillon powder
  • 1 Tbsp butter
  • 2 garlic cloves, minced
  • 1/2 tsp nutmeg
  • 1 tsp thyme (2 tsp if using fresh)
  • 1/2 - 3/4 cup Smoked Gouda cheese
  • 1/2 - 3/4 cup Cheddar cheese

Instructions

1

Pre-heat oven to 375 degrees

2

In a large pan, over medium high heat, add the butter and onions. Cook about 5 minutes

3

Add the garlic, and cook another minute or two, lower the temp to medium, then add the heavy cream (don't let the cream burn, keep stirring and lower the temp more if needed)

4

Add the thyme, nutmeg, chicken bouillon powder, and potatoes. Cook about 15 minutes until the potato slices are fork tender

5

Transfer to a 9x9 baking dish and cover with the grated cheese

6

Bake about 15 minutes or until the cheese is slightly golden brown on top and the cheese is bubbly

7

Pull from oven and let rest at least 5 - 10 minutes before serving

Casserole/ Seafood/ Vegetarian

Lobster Mac and Cheese with Smoked Gouda

On the menu tonight – Lobster Mac and Cheese!

We’ve all made Mac and Cheese, right? So, this time, I wanted to make it special – like going to an expensive steak house special. So, I used smoked Gouda cheese and lobster as a nod to the lobster mac and cheese I always see when I’m out.

While I used smoked Gouda cheese, you could also use Gruyere or any other cheese you like. I think next time, I may use a mix of Smoked Gouda and Gruyere.

It comes together quickly, so have all your ingredients ready to go before you start cooking. When you start adding liquid to the roux, do it slowly and make sure you work out any lumps as you go. One other tip, take the time to toast the panko in butter. That extra crunch the panko brings is a great tasty texture.

I hope the next time you make mac and cheese, you try my version. It’s SO GOOD!

Lobster Mac and Cheese

1 Star2 Stars3 Stars4 Stars5 Stars (No Ratings Yet)
Loading...
By Patrick Dulmage Serves: 8-10
Prep Time: 15 minutes Cooking Time: 1 hour 10 minutes Total Time: 1 hour 25 minutes

Lobster Mac and Cheese

Ingredients

  • 1 lb Pasta shells / elbow macaroni / Cavatappi - your choice
  • 1 quart whole milk
  • 1 stick butter, divided
  • 4 cups cheese, grated - your choice of smoked Gouda, Gruyere, or good ole Velveeta (since it's Lobster mac and cheese, I went fancier on the cheese)
  • 2 cups sharp cheddar, grated
  • 1/2 - 1 1/2 lbs lobster meat, cooked
  • 1/2 cup flour
  • 1/2-1 tsp ground nutmeg
  • 1 - 1 1/2 cups Panko bread crumbs
  • 1/2 tsp freshly ground pepper
  • Kosher salt to taste

Instructions

1

Pre-heat the oven to 350 degrees

2

Bring a large pot of salted water to a boil and cook pasta according to pkg instructions

3

Heat the milk in a small pot over low heat - don't let it burn

4

In a medium skillet, toast the Panko with 2 Tbsp of butter and set aside

5

In a large pan, melt 6 Tbsp of butter and add the flour for 2-3 minutes over medium heat

6

Slowly pour in the milk and whisk as you go. Work out any lumps as you go and whisk until the sauce thickens

7

Add in the grated cheese and continue stirring

8

Once the cheese is incorporated, cut the heat, and add in the pasta and lobster

9

Season with nutmeg, salt and pepper

10

Top with the toasted Panko

11

Bake until browned on top and the cheese is bubbly - about 30-40 minutes

12

Once finished, pull from the oven and let rest at least 5 minutes