Browsing Category

PartyFood

PartyFood/ Side Dishes

Old Fashioned Potato Salad

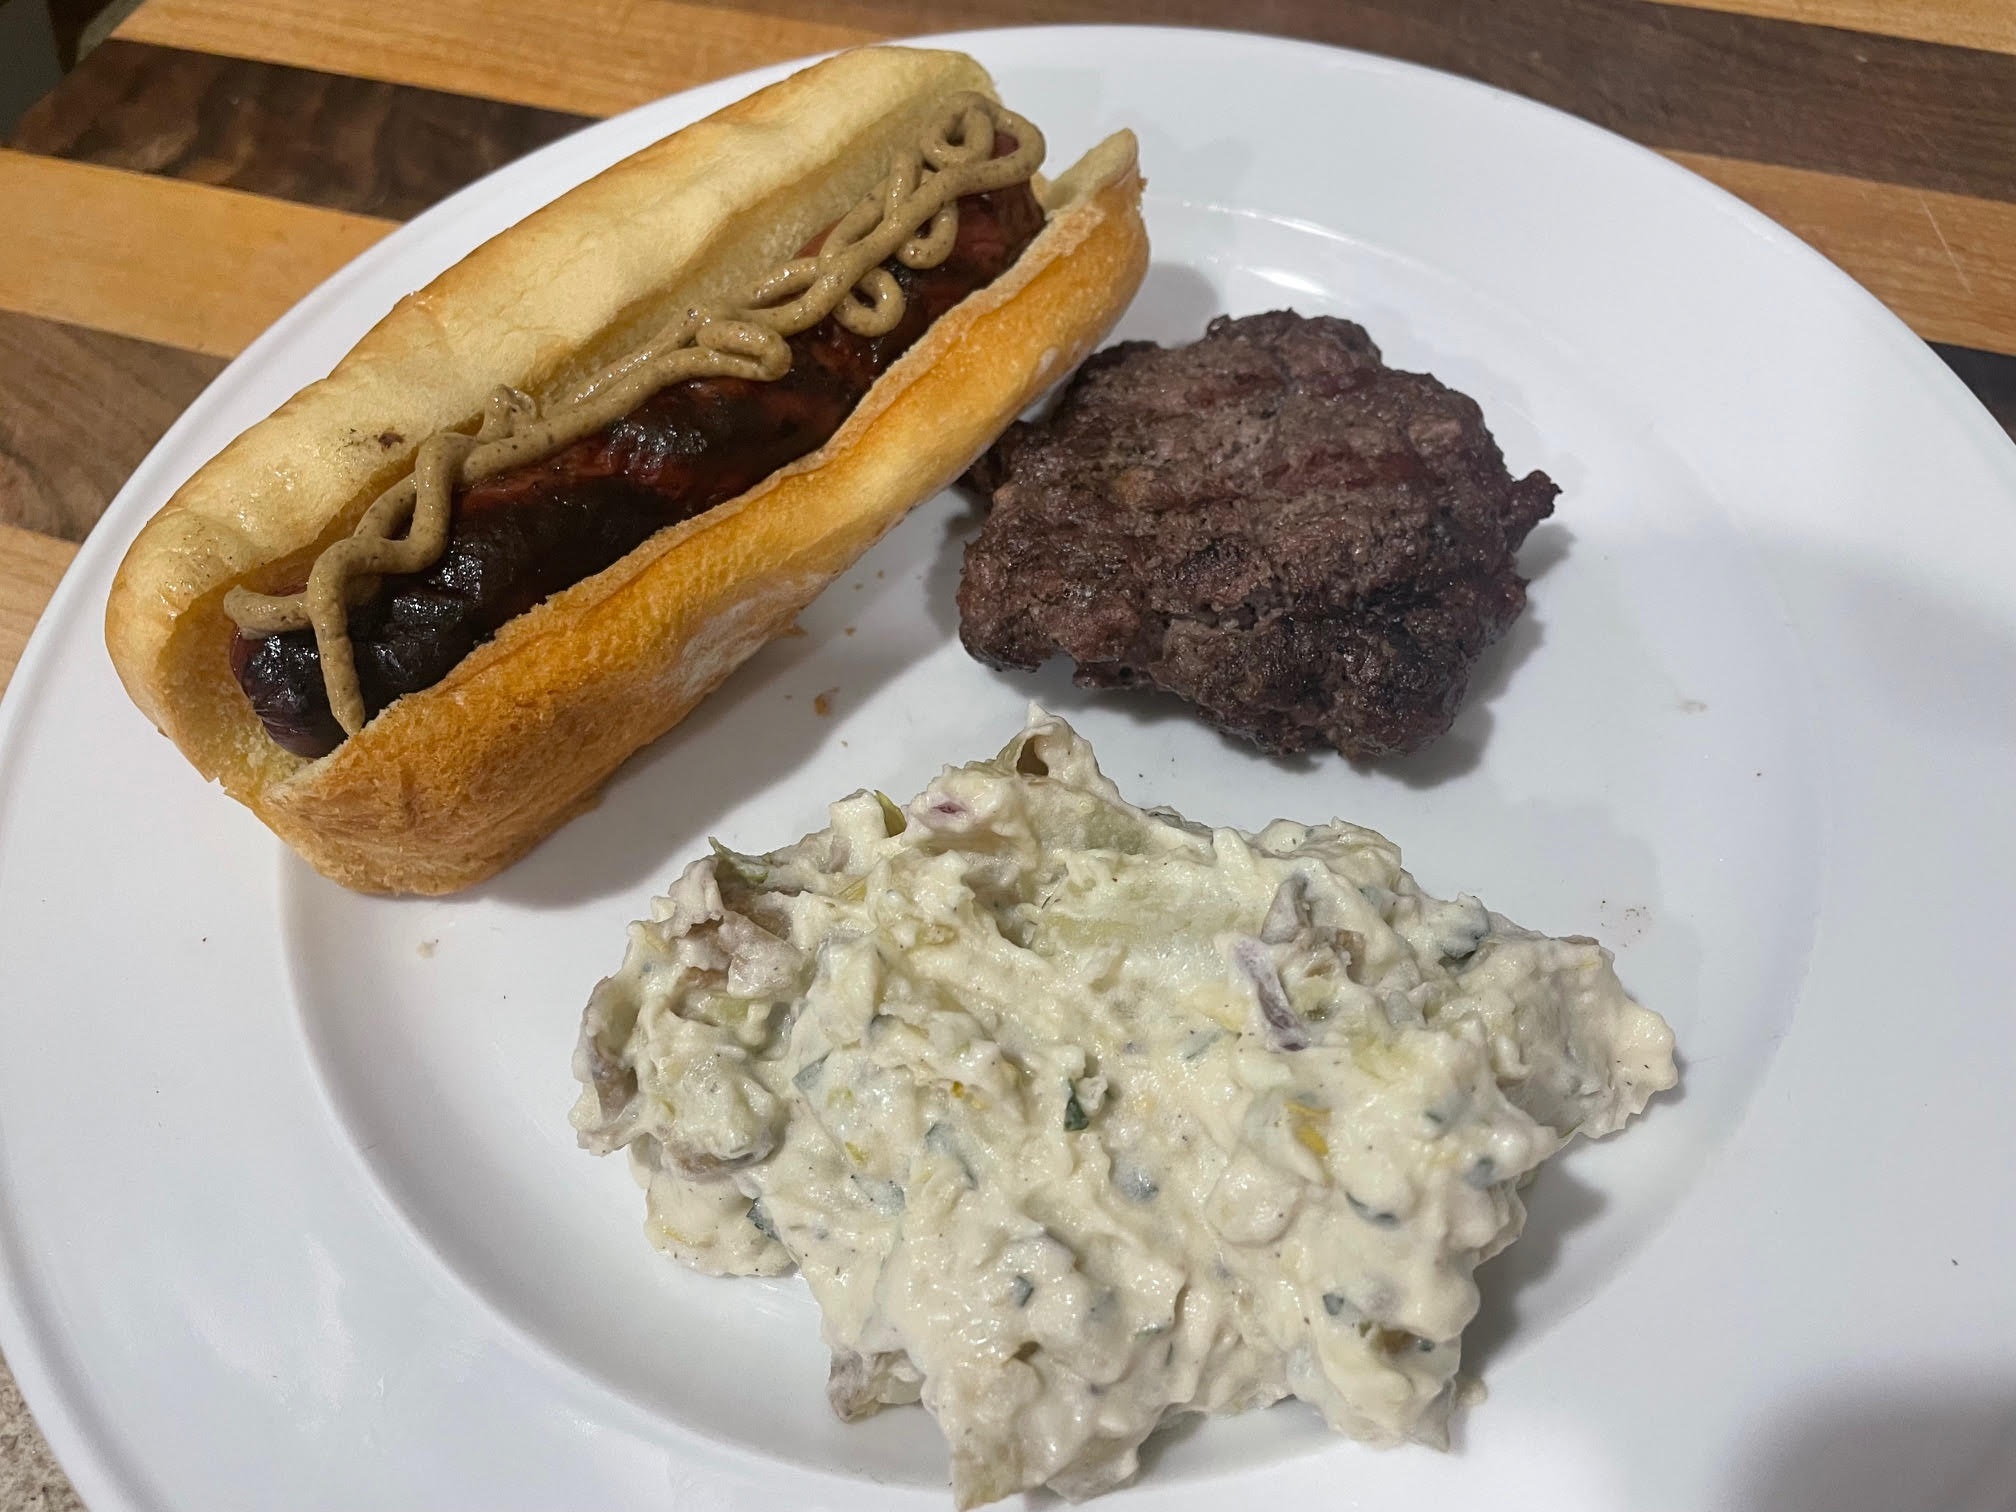
On the menu tonight – Old Fashioned Potato Salad!

Potato salad is must for any BBQ, grill session, pot luck, and a perfect side dish for so many meals. This version comes together so easily and is so delicious, you won’t need to get the stuff pre-made at the grocery store.

My version includes apple cider vinegar, mayonnaise, dry mustard powder, red onion, parsley,and spicy pickles. Spicy pickles? YES! You’ll know the pickles are there, but they are in the background.

The next time you need a side dish for your BBQ, consider trying my Old Fashioned Potato Salad!

Old Fashioned Potato Salad

1 Star2 Stars3 Stars4 Stars5 Stars (No Ratings Yet)
Loading...

Old Fashioned Potato Salad

Ingredients

  • 2-3 lbs potatoes (your choice of potato but you can't go wrong with the small red potatoes or Yukon gold)
  • 3/4 cup Mayonnaise
  • 1/4 cup Parsley, chopped
  • 1/2 cup Red onion, finely chopped
  • 1/2 cup Celery finely chopped (I like to use the center of the celery stalk and include the greens)
  • 1 - 2 Spicy pickles (like Zingers), finely chopped
  • 1 tsp dry mustard powder
  • 1/2 tsp garlic powder
  • Salt and Pepper to taste

Instructions

1

Dice the potatoes to desired size (approx 1" dice) or slice

2

Put the potatoes in a large pot of water as you cut them to avoid them getting brown

3

Bring the potatoes to a boil, generously season the water with Kosher or Sea salt, then lower the heat and cook until fork tender

4

Drain the potatoes and let cool down before adding the rest of the ingredients

5

Once cooled, add the potatoes to a large mixing bowl along with rest of the ingredients

6

Check seasoning, add salt and pepper to taste

PartyFood/ Side Dishes/ Uncategorized/ Vegetarian

Boiled Peanuts

On the snacking menu for tonight – Boiled Peanuts!

Boiled peanuts are definitely one of those things that get really mixed results when you mention them. “What are boiled peanuts?” “That sounds gross…” “Yum! If you are from the South, you’ve likely had had boiled peanuts. If you are from the South and haven’t had boiled peanuts, please mail your Southern card to… I’m just kidding.

Seriously though, if you are from the South, even if you haven’t tried boiled peanuts, you HAVE seen the roadside stand with the guy sitting next to a half barrel or converted beer keg sitting over a low burning fire filled with boiled peanuts. You buy some, and the guy ladles out your peanuts into a styrofoam cup. I mentioned the ladle. The ladle used to get the peanuts is something to watch out for as your purchase is being prepared. It’s almost always a jerry-rigged device with holes drilled in so the water from the barrel or keg can drain as they get your boiled peanuts.

Oh, definitely strike up a conversation with the person at the stand. For me, half the fun of the drive to wherever it is I’m going is stopping to get some boiled peanuts and chatting with the person at the stand. You may also buy some fresh fruit, produce, and / or BBQ as well before you continue on your way.

If you’ve never tried boiled peanuts, I hope the next time you plan to have people over for a game or the holidays you will make a batch of boiled peanuts for your guests to snack on.

Boiled Peanuts

1 Star2 Stars3 Stars4 Stars5 Stars (No Ratings Yet)
Loading...
By Patrick Dulmage Serves: unknown
Prep Time: 5 minutes Cooking Time: 8-9 hrs Total Time: 8-9 hrs

Boiled Peanuts

Ingredients

  • bag of green peanuts
  • Kosher Salt
  • Filtered / Bottled Water (tap water has chlorine and other chemicals that don't taste so great)

Instructions

1

Spread out the peanuts from the bag and remove any rotten or moldy peanuts

2

Fill a crockpot about 3/4 full with peanuts

3

Pour in enough water in to the crockpot that the peanuts begin to float and then pour some more. The water will evaporate, so I fill it as high as I can but still able to close the lid

4

Pour in 4 palm-fulls of Kosher salt and stir it in. If you have never made them before, start with 3 palm-fulls if you are nervous they will be too salty

5

Set the crockpot on high for 4 hrs.

6

Once the 4 hrs are up, lower the temperature to low and let it go another 4 - 5 hrs. At the 4 hour mark, taste a few to see if they are the consistency you want. I like mine with a little bite to them... too mushy and you can't get them out of the shell.

7

Once finished, cut the heat, drain, and transfer to another container.

8

Serve hot

Notes

They are great hot, warm, or even cold. They store well in the fridge a few days, if they last that long. You can add flavorings too. You can add some sliced jalapeno, or hatch chilies, or Old Bay Seasoning. When I've done Old Bay, I'll add two spoonfuls (like a cereal spoon) of the Old Bay at the beginning with the salt

PartyFood

Homemade French Onion Dip

On the Menu Tonight – French Onion Dip!

Since I’m making this for 4th of July, I wanted to make something more special than sour cream and French Onion Soup mix. This dip has lots of onion, some shallots, and garlic along with sour cream, cream cheese and some other ingredients.

It takes some time to get the onions, shallots, and garlic cooked down, so plan to spend some time watching the onions so they caramelize all over. Once they are done to your liking, cut the heat and let them cool.

While the onions cook, you can assemble the cold ingredients in a big bowl. Once the onions are cooled off, gently fold in the onion mixture and let it rest in the fridge at least an hour before serving.

I hope you’ll try my version of French Onion Dip.

Homemade French Onion Dip

1 Star2 Stars3 Stars4 Stars5 Stars (No Ratings Yet)
Loading...
By Patrick Dulmage Serves: 8-10
Prep Time: 15 minutes Cooking Time: 20-30 minutes Total Time: 45 minutes

Homemade French Onion Dip

Ingredients

  • 2 Vidalia Onions, quartered and sliced
  • 2 shallots, quartered and finely sliced
  • 2 - 3 garlic cloves, minced
  • 1 cup mayonnaise
  • 2 cups sour cream
  • 8 oz block cream cheese, softened
  • 1-2 green onions, finely chopped
  • 1 tsp Worcestershire sauce
  • 1 tsp celery seed
  • 1 tsp salt
  • 1 tsp freshly ground pepper
  • 1 Tbsp olive oil

Instructions

1

Pre-heat a large pan over med-high heat

2

Add the onions with the olive oil

3

Meanwhile, in a large mixing bowl add the sour cream, cream cheese, and mayonnaise

4

Add the celery seed, salt, pepper, and green onions

5

Gently fold the ingredients in the bowl

6

Stir the onions and add the shallots

7

After about 5 minutes, add the minced garlic

8

Continue cooking until the onions and shallots are cooked to your liking (they should have a light brown color at the minimum)

9

When finished cooking, cut the heat and let them cool

10

Once the onions have fully cooled, fold them in to the sour cream mixture, let rest at least an hour before serving

Chicken/ PartyFood

Spicy Buffalo Chicken Enchiladas with Shredded Iceberg Lettuce

On the Menu tonight – Spicy Buffalo Chicken Enchiladas!

When I saw Katie Lee Biegel make this on The Kitchen, I had to add this one to my Superbowl menu instead of chicken wings. There is a lot of help from the store in this recipe too, which makes it a great dish to make anytime because it comes together so fast. By using a rotisserie chicken, you simply pull the meat off the bones and chop it to bite-sized pieces. Mix in the shredded Monterey Jack cheese with the chicken in a large mixing bowl. When the buffalo sauce is ready, mix a cup of that in as well.

With the buffalo chicken mixture ready, you are ready for assembly. When Katie made her version, she cut the enchiladas into pinwheels. I did about half of the enchiladas into pinwheels and the rest simply cut the enchiladas in half. The pinwheels are great for a party and the half-sized pieces are great for lunch or dinner. Once all the enchiladas are assembled, pour the rest of the buffalo sauce over them along with the rest of the shredded Monterey Jack cheese. Bake them and serve with the finely shredded iceberg lettuce along with crumbled blue cheese and either blue cheese or ranch dressing.

Now that you have the technique down, you can modify it to an endless variety of enchiladas. I hope you will try this version and let me know what you think.

Spicy Buffalo Chicken Enchiladas

1 Star2 Stars3 Stars4 Stars5 Stars (No Ratings Yet)
Loading...
By Katie Lee Biegel Serves: 12

Spicy Buffalo Chicken Enchiladas

Ingredients

  • 1 Rotisserie chicken, pulled from the bone and chopped
  • 1 stick butter
  • 1 lb grated Monterey Jack cheese
  • 2 cups mild red enchilada sauce
  • 3/4 cup hot sauce (Frank's Red Hot recommended)
  • 8 10-inch flour tortillas
  • 1/2 head iceberg lettuce, finely shredded
  • 1/2 cup Ranch dressing
  • 1/2 cup blue cheese crumbled

Instructions

1

Pre-heat oven to 350 degrees

2

Butter a 13x9 baking dish

3

Add the chicken and 2 1/2 cups of the shredded Monterey Jack cheese to a large mixing bowl

4

Heat the butter, enchilada sauce and hot sauce and in a small saucepan over medium heat until the butter melts

5

Remove from the heat

6

Transfer 1 cup of the sauce to the bowl with the chicken

7

Toss to fully coat

8

Ladle 1/2 cup of the sauce into the bottom of the prepared baking dish

9

Spread a heaping 1/2 cup of the chicken mixture evenly onto a tortilla, then roll it up (If you’d like, trim the round ends of the tortilla that are unfilled and reserve for another use)

10

Cut the rolled tortilla into 6 pinwheels

11

Place each pinwheel cut-side down in the baking dish

12

Repeat with the remaining tortillas and chicken mixture

13

Pour the remaining sauce over the tortillas and sprinkle the remaining Monterey Jack cheese on top

14

Bake until the cheese is melted and bubbling, 15 to 20 minutes

15

Meanwhile, toss the lettuce with the ranch dressing in a large bowl

16

Sprinkle the blue cheese crumbles on top of the enchiladas

17

Serve immediately with the salad

Beef/ PartyFood

Smoked Kielbasa and Irish Cheddar Cheese Crescent Rolls

On the menu tonight – Smoked Kielbasa and Irish Cheddar Cheese Crescent Rolls!

These are a variation of pigs in a blanket. When I was shopping the other day, they totally got me with the samples. I sampled both the smoked kielbasa and Irish Cheddar. I had already planned on making something with crescent rolls, but once I tried these things, the menu changed.

This dish goes together really quickly. All you need to do is prep the ingredients, have the oven pre-heated, and the sheet pan ready. Roll out the crescent dough, spread a layer of mustard on it, add the kielbasa and cheese, then roll dough as you would if you were making plain crescent rolls. Bake per package instructions, but check them before you take them out. Because you are wrapping up some other ingredients, you may need an additional 5-10 minutes to allow that inner dough to finish cooking.

Serve right away. These rolls are good hot or cold and would make a great picnic dish. Also, think breakfast. You could fill these with other fillings like bacon and cheese. I bet a little scrambled eggs with some ham and cheese would be fantastic.

I hope you will make these rolls for your next party.

Smoked Kielbasa and Irish Cheddar Cheese Crescent Rolls

1 Star2 Stars3 Stars4 Stars5 Stars (No Ratings Yet)
Loading...
By Patrick Dulmage Serves: 6-8
Prep Time: 10 minutes Cooking Time: 25 minutes Total Time: 35 minutes

Smoked Kielbasa and Irish Cheddar Cheese Crescent Rolls

Ingredients

  • 1 pkg crescent rolls
  • 1 lb Smoked Kielbasa
  • 4 oz grainy or yellow mustard
  • 8 oz Irish Cheddar cheese
  • 2 cloves garlic, minced
  • 1/2 stick butter

Instructions

1

Pre-heat oven to 350 degrees

2

Melt the butter over low heat with the minced garlic

3

Un-roll the crescent rolls and break them apart to individual triangles

4

Cut the kielbasa to length, use the base of the dough triangle as a guide

5

Then quarter each piece length-wise (see if you can take off the kielbasa casing)

6

Cut your cheese into similar size blocks as the kielbasa

7

Brush each of the spread out crescent rolls with mustard (don't be shy with the mustard)

8

Take two pieces of kielbasa, two pieces of cheese, and roll them up in the crescent dough (starting with the base of the triangle)

9

Repeat with each piece of crescent dough, placing the rolls on the sheet pan (leave a couple of inches between each roll as the cheese will likely ooze out)

10

Brush each roll with the garlic butter

11

Bake until the rolls are golden brown and remove from the oven

12

If you have any leftover melted butter, you can brush them again with the rest of the garlic butter

13

When done, let them rest at least 5-10 minutes to let the cheese cool down a bit

14

Serve hot or cold with some mustard available for dipping (they are fantastic right out of the fridge and perfect for a picnic)

Notes

I've also made these leaving out the garlic butter and they are still fantastic. The crescent dough is already kind of buttery. Feel free to substitute the smoked kielbasa with other fillings.

Casserole/ PartyFood

Cuban Slider Casserole

On the menu tonight – Cubano Slider Casserole!

After seeing this made on The Kitchen, I knew that I was going to make it. Difficulty level – Easy.

For my version, I made my own pulled pork. However, you could take a shortcut and buy the prepared pulled pork to make it even easier. I used brioche slider buns. If you haven’t bought slider buns before, they come attached and you have to break them apart. For this dish, you don’t break them apart. Slice the entire sheet of buns like you are making one giant sandwich – which you kind of are.

Put the bottom half of the buns in the casserole dish, slather some yellow mustard, then a layer of pulled pork, then a layer of ham, a slice of Swiss cheese, and finally some sliced pickle. I used spicy pickles to add a little kick to the sliders. Slather the top half of the buns with some more yellow mustard and then place on top of the “sandwich”. I used a pastry brush to paint melted garlic butter on top before putting them in the oven.

Bake, covered, for about 20-25 minutes, uncover and bake an additional 5 minutes. Serve with the rest of your Superbowl Sunday spread. I hope you will try my version of Cubano Slider Casserole!

Cuban Sliders

Now that you know this technique, you can go wild with the variations of slider casseroles. You could make a breakfast slider casserole with scrambled eggs, bacon (or sausage), and cheese. What about a roasted vegetable slider casserole using roasted red bell pepper, egg plant, and onions? Let me know what version you make.

Cuban Slider Casserole

1 Star2 Stars3 Stars4 Stars5 Stars (No Ratings Yet)
Loading...
By Patrick Dulmage Serves: 6
Prep Time: 15 minutes Cooking Time: 1 hr 30 minutes Total Time: 1 hour 30 minutes

Cuban Slider Casserole

Ingredients

  • 12-16 oz pulled/shredded pork (homemade or store bought)
  • 12 oz thinly sliced ham
  • 12 count brioche slider buns, (potato buns are used a lot as well) cut in half
  • 1/4 cup Yellow mustard
  • 8 oz spicy pickles, sliced
  • 12 slices Swiss cheese
  • 1 tsp Oregano
  • 1 stick butter
  • 2 cloves garlic, minced

Instructions

1

Pre-heat oven to 350 degrees

2

Melt the butter over medium heat

3

Once the butter is melted, add the minced garlic and cut the heat

4

Put the bottom half of the slider buns in a baking dish

5

Evenly spread the yellow mustard on the buns

6

Then, spread the pulled pork

7

Add the ham

8

Sprinkle on the oregano

9

Put the pickles on next, followed by the Swiss cheese

10

Evenly spread mustard on the top buns and cover the cheese

11

Using a pastry brush, paint the tops of the buns with the melted garlic butter (feel free to gently pour it on)

12

Cover with tin foil and bake 25 minutes

13

Uncover and bake an additional 5 minutes