Browsing Category

Side Dishes

Side Dishes/ Vegetarian

Spinach Pie

On the menu tonight – Spinach Pie!

This recipe came from my wife’s grandmother. She would make this dish during Passover and Hannukah. It calls for mazto meal instead of bread crumbs along with an egg for the binder.

While there aren’t a lot of ingredients, it’s full of flavor from the spinach, onions, and seasoning. It’s so good that you could use this as a side dish during Thanksgiving (anytime really), or by itself as a light lunch.

I hope that you will give this dish a try. Let me know how your version turns out!

Spinach Pie

1 Star2 Stars3 Stars4 Stars5 Stars (1 votes, average: 5.00 out of 5)
Loading...

Spinach Pie

Ingredients

  • 2 bags chopped spinach, from frozen food section
  • 1 medium onion, diced
  • 1 cup matzo meal
  • 1-2 eggs, beaten
  • 1 Tbsp Kosher salt
  • 2 tsp onion powder
  • 2-3 tsp freshly ground pepper
  • 1-2 Tbsp olive oil

Instructions

1

Thaw the spinach and squeeze out the excess water using a clean kitchen towel

2

Pull apart the now compressed spinach in to a large mixing bowl

3

In a 12" skillet, pre-heat over medium heat

4

Add the olive oil and the diced onion

5

Saute the onions until translucent

6

Season with a little salt and pepper

7

Once cooked, cut the heat and set aside to cool

8

Add the cooked onions to bowl with the spinach

9

Season with salt, pepper, and onion powder

10

Add the matzo meal, beaten egg, and stir to combine

11

Bring the skillet back to med or med-high heat along with some olive oil

12

Spread out the spinach mixture in the pan and press it down with a spatula

13

Have a dinner plate or something similar near by in order to help you flip the mixture over

14

Cook the mixture for 5-8 minutes. At the 5 minute mark, gently lift up a section to see if it has browned sufficiently. You want it to be lightly browned

15

Once you are satisfied that side has cooked enough, carefully put your dinner plate on top of the spinach and turn it over

16

Take another look at the pie, it should be lightly browned

17

Add a little more oil to the pan and then gently slide the pie back in to the pan to cook the other side

18

Gently press down on the mixture with the spatula

19

After another 5-8 minutes, take a peek and see if it has cooked to your liking

20

Once done use your plate again to take the pie out of the pan

21

Season immediately with a little salt and freshly ground pepper

Side Dishes

Classic Southern Collard Greens

On the menu tonight – Classic Southern Collard Greens!

After going to countless BBQ places and having just as many versions of collard greens, I decided that I would try my hand at this Southern classic. The key to this dish, in my opinion, is time and patience. Take the time to carefully wash the greens. I cut the stems from the center of each leaf. The leaves can be kind of firm, so they require a longer cook to soften them up. You’ll simmer the collards low and slow for a couple of hours.

I cooked my greens in chicken broth to bring some more flavor to the pot likker, the savory liquid that will be created from that long slow cook. Oh, and don’t skimp on doling out the likker in each serving.

Eat the greens as a side to your BBQ or just have a big bowl with a slice of corn bread. Let me know how your batch of Collard Greens turns out!

Classic Southern Collard Greens

1 Star2 Stars3 Stars4 Stars5 Stars (No Ratings Yet)
Loading...

Classic Southern Collard Greens

Ingredients

  • 1 tsp olive oil
  • 1 cup chopped Vidalia onion
  • 3-5 garlic cloves, roughly chopped
  • 3 lbs fresh collard greens (about 3-4 bundles) Weight includes the stems
  • 3/4 - 1 lb ham hock (if you don't have a ham hock, you can simply use 3/4 lb chunks of ham or bacon)
  • 32 oz chicken broth (I used one that you could drink on its own)
  • 1 tablespoon Old Bay Seasoning or Creole Seasoning

Instructions

1

In a large pot, put in the ham hock along with enough water to cover. Bring the water to a boil. Cook for about 45 min to an hour until it becomes tender.

2

While the ham hock cooks, wash your greens to remove any dirt and grit.

3

Remove the stems from the greens

4

In a large Dutch oven, add the olive oil along with the diced onions and garlic. If not using a ham hock, add the chunks of ham at this time.

5

Saute the onion and garlic until translucent

6

Add the chicken broth

7

Begin adding the chopped collards. If they don't all fit at first, let them wilt down and add the rest

8

Add the Old Bay seasoning and the ham hock, bring to a boil.

9

Reduce the heat to low and put the lid on the pot

10

Simmer the greens for about two hours or until the greens are soft. Periodically stir throughout the cooking process

11

When ready, remove the ham hock (or ham chunks) and shred the meat into smaller pieces. Adjust seasoning as needed.

12

Serve either as a side dish or with a nice slice of cornbread

Notes

Collards are more bitter than other greens. If you find the dish too bitter after cooking, you can add a little bit of sugar (about a teaspoon or two) to tone down the bitterness.

Sauces/ Side Dishes

Blueberry Compote

Biscuits and Blueberry Compote

On the menu this morning – Blueberry Compote!

I made this to go with my Buttermilk Biscuits and WOW was it delicious. It is surprisingly easy to make, so if you whip up a batch of this in very little time.

The recipe was inspired from a trip to Buttermilk Kitchen, a really great restaurant in Buckhead. After eating there with visiting family, we bought their cookbook. This is the compote they serve at the restaurant.

There aren’t a lot of ingredients, so fresh berries are going to give you the best results. That said, use what you have available.

I hope you will try this recipe and share the goodness with your family and friends!

Blueberry Compote

1 Star2 Stars3 Stars4 Stars5 Stars (No Ratings Yet)
Loading...

Blueberry Compote

Ingredients

  • 4 cups blueberries (fresh or frozen)
  • 1/2 cup sugar
  • 1 1/2 tsp lemon juice
  • 1 Tbsp corn starch

Instructions

1

Put the blueberries, sugar, and lemon juice in a small pot over medium heat

2

Stir to combine

3

After about 5 minutes, the mixture will start to thicken. Stir occasionally, so it doesn't burn

4

In a bowl, add the cornstarch with a tablespoon or two of water and mix to combine - no lumps

5

Pour the cornstarch slurry in to the pot with the blueberries

6

Stir to combine

7

Bring mixture to a boil and cook for another 3-5 minutes while continually stirring

8

Remove from the heat and serve while hot or let it cool before serving

9

It will store in an airtight container for about two weeks (if it lasts that long!)

Notes

Blackberries would be a delicious substitute for blueberries.

Breakfast/ Side Dishes

Buttermilk Drop Biscuits with Blueberry Compote

Biscuits and Blueberry Compote

On the menu today – Buttermilk Drop Biscuits with Blueberry Compote!

There’s nothing better in the morning than a warm, buttery, fluffy biscuit! That is what you’ll get making this recipe. They are SO darn delicious!

Serve them with some jam, or make an egg biscuit that is worlds better than a fast food place. You could put some red pepper jelly and a piece of buttermilk fried chicken on one of these biscuits and you will be living large!

They don’t take a lot of time to make, so get in the kitchen and try these biscuits!

Buttermilk Drop Biscuits

1 Star2 Stars3 Stars4 Stars5 Stars (1 votes, average: 5.00 out of 5)
Loading...

Buttermilk Drop Biscuits

Ingredients

  • 1/2 lb, plus 1 stick unsalted European-style butter (Frozen)
  • 5 cups all purpose flour
  • 4 Tbsp granulated sugar
  • 4 Tbsp baking powder
  • 1 Tbsp Kosher salt
  • 2 3/4 cups Buttermilk
  • Melted butter, to brush on top

Instructions

1

Pre-heat oven to 350 degrees

2

Prepare a sheet pan, lightly coated with flour

3

Grate the frozen butter on the flour coated baking sheet

4

Toss the grated butter lightly to coat with the flour on the baking sheet

5

In a large mixing bowl, add the flour, sugar, baking powder, and salt - whisk to combine

6

Add the buttermilk and mix with your hands until the dough comes together (don't over mix)

7

Get a 4 oz scoop or 1/2 cup measuring cup and portion the dough onto a buttered baking sheet (leave at least two to three inches between each biscuit)

8

Bake for 10 minutes

9

Rotate the baking sheet and bake for another 10-15 minutes. The biscuits should be golden brown and fully cooked through.

10

Once out of the oven, brush with melted butter

Chicken/ PartyFood/ Side Dishes

Chicken Gyro Dip with Pita Chips

On the menu tonight – Chicken Gyro Dip with Pita Chips!

I love gyros, but I didn’t feel like driving to get them tonight. This is the perfect weeknight meal! It goes together really quickly, it can be a dip for an appetizer or a light meal, and it’s DELICIOUS! It has the gyro flavors, but in dip form.

The only thing you have to cook is the chicken. There is a little chopping required for the veggies, but nothing complicated. The meal goes together even quicker if you have one person doing the chopping and another doing the cooking. When I made this, Mrs helped me with the chopping. With both of us working on it, we had this meal finished in about 15 to 20 minutes.

The next time you need an appetizer for a party or you just want a quick and light meal, try this Gyro Dip with Pita Chips!

Chicken Gyro Dip with Pita Chips

1 Star2 Stars3 Stars4 Stars5 Stars (No Ratings Yet)
Loading...

Chicken Gyro Dip with Pita Chips

Ingredients

  • 1 Tbsp olive oil
  • 1/2 Vidalia onion, diced
  • 2-3 cloves garlic, minced or grated with a rasp
  • 1 tsp fresh chopped oregano (dry is fine too)
  • 1 lb ground chicken
  • 1 tsp Kosher salt
  • Freshly ground pepper to taste (I used about a teaspoon)
  • 8 oz hummus, (plain, roasted garlic, or red pepper)
  • 4 oz feta, crumbled
  • 2-3 plum tomatoes, seeded and diced
  • 1/2 English cucumber, seeded and diced
  • 8 oz tzatziki dip (store bought or homemade)
  • 2 teaspoons fresh chopped dill (dry is ok in a pinch, but you'll be happier with fresh)
  • Pita chips, for serving

Instructions

1

Pre-heat a large pan over medium-high heat

2

Add the olive oil

3

Add the onions and cook for about 5-7 min, until they are translucent or even a little browned

4

Add the chicken and garlic

5

Season with oregano, salt and plenty of black pepper

6

As the chicken cooks, start layering the other ingredients in the baking dish (9x9)

7

First, put a layer of hummus

8

Once the chicken is browned and broken down into small bits, spread an even layer over the hummus

9

Then, layer the tomatoes and cucumbers

10

Then, layer the tzatziki dip and sprinkle the dill on top

11

Serve with the pita chips or pita bread

Side Dishes/ Vegan/ Vegetarian

Balsamic Glazed Roasted Brussel Sprouts with Onions and Shallots

On the menu tonight, Balsamic Glazed Roasted Brussel Sprouts with Onions and Shallots!

If you think you don’t like brussel sprouts, try this recipe. While simple, the recipe is REALLY flavorful and So easy to make. The only ingredients you need are brussel sprouts, Vidalia onion, shallot, olive oil, balsamic vinegar, Kosher salt and pepper.

When you aren’t sure what side dish to serve, I hope that you’ll give this recipe a try.

Balsamic Glazed Roasted Brussel Sprouts with Onions and Shallots

1 Star2 Stars3 Stars4 Stars5 Stars (No Ratings Yet)
Loading...

Balsamic Glazed Roasted Brussel Sprouts with Onions and Shallots

Ingredients

  • 1 lb brussel sprouts, quartered
  • 1/2 - 1 Vidalia onion, sliced thinly
  • 1 shallot, thinly sliced
  • 1/4 cup olive oil
  • 1/4 cup balsamic vinegar
  • Kosher salt
  • Freshly ground black pepper

Instructions

1

Pre-heat oven to 350 degrees

2

Put the quartered brussel sprouts on a large, rimmed sheet pan

3

Add the sliced Vidalia onion, and sliced shallot to the sheet pan

4

Drizzle the veggies with olive oil and toss to coat everything with olive oil

5

Season with Kosher salt and freshly ground pepper

6

Put in the oven for about 25-30 minutes

7

If the veggies looked cooked to your liking, take sheet pan out of the oven and drizzle with the balsamic vinegar

8

Serve and enjoy!

PartyFood/ Side Dishes

Old Fashioned Potato Salad

On the menu tonight – Old Fashioned Potato Salad!

Potato salad is must for any BBQ, grill session, pot luck, and a perfect side dish for so many meals. This version comes together so easily and is so delicious, you won’t need to get the stuff pre-made at the grocery store.

My version includes apple cider vinegar, mayonnaise, dry mustard powder, red onion, parsley,and spicy pickles. Spicy pickles? YES! You’ll know the pickles are there, but they are in the background.

The next time you need a side dish for your BBQ, consider trying my Old Fashioned Potato Salad!

Old Fashioned Potato Salad

1 Star2 Stars3 Stars4 Stars5 Stars (No Ratings Yet)
Loading...

Old Fashioned Potato Salad

Ingredients

  • 2-3 lbs potatoes (your choice of potato but you can't go wrong with the small red potatoes or Yukon gold)
  • 3/4 cup Mayonnaise
  • 1/4 cup Parsley, chopped
  • 1/2 cup Red onion, finely chopped
  • 1/2 cup Celery finely chopped (I like to use the center of the celery stalk and include the greens)
  • 1 - 2 Spicy pickles (like Zingers), finely chopped
  • 1 tsp dry mustard powder
  • 1/2 tsp garlic powder
  • Salt and Pepper to taste

Instructions

1

Dice the potatoes to desired size (approx 1" dice) or slice

2

Put the potatoes in a large pot of water as you cut them to avoid them getting brown

3

Bring the potatoes to a boil, generously season the water with Kosher or Sea salt, then lower the heat and cook until fork tender

4

Drain the potatoes and let cool down before adding the rest of the ingredients

5

Once cooled, add the potatoes to a large mixing bowl along with rest of the ingredients

6

Check seasoning, add salt and pepper to taste

PartyFood/ Side Dishes/ Uncategorized/ Vegetarian

Boiled Peanuts

On the snacking menu for tonight – Boiled Peanuts!

Boiled peanuts are definitely one of those things that get really mixed results when you mention them. “What are boiled peanuts?” “That sounds gross…” “Yum! If you are from the South, you’ve likely had had boiled peanuts. If you are from the South and haven’t had boiled peanuts, please mail your Southern card to… I’m just kidding.

Seriously though, if you are from the South, even if you haven’t tried boiled peanuts, you HAVE seen the roadside stand with the guy sitting next to a half barrel or converted beer keg sitting over a low burning fire filled with boiled peanuts. You buy some, and the guy ladles out your peanuts into a styrofoam cup. I mentioned the ladle. The ladle used to get the peanuts is something to watch out for as your purchase is being prepared. It’s almost always a jerry-rigged device with holes drilled in so the water from the barrel or keg can drain as they get your boiled peanuts.

Oh, definitely strike up a conversation with the person at the stand. For me, half the fun of the drive to wherever it is I’m going is stopping to get some boiled peanuts and chatting with the person at the stand. You may also buy some fresh fruit, produce, and / or BBQ as well before you continue on your way.

If you’ve never tried boiled peanuts, I hope the next time you plan to have people over for a game or the holidays you will make a batch of boiled peanuts for your guests to snack on.

Boiled Peanuts

1 Star2 Stars3 Stars4 Stars5 Stars (No Ratings Yet)
Loading...
By Patrick Dulmage Serves: unknown
Prep Time: 5 minutes Cooking Time: 8-9 hrs Total Time: 8-9 hrs

Boiled Peanuts

Ingredients

  • bag of green peanuts
  • Kosher Salt
  • Filtered / Bottled Water (tap water has chlorine and other chemicals that don't taste so great)

Instructions

1

Spread out the peanuts from the bag and remove any rotten or moldy peanuts

2

Fill a crockpot about 3/4 full with peanuts

3

Pour in enough water in to the crockpot that the peanuts begin to float and then pour some more. The water will evaporate, so I fill it as high as I can but still able to close the lid

4

Pour in 4 palm-fulls of Kosher salt and stir it in. If you have never made them before, start with 3 palm-fulls if you are nervous they will be too salty

5

Set the crockpot on high for 4 hrs.

6

Once the 4 hrs are up, lower the temperature to low and let it go another 4 - 5 hrs. At the 4 hour mark, taste a few to see if they are the consistency you want. I like mine with a little bite to them... too mushy and you can't get them out of the shell.

7

Once finished, cut the heat, drain, and transfer to another container.

8

Serve hot

Notes

They are great hot, warm, or even cold. They store well in the fridge a few days, if they last that long. You can add flavorings too. You can add some sliced jalapeno, or hatch chilies, or Old Bay Seasoning. When I've done Old Bay, I'll add two spoonfuls (like a cereal spoon) of the Old Bay at the beginning with the salt

Side Dishes/ Vegetarian

Scalloped Potatoes au Gratin with Smoked Gouda and Cheddar Cheese

On the menu tonight – Scalloped Potatoes au Gratin!

I’ve seen so many pictures of Scalloped Potato dishes that I decided to make it. This isn’t a difficult dish to make, but it looks awesome – especially if you take the time to arrange the potato slices neatly. I didn’t have the time to arrange the slices in any particular shape this time.

The trick to this dish is getting the slices the same thickness. Take the help from your food processor or box grater to get perfectly uniform slices – about 1/8″. From there, all you have to do is add the cream and other ingredients to a large pan and cook the potatoes about 15 -18 minutes. Then, transfer the ingredients to your baking dish and bake. That’s it!

So, the next time you are serving potatoes, consider making them a little fancy and try my Scalloped Potatoes!

Scalloped Potatoes au Gratin with Smoked Gouda and Cheddar Cheese

1 Star2 Stars3 Stars4 Stars5 Stars (3 votes, average: 4.33 out of 5)
Loading...
side dishes
By Patrick Dulmage Serves: 12
Prep Time: 15 minutes Cooking Time: 30 minutes Total Time: 45 minutes

Scalloped Potatoes au Gratin with Smoked Gouda and Cheddar Cheese

Ingredients

  • 2 1/2 - 3 lbs Russet or Yukon Gold Potatoes, sliced about 1/8" thick
  • 1 onion, finely chopped
  • 2 cups heavy cream
  • 1 Tbsp chicken bouillon powder
  • 1 Tbsp butter
  • 2 garlic cloves, minced
  • 1/2 tsp nutmeg
  • 1 tsp thyme (2 tsp if using fresh)
  • 1/2 - 3/4 cup Smoked Gouda cheese
  • 1/2 - 3/4 cup Cheddar cheese

Instructions

1

Pre-heat oven to 375 degrees

2

In a large pan, over medium high heat, add the butter and onions. Cook about 5 minutes

3

Add the garlic, and cook another minute or two, lower the temp to medium, then add the heavy cream (don't let the cream burn, keep stirring and lower the temp more if needed)

4

Add the thyme, nutmeg, chicken bouillon powder, and potatoes. Cook about 15 minutes until the potato slices are fork tender

5

Transfer to a 9x9 baking dish and cover with the grated cheese

6

Bake about 15 minutes or until the cheese is slightly golden brown on top and the cheese is bubbly

7

Pull from oven and let rest at least 5 - 10 minutes before serving

Seafood/ Side Dishes/ Vegetarian

Shrimp Fried Rice

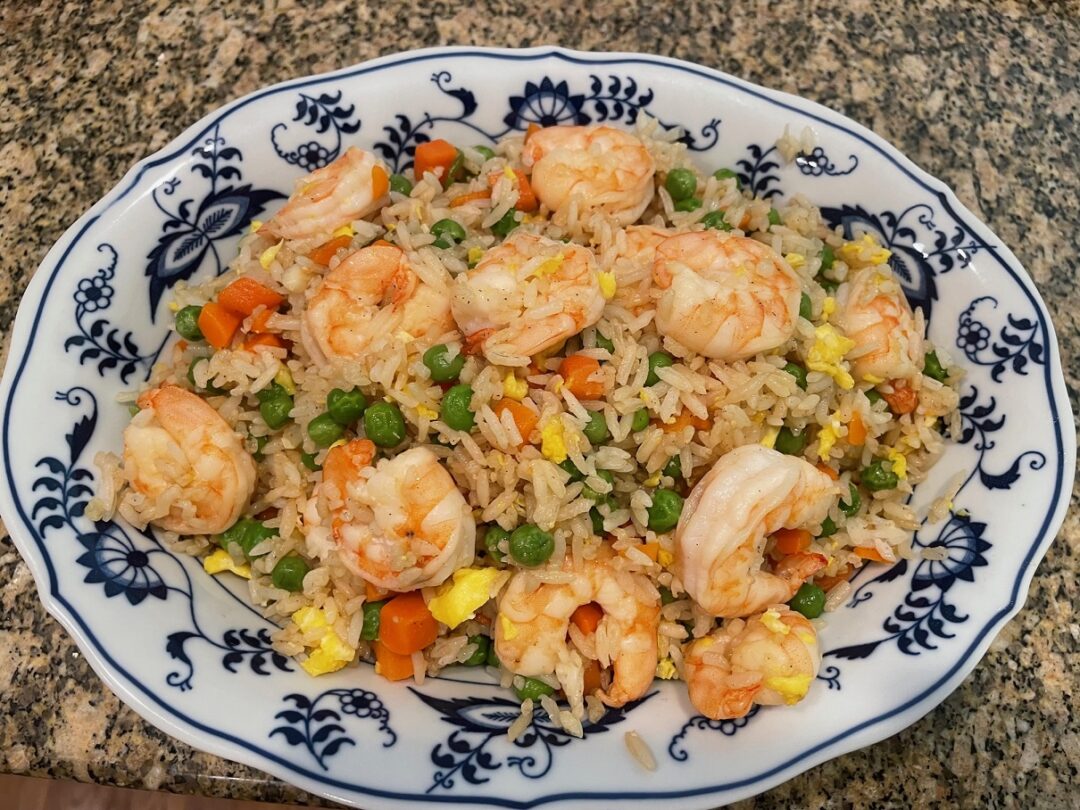
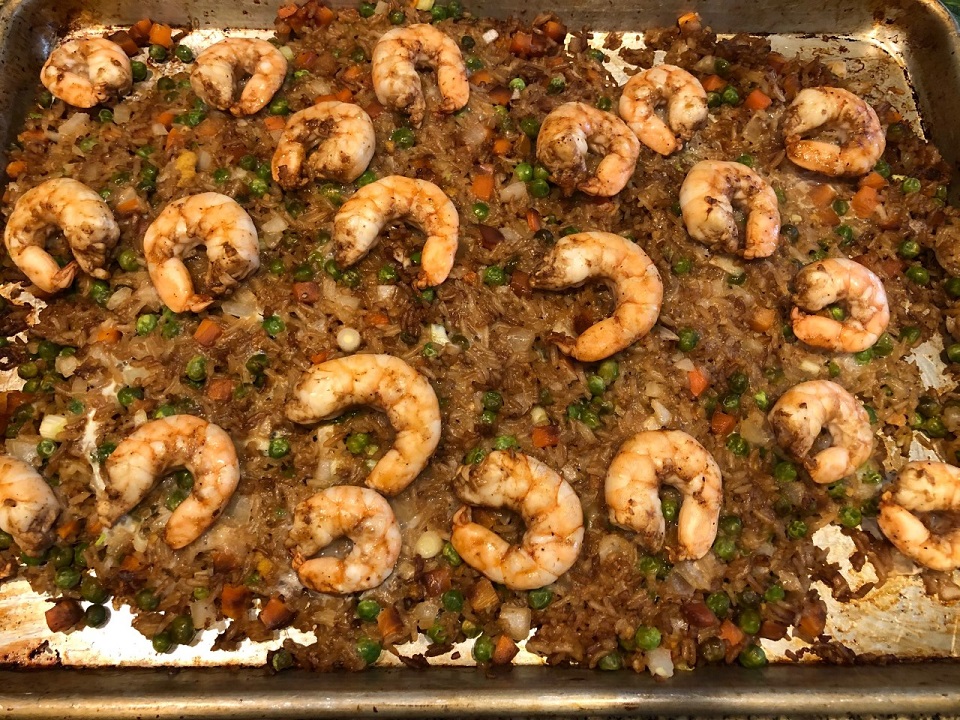
On the menu tonight – Shrimp Fried Rice!

I love fried rice and this version is SO easy to make. While I know how to make rice, I like to take a shortcut when I make fried rice. Whenever we order Chinese food, we never eat all the rice. You can only have plain rice as a side with so many things. SO, what to do? Fried Rice!

Fried Rice… you can go vegetarian – garlic, peas, carrots, and green onion. OR Pescatarian – same as vegetarian and add shrimp. OR you can go Carnivore – same as vegetarian and add your choice of meat. My recommendation would be Spam. Yes – Spam. Spam and pineapple. Today, I went with shrimp for the protein.

When I say this dish comes together quickly, we’re talking about 15 minutes. I mentioned the Chinese food rice, the second shortcut is frozen peas and carrots. Frozen veggies are just as fresh as fresh – they have to be. The veggies are frozen right away after being picked and processed wherever they are grown. Just don’t let them sit in your freezer for 6 months and expect them to taste fresh. They are PERFECT for fried rice. The carrots are already diced way better than you or I are going to dice them and there’s no prep for the peas. So, for prep on this dish all I had to do was smash and finely chop the garlic, measure out the soy sauce, fish sauce, and sesame seed oil.

For the cook, just heat up a large skillet or even a roasting pan, sans the rack, and heat up the oil. Cook the scrambled eggs, remove and let cool. Then add in the shrimp and garlic, cook about 3 minutes. Don’t forget to flip the shrimp so the other side gets to cook. Then, add the peas and carrots, cook an additional 3-5 minutes. Add the rice, soy sauce, fish sauce, and sesame seed oil. Stir to combine and continue stirring to let the rice get a little crispy.

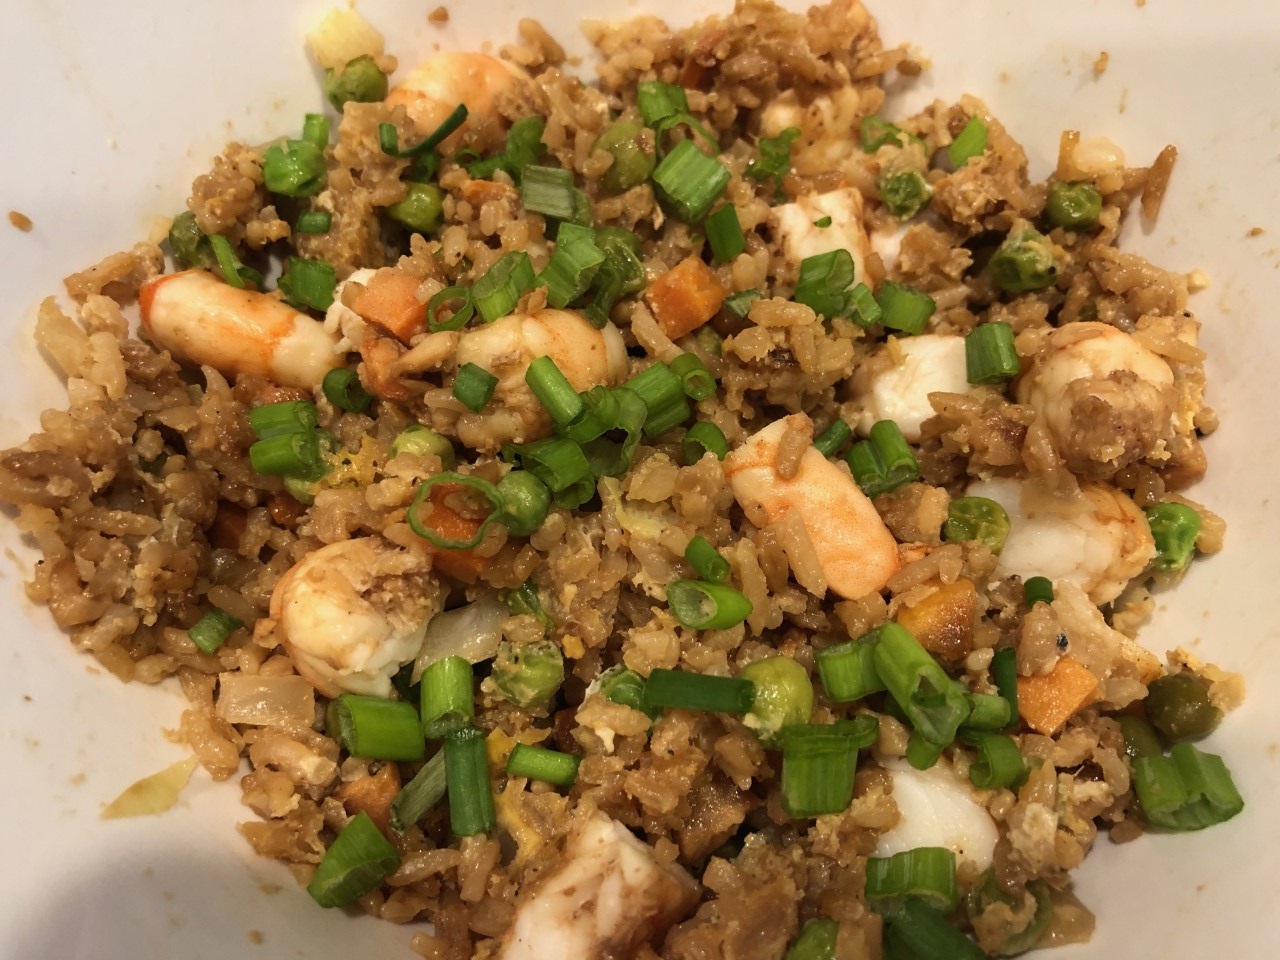
Serve immediately with a little chopped green onion on top. I hope the next time you are in the mood for Fried Rice, I hope you’ll try my Shrimp Fried Rice.

Shrimp Fried Rice

1 Star2 Stars3 Stars4 Stars5 Stars (No Ratings Yet)
Loading...
By Patrick Serves: 8-10
Prep Time: 10 minutes Cooking Time: 15 minutes Total Time: 25 minutes

Shrimp Fried Rice

Ingredients

  • 1/4 - 1/2 lb shrimp - deveined
  • 2- 3 cups cooked rice
  • 12 oz pkg frozen peas and carrots
  • 2-3 cloves garlic, minced or smashed and finely chopped
  • 2 eggs, scrambled
  • 2 Tbsp Soy Sauce
  • 1 Tbsp Fish Sauce
  • 1/4 tsp Sesame Seed Oil
  • 1/4 - 1/2 tsp white pepper
  • 1 Tbsp vegetable oil

Instructions

1

Pre-heat large cast iron skillet or roasting pan over medium-high heat (you want some room to groove on this one)

2

Add about 1/2 tsp oil to the pan

3

Add the scrambled eggs and cook to finished - but barely finished and remove from pan. The eggs will get cooked more with the rice later

4

Add the shrimp and garlic and cook about a minute and a half, then flip the shrimp to cook another minute and a half on the other side

5

Add the peas & carrots mix, the rice, fish sauce, soy sauce, and sesame oil, cook another 3-5 minutes

6

Add the white pepper and stir to combine

7

Continue stirring the mixture to let some of the rice get crispy bits

8

It should be ready now... serve immediately and garnish with the chopped green onion

Notes

This same recipe could be tweaked so many ways. As I mentioned the Spam Fried Rice. For that one, you'll want to add some pineapple and bell pepper.